
Areas of use & target groups#
PROREFERIT is the digital platform for self-employed professionals and companies that regularly recommend customers to one another.
PROREFERIT connects local partners in a structured network and ensures that every referral is recorded transparently, evaluated and fairly remunerated.
PROREFERIT also offers a multilingual email system for automating and optimising customer communication, as well as a module for planning and booking online events.
System requirements#
PROREFERIT is a cloud-based application. It runs in current browsers such as Google Chrome, Microsoft Edge, Apple Safari, Mozilla Firefox …
The application is opened via the link
https://partner.proreferit.com/index.php
To be able to use all functions, it may be necessary to allow
-
the use of JAVASCRIPT and
-
copying to the clipboard
for this page in the browser.
The settings for this depend on the browser you use.
Google Chrome: Click the icon to the left of the URL, go to the site settings and set Clipboard to Allow.
Microsoft Edge: Click the padlock icon in the address bar, choose the permissions for this site and allow the clipboard.
Registration#
If you are not yet registered, open the link
https://partner.proreferit.com/index.php
and select ‘Registration’.
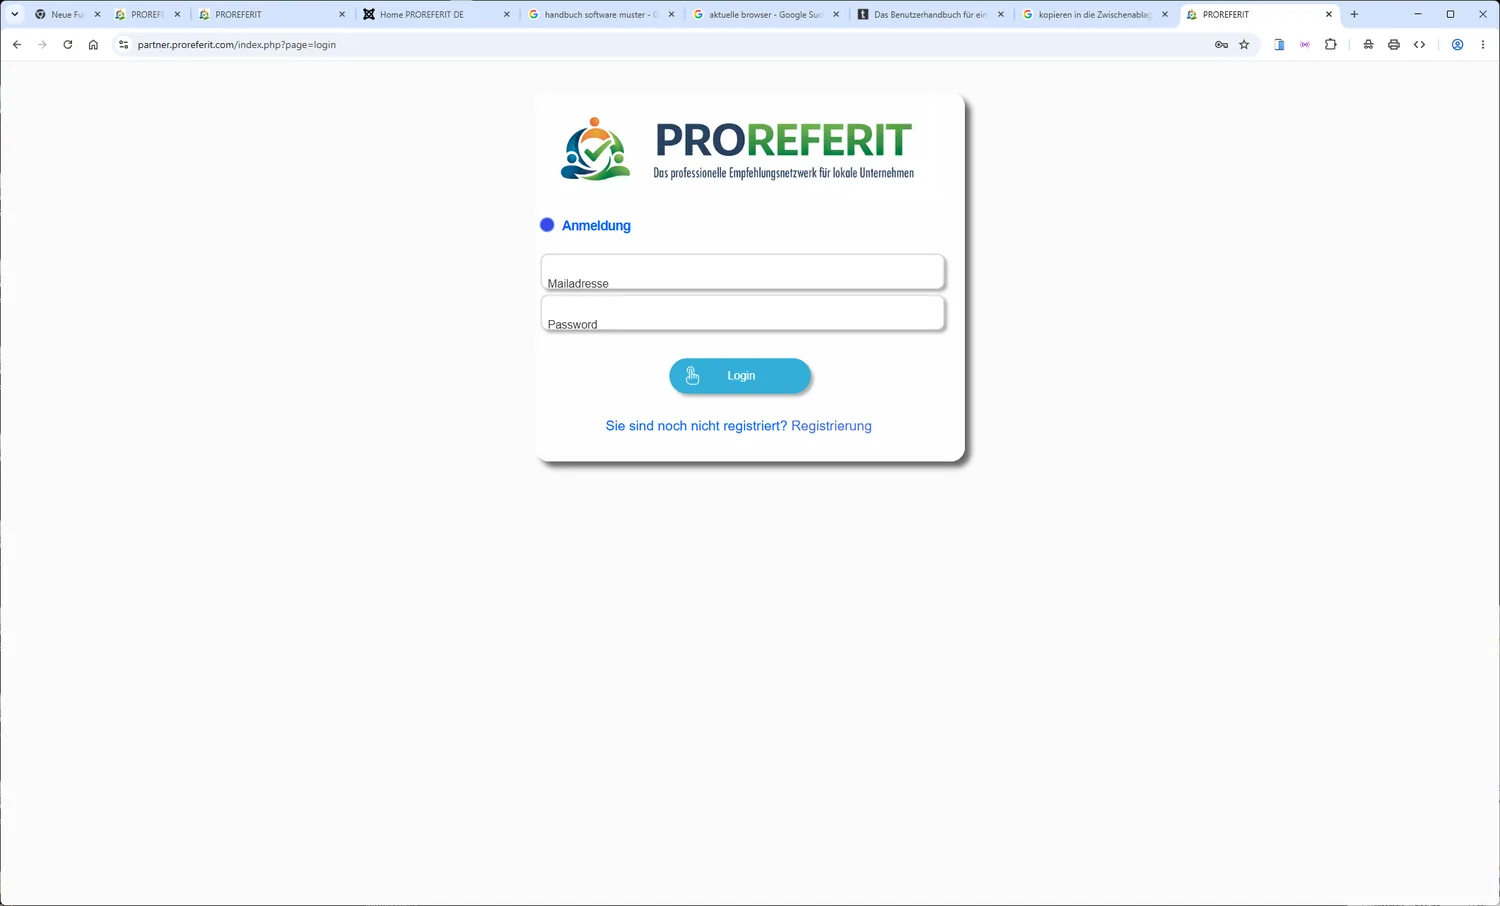
Then fill in the following form with your details.
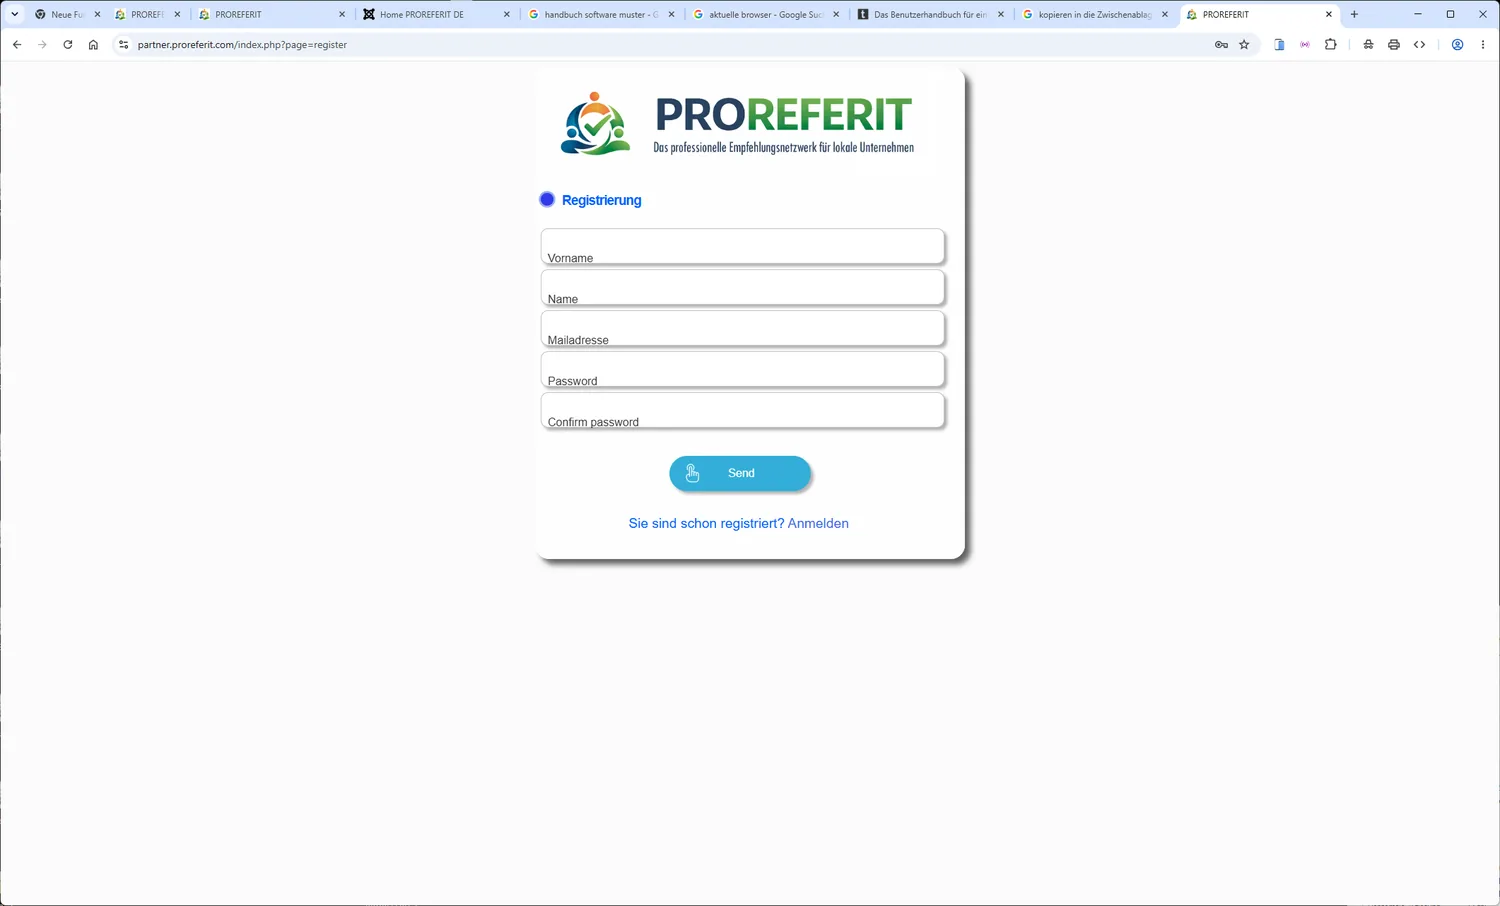
It is important to enter a valid email address, because a confirmation of your registration will be sent to it.
The password you choose should be at least 8 characters long (upper and lower case) and contain at least one number and one special character.
Repeat the password to prevent typing errors.
After you click the Send button, a confirmation email will
be sent to your mailbox.
When you have received this email, confirm your registration by clicking the confirmation link it contains.
Login process and initial setup#
Once the registration process is complete, you can log in to use the program. Unless you choose otherwise at a later stage, the program starts in the free Basic version.
In the free Basic version, all program functions are available. However, there are limits on the number of different records and on storage size.
Detailed information about the available licence models can be found under
ADMIN >  .
When you first use the program, you are taken directly to the page
PROREFER >  .
To use the program, you must accept the General Terms and Conditions (T&Cs) and the privacy notices. To do so, tick the box for each required consent.
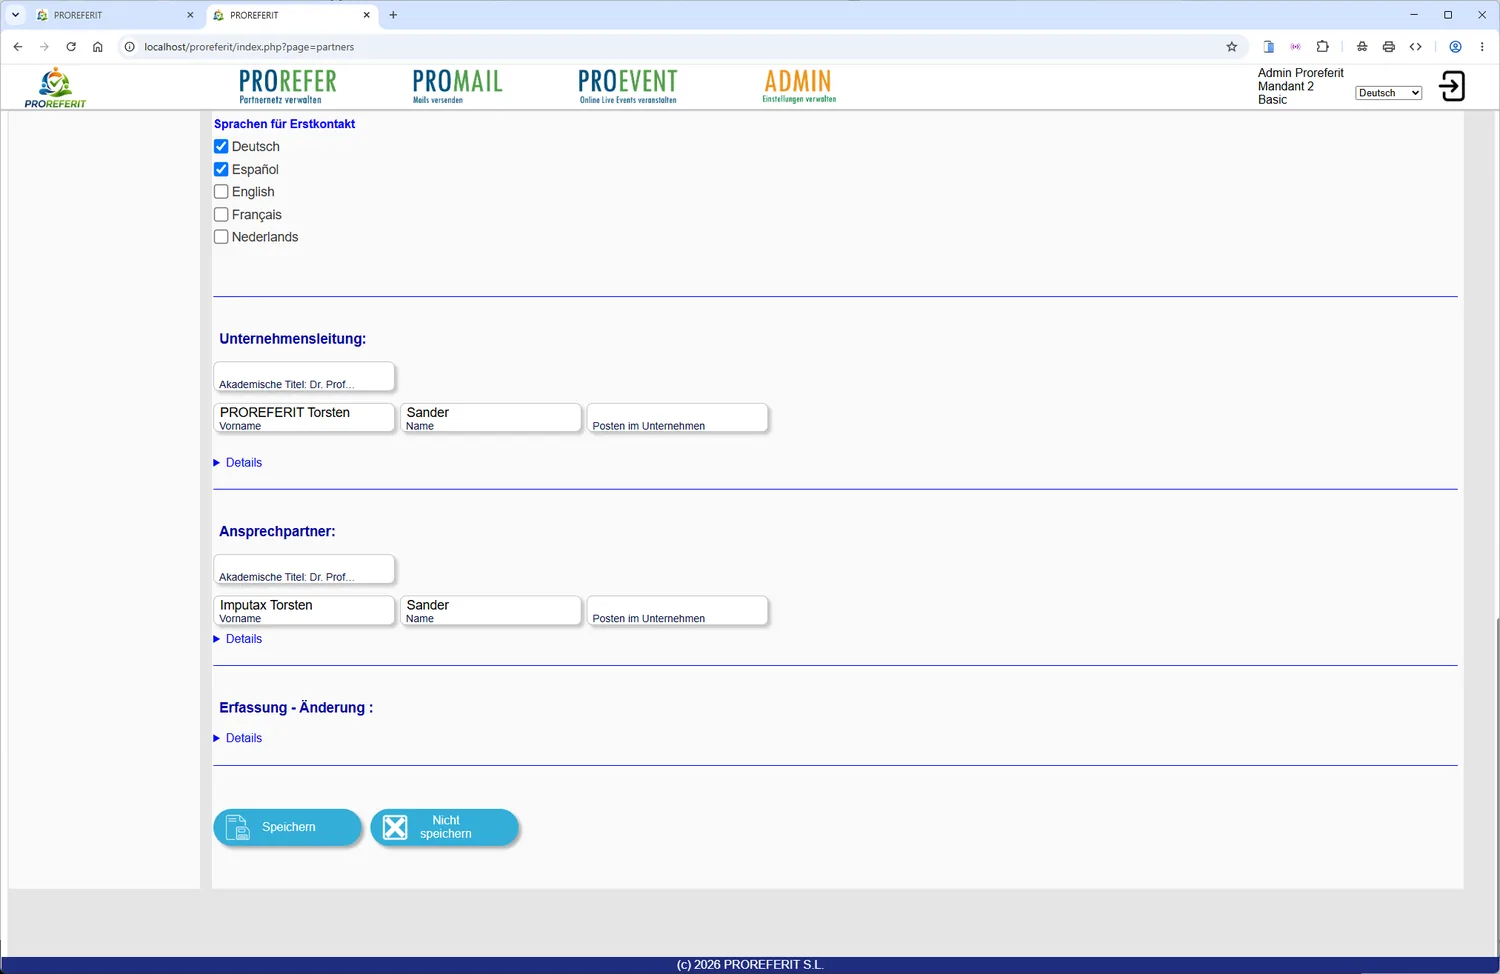
For clarity, sections marked ‘Details’ can be expanded and collapsed.
Fill in the required information and save it using the button  at the end of the page.
If (accidental) changes should not be saved, you can reset the content to the last saved state with the
‘Don’t save’ button  .
If you want to send your own emails via PROMAIL, you must also enter the communication details of
the mail server you use under the menu item ADMIN >
 .
After completing this preparation, you can start using the application.
Core functions & operation
Core functions & operation#
Data security#
For reasons of data security, the program’s connection to the server is ended automatically if there has been no user activity for more than one hour. You will then need to log in again.
Main menus and user interface#
The program is operated via the program areas
-
PROREFER
-
PROMAIL
-
PROEVENT
-
ADMIN
On the right-hand side of the header, the name of the logged-in user, the ID of the tenant the user belongs to and the current licence model are displayed.
Next to it, each user can individually choose the language of the user interface from a list box.
You log out via the item at the far right 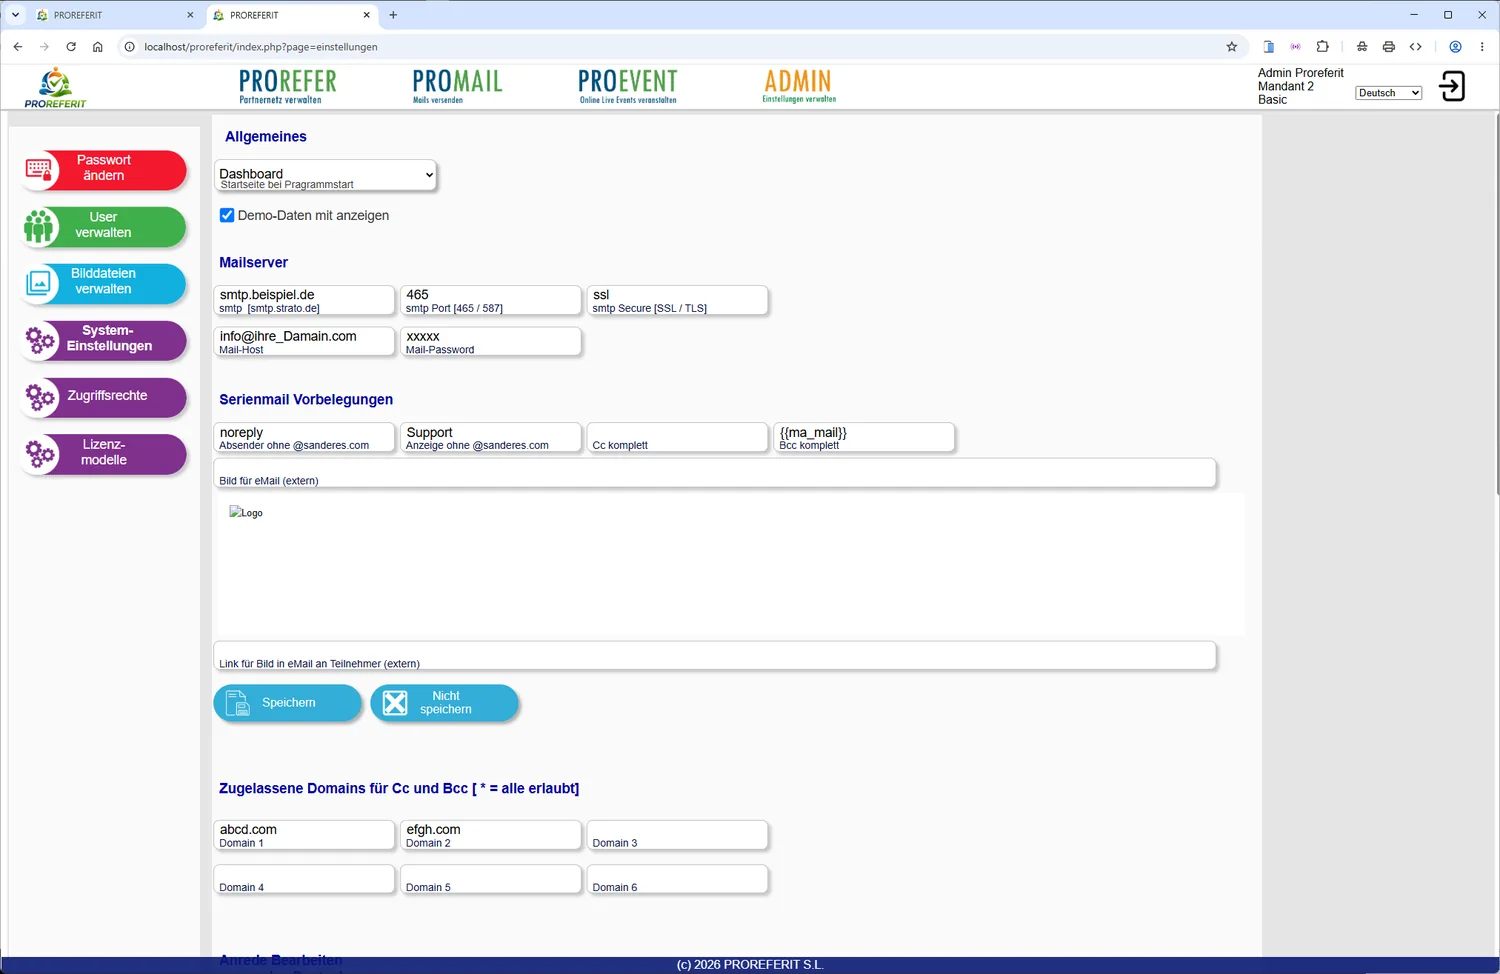 (Logout).
Depending on the selection (PROREFER, PROMAIL, PROEVENT, ADMIN), the corresponding detail menu is shown on the left side of the screen. The following description explains all menu items. However, users set up by the administrator (ADMIN > Manage users) may not see all items of the detail menu, depending on the permissions assigned to them. For more information on setting up users and assigning access rights, see the section ‘ADMIN’ later in this manual.
PROREFER#
Purpose#
The PROREFER module handles the entire management of business partnerships, incoming customer enquiries and their progress through to commission payment for the referring partners. It defines which of your own commissions are offered for which referrals and when the conditions apply or applied.
Recommended steps#
If you want to take part in the partner programme, first complete the data under PROREFER > in full and upload your company logo in a 1:1 or 6:5
format. This image will later also be displayed on partner pages.
Please also click the ‘Details’ items and fill in the information they contain.
At the end of the entry –
In the second step, enter your own commission offers under PROREFER >  . Repeat this step for each individual offer and finish
each one with
To connect with a partner, either they send you an invitation or you send an invitation to a potential partner.
The potential partner must first be saved as a customer under PROMAIL > Customers. You can then send a partner
request there using the button  .
The preparations for taking part in the partner programme are now complete.
Detailed description#
Processing the inbox#
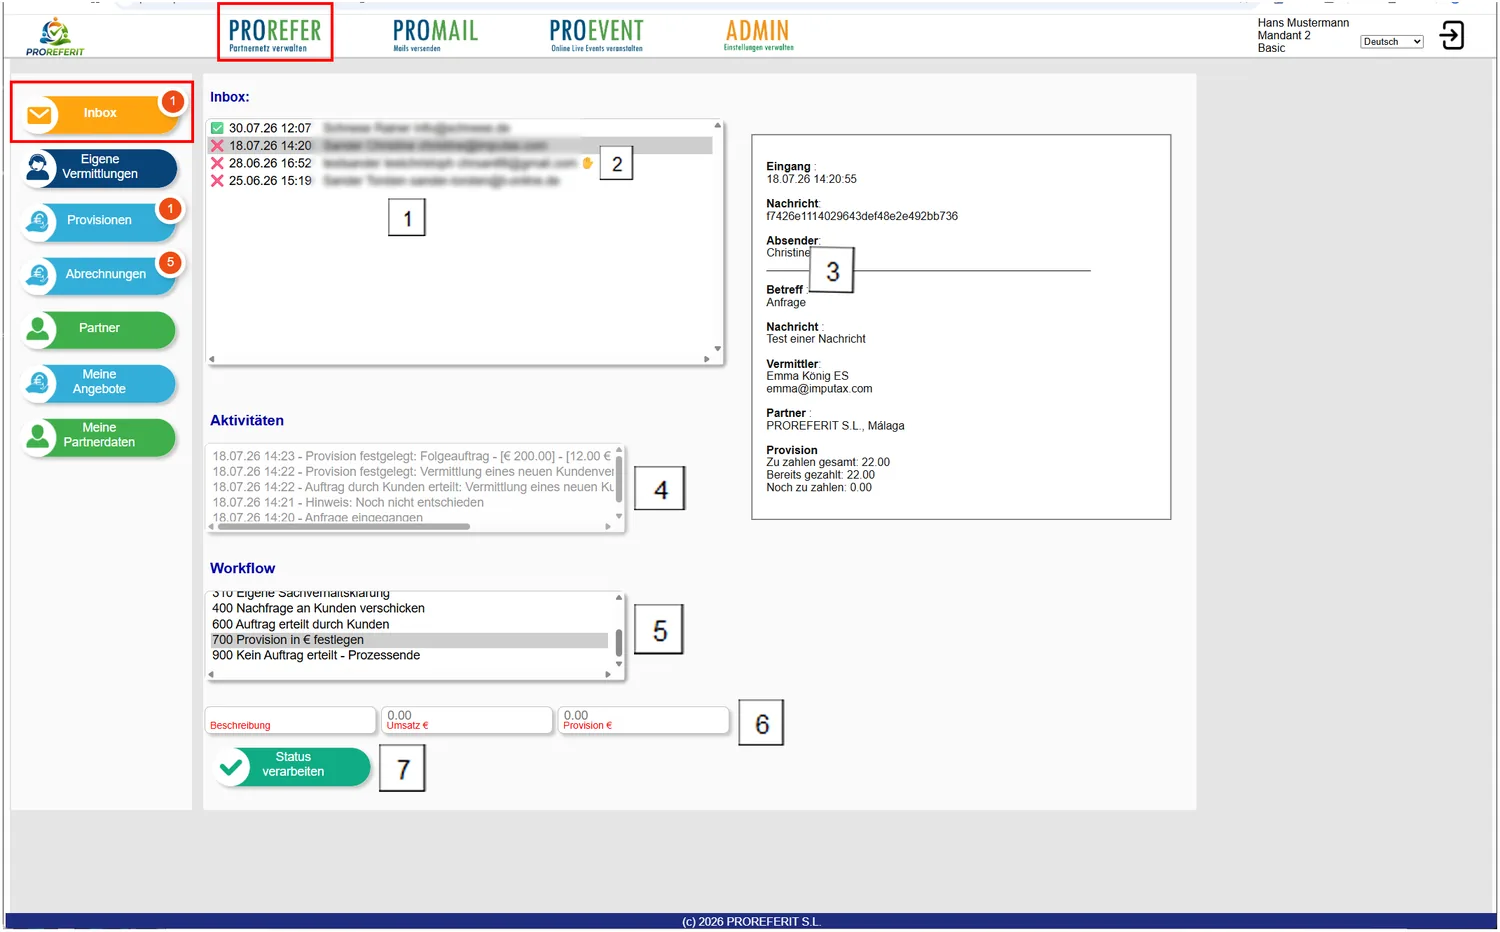
The inbox is used to review incoming customer enquiries and to initiate the further steps through to commission settlement. If red circles containing a number appear next to the menu items, this means that activities are still outstanding.
The inbox always displays a corresponding notice if no activity has yet taken place for an incoming enquiry. The unprocessed enquiry is marked in the list box 1 with a yellow hand symbol 2.
-
List box with all incoming items, sorted by date received. The newest item is at the top. A ✅ or a ❌ appears before the date and time of receipt.
If the sender’s email address is already saved in the customer data, you can tell by the ✅ before the address.
If a ❌ is shown before it, the email address is not yet saved in the customer file.
-
The ✋ symbol indicates that no reaction to the item has been recorded yet.
-
When you select an item in the inbox 1, the related message information is displayed.
-
All activities that have already been processed can be traced here.
-
When a new activity takes place, please select it in the ‘Workflow’ list box.
-
Then enter the corresponding additional information (where displayed).
-
The step is completed by clicking the button
 , until the next activity is recorded.
At the end of the process, the status should be either ‘No order placed – process ended’ or, if an order was placed, ‘Set commission in €’.
Own referrals#
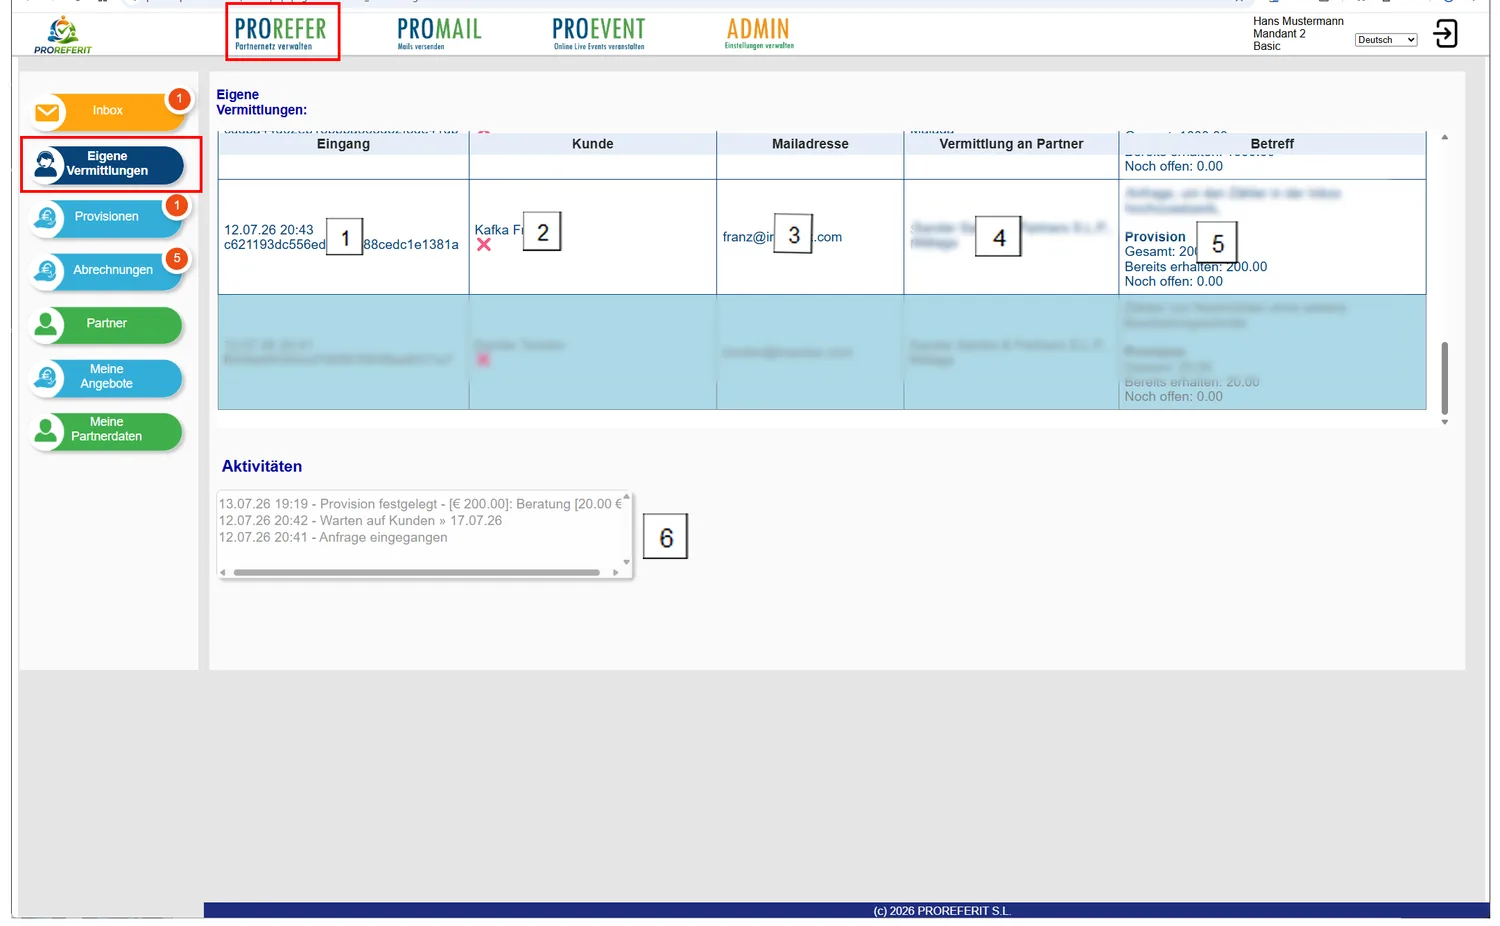
The item Own referrals is the counterpart to the inbox.
Whenever your activities result in a customer enquiry arriving at a partner company, you can follow here the activities your partner company has triggered.
For each referral, the partner’s activities are also shown transparently.
Clicking the header of a column in the table sorts the table accordingly.
-
Date and time the enquiry arrived at the partner company, plus a unique key to make later queries about the item easier
-
Enquiring customer
If the sender’s email address is already saved in your customer data, you can tell by the ✅ before the address.If a ❌ is shown before it, the email address is not yet saved in the customer file.
-
Email address of the enquiring customer
-
Information on which partner the enquiry was referred to
-
Subject text of the enquiry and information on commission payments
-
Display of the activities triggered by the partner for the selected enquiry.
Commissions#
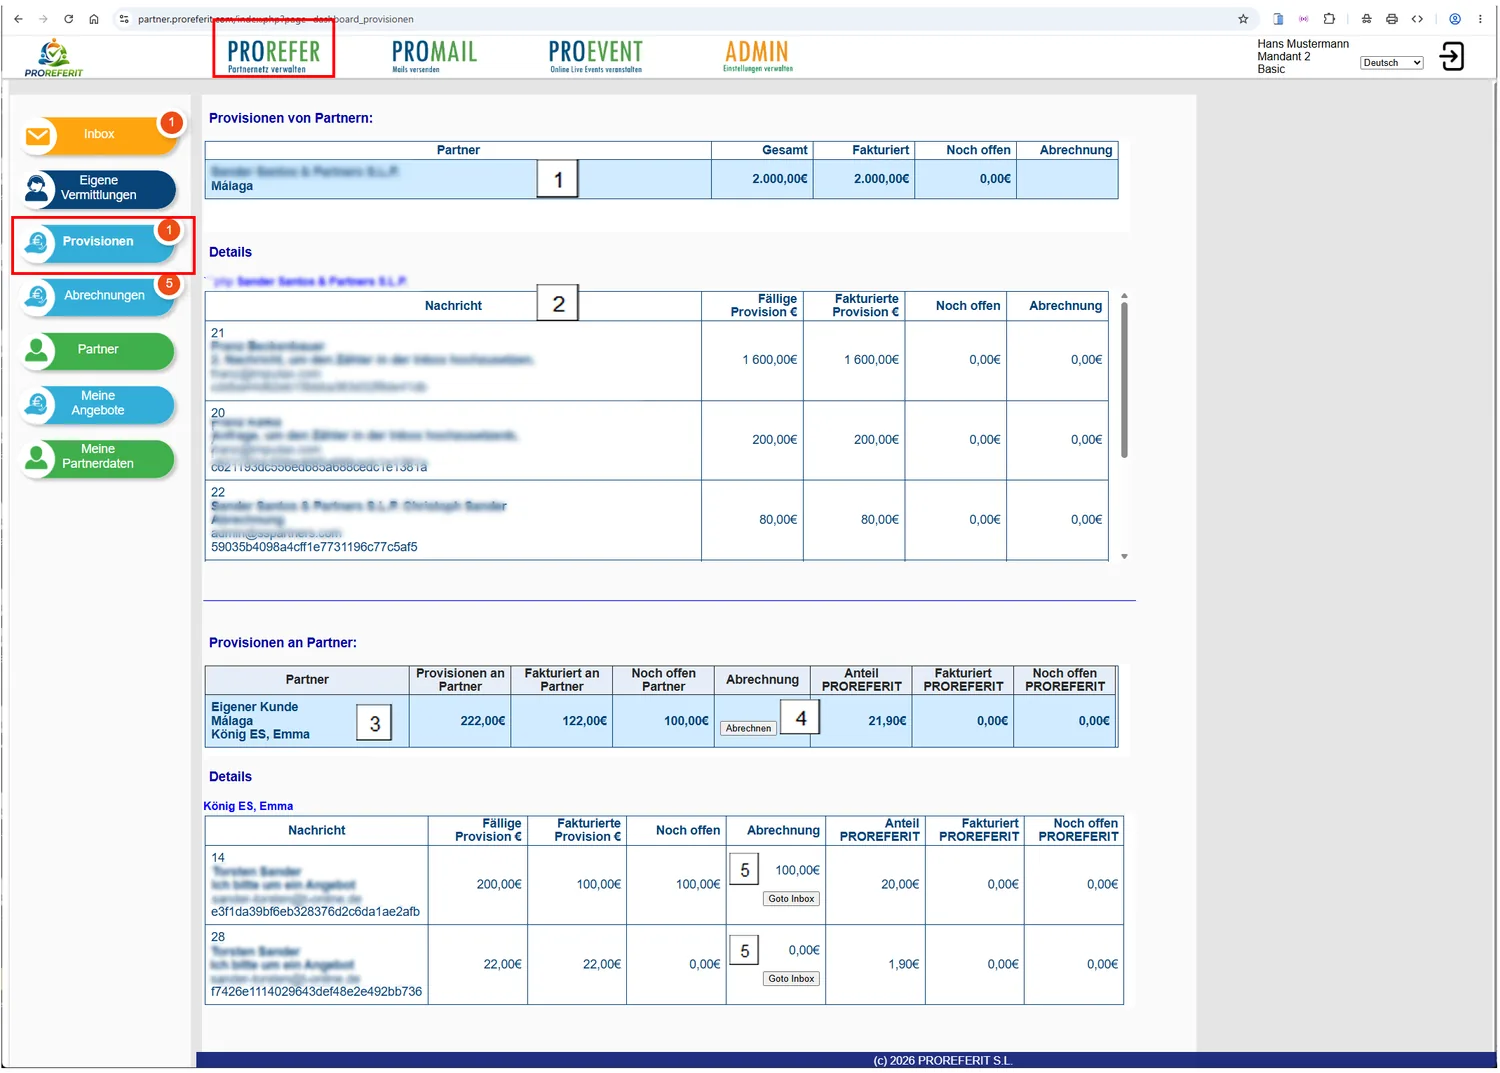
This lists the partners from whom you receive commissions for referrals and the partners to whom you have to pay commissions.
-
Display of all partners from whom you receive or have received commissions, with the totals of all transactions with that partner.
-
When a partner is selected, the details leading to the totals under 1 are displayed.
-
Display of all partners to whom you pay or have paid commissions, with the totals of all transactions with that partner.
When a partner is selected, the details leading to the totals under 3 are displayed.
-
Once open commissions of €20 or more have accumulated, both partners involved can trigger a settlement run. To do so, simply click the ‘Settle’ button.
The settlement run offsets the commissions and transfers them to the area
 .
-
If you want further information on the message shown, you can jump straight to the inbox by clicking the ‘Goto Inbox’ button.
Statements#
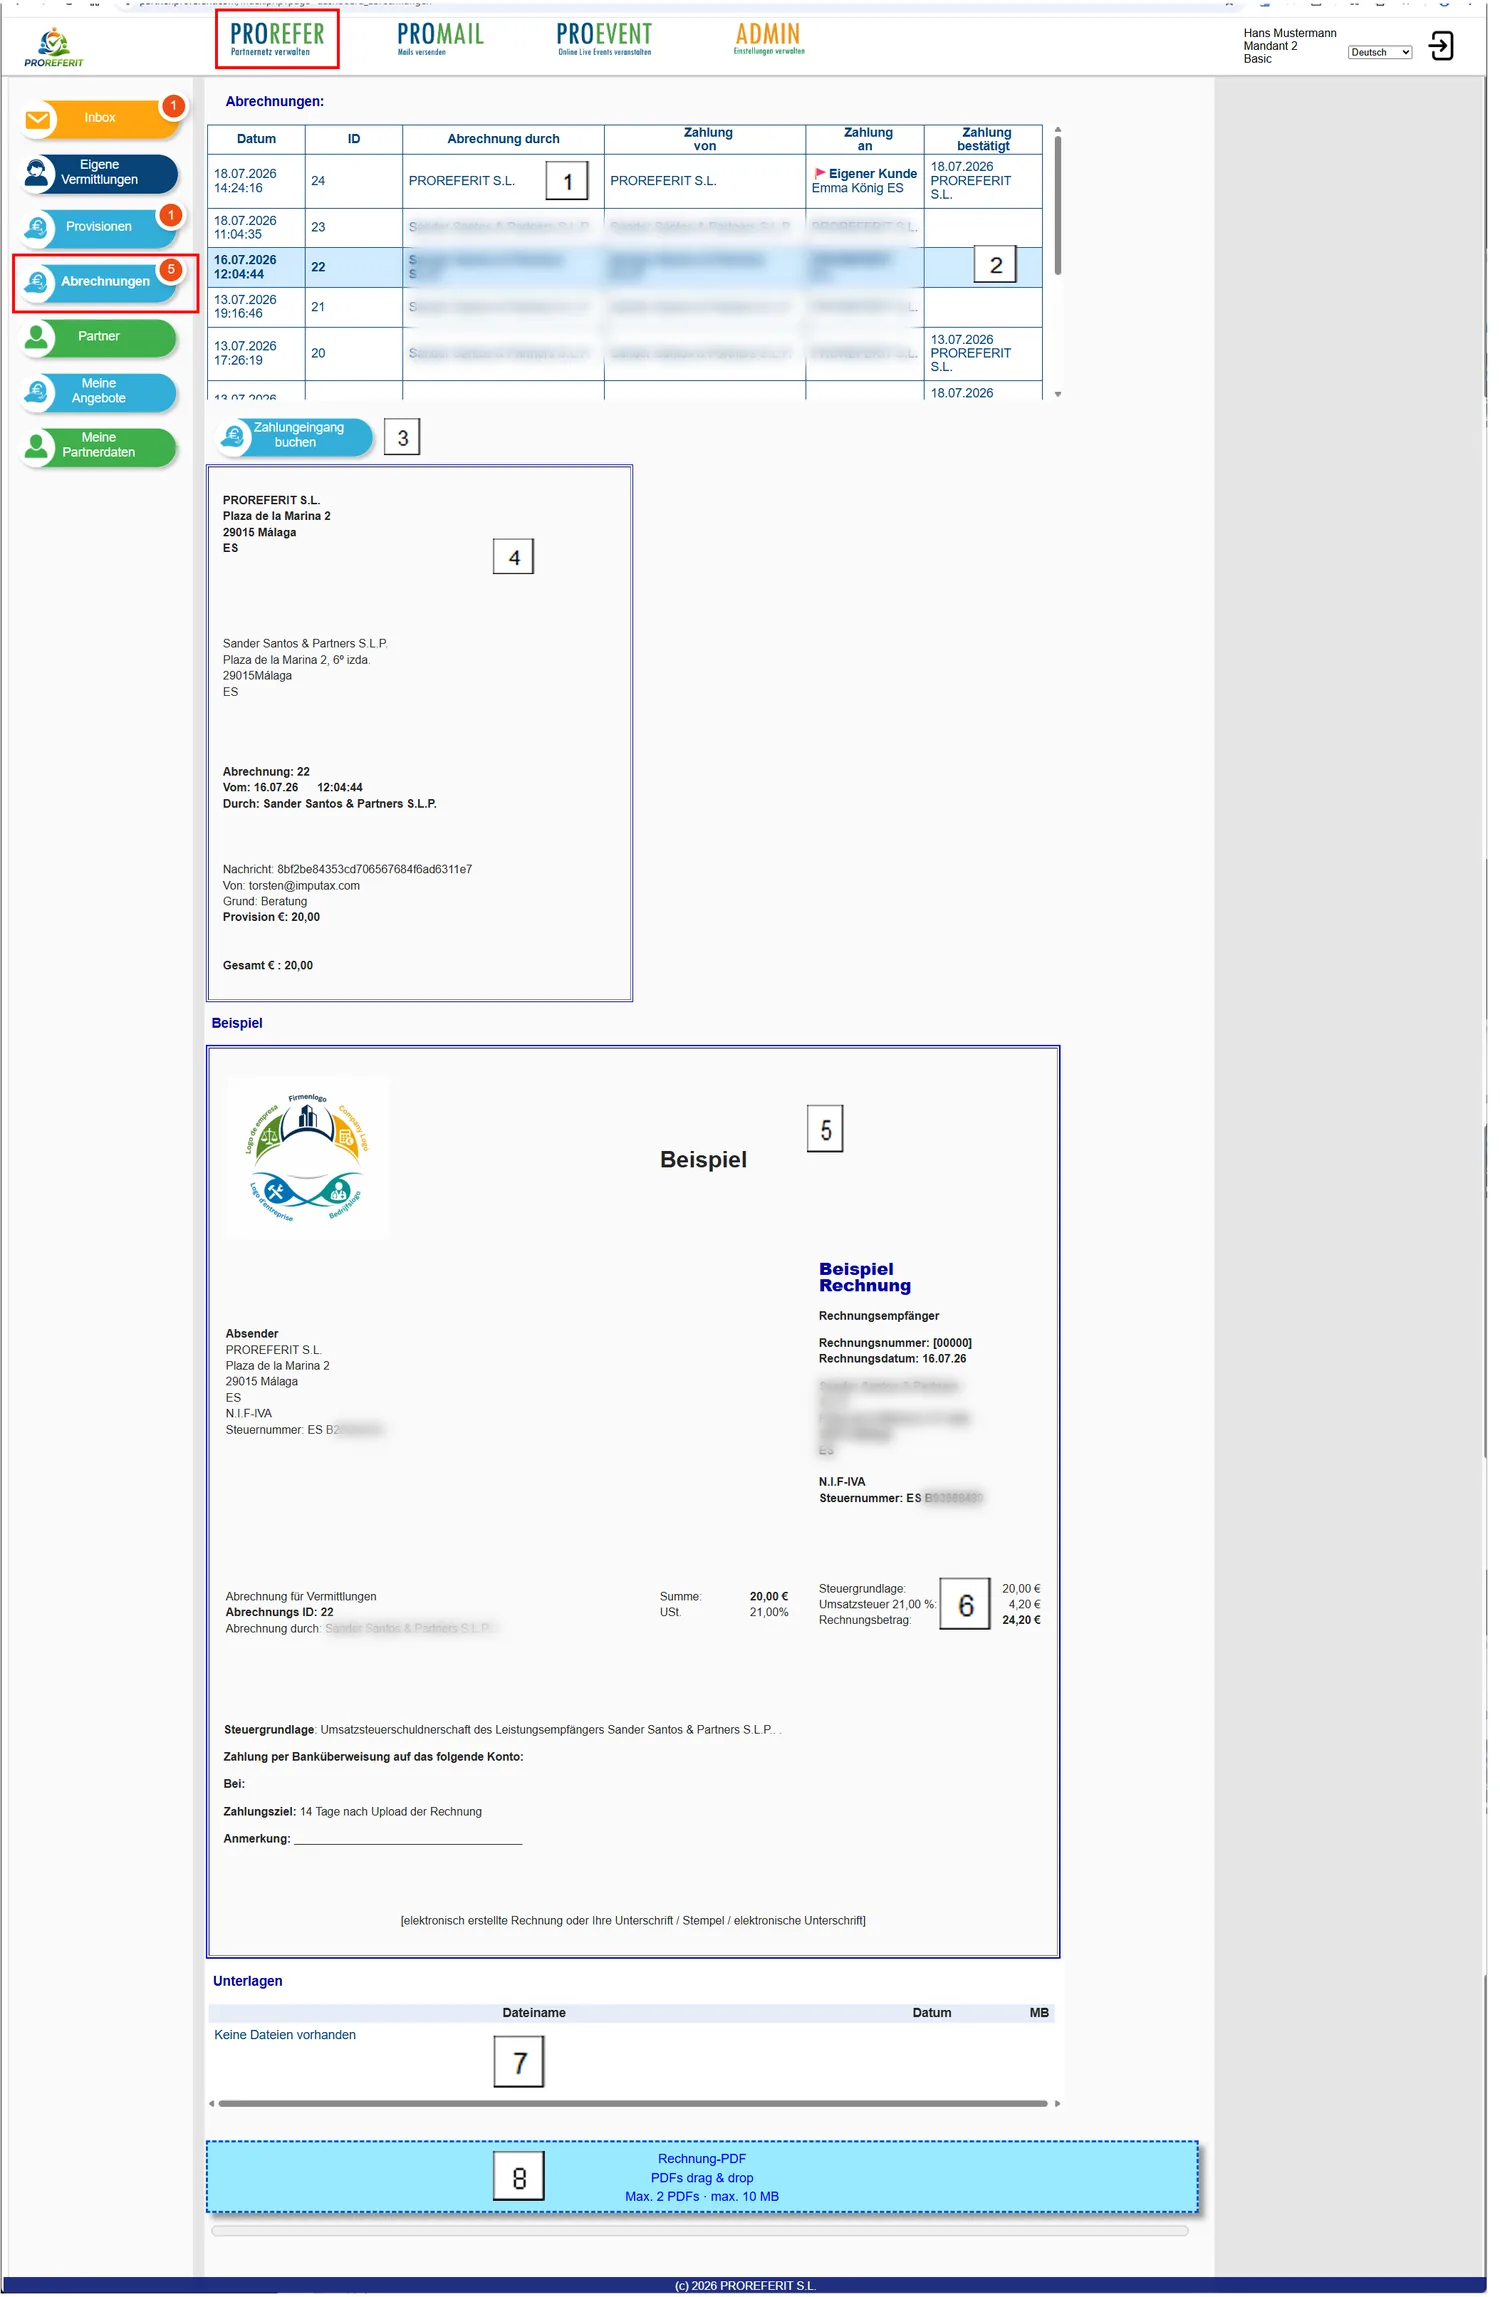
Once the settlement of a commission has been triggered, the commission payment process is handled and documented here.
-
An overview of all settlement runs is shown. Click a row for further information.
-
If you record a payment received for an invoice you issued to your partner company,
-
confirm this by clicking the button ‘Book payment received’.
The column is then updated. -
Information about the settlement run is shown in summary form.
-
If you can issue an invoice yourself, the sample invoice shown gives you an idea of what it might look like.
-
Because tax rates in cross-border transactions can differ from those within the same country, a proposal is shown here for how the tax would have to be applied. The different European tax rates are stored in the program.
-
If you have created an invoice with your own invoicing system, you can upload it and thereby make it available to your partner company for payment. The uploaded documents in PDF format are displayed here and can be downloaded.
-
New invoice documents are uploaded by dragging them from the file explorer onto the blue field ‘PDFs drag & drop’. Alternatively, you can click the blue field, which opens a file selection dialogue.
Several documents can be selected and uploaded at the same time.
Partners#
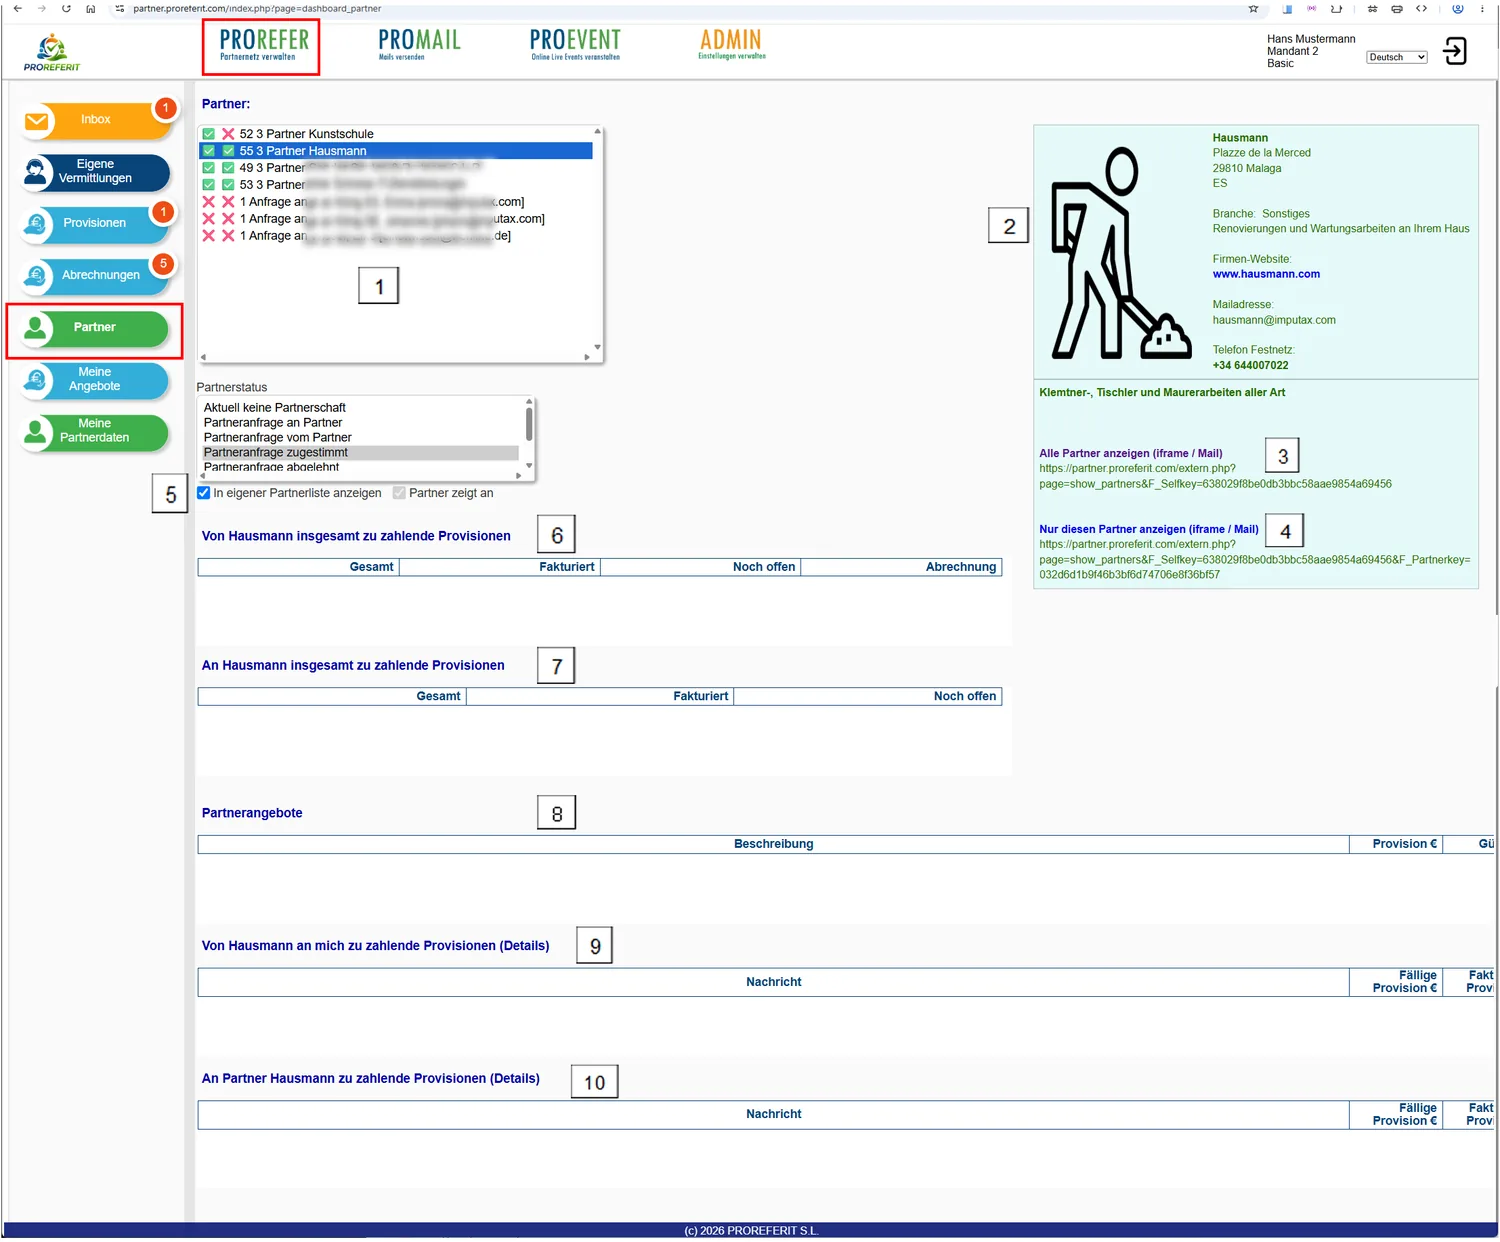
The partner status is processed and documented here.
You can also trace here which commission offers the partner company has or had, and when.
In addition, you get an overview of the commissions payable and received per partner.
My offers#
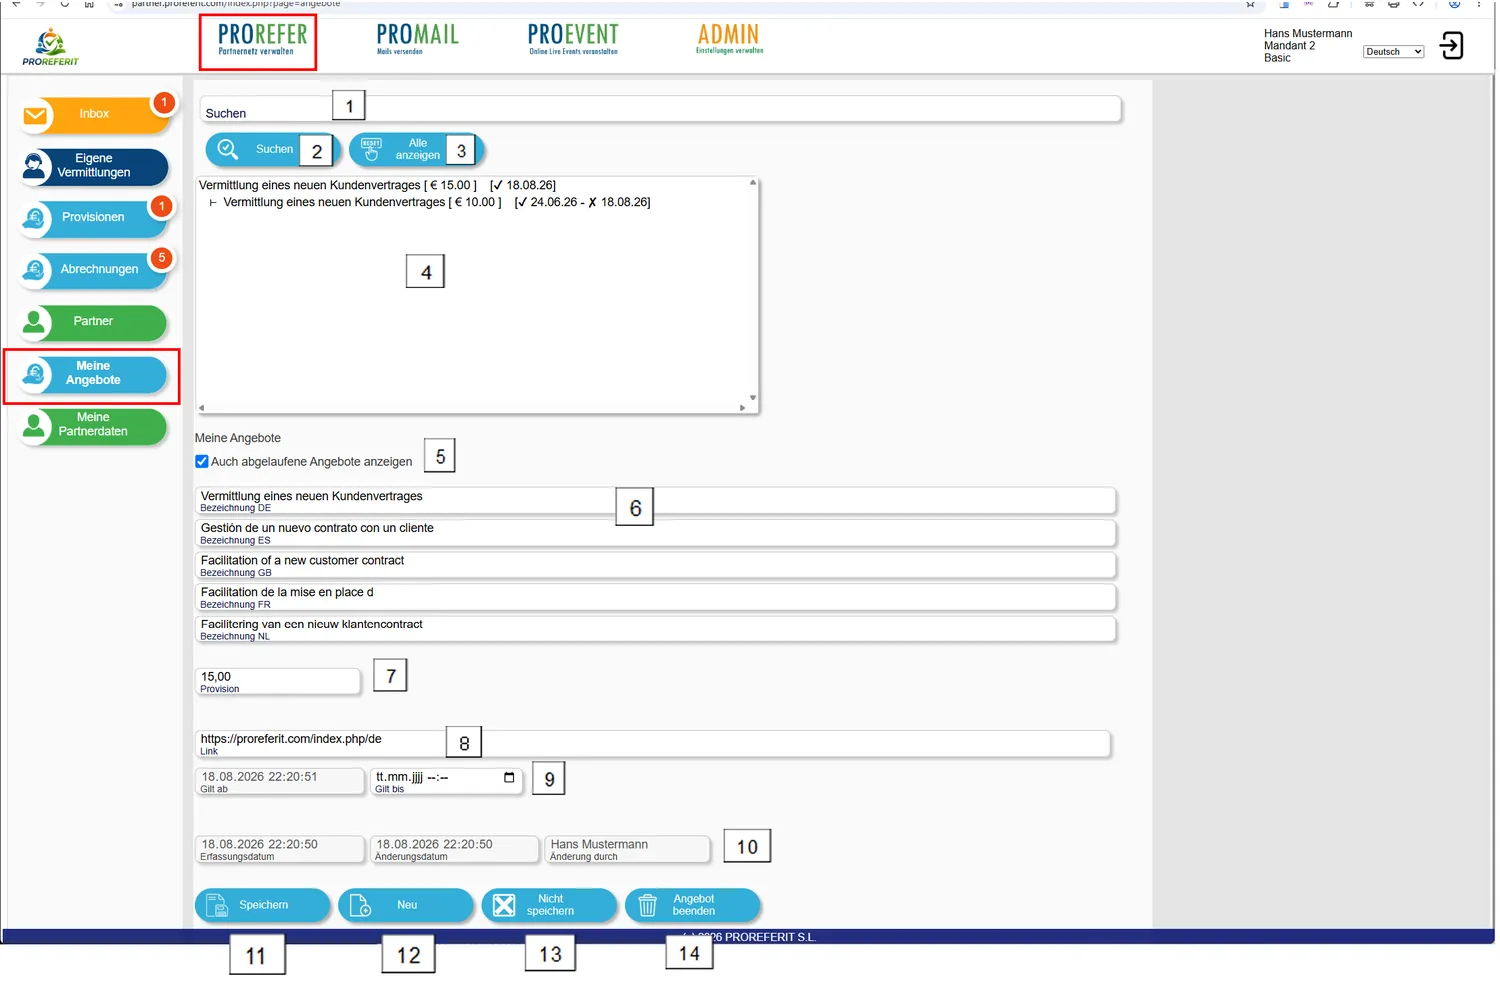
All offers for which referral commissions are or were offered in a particular period are managed here.
My partner data#
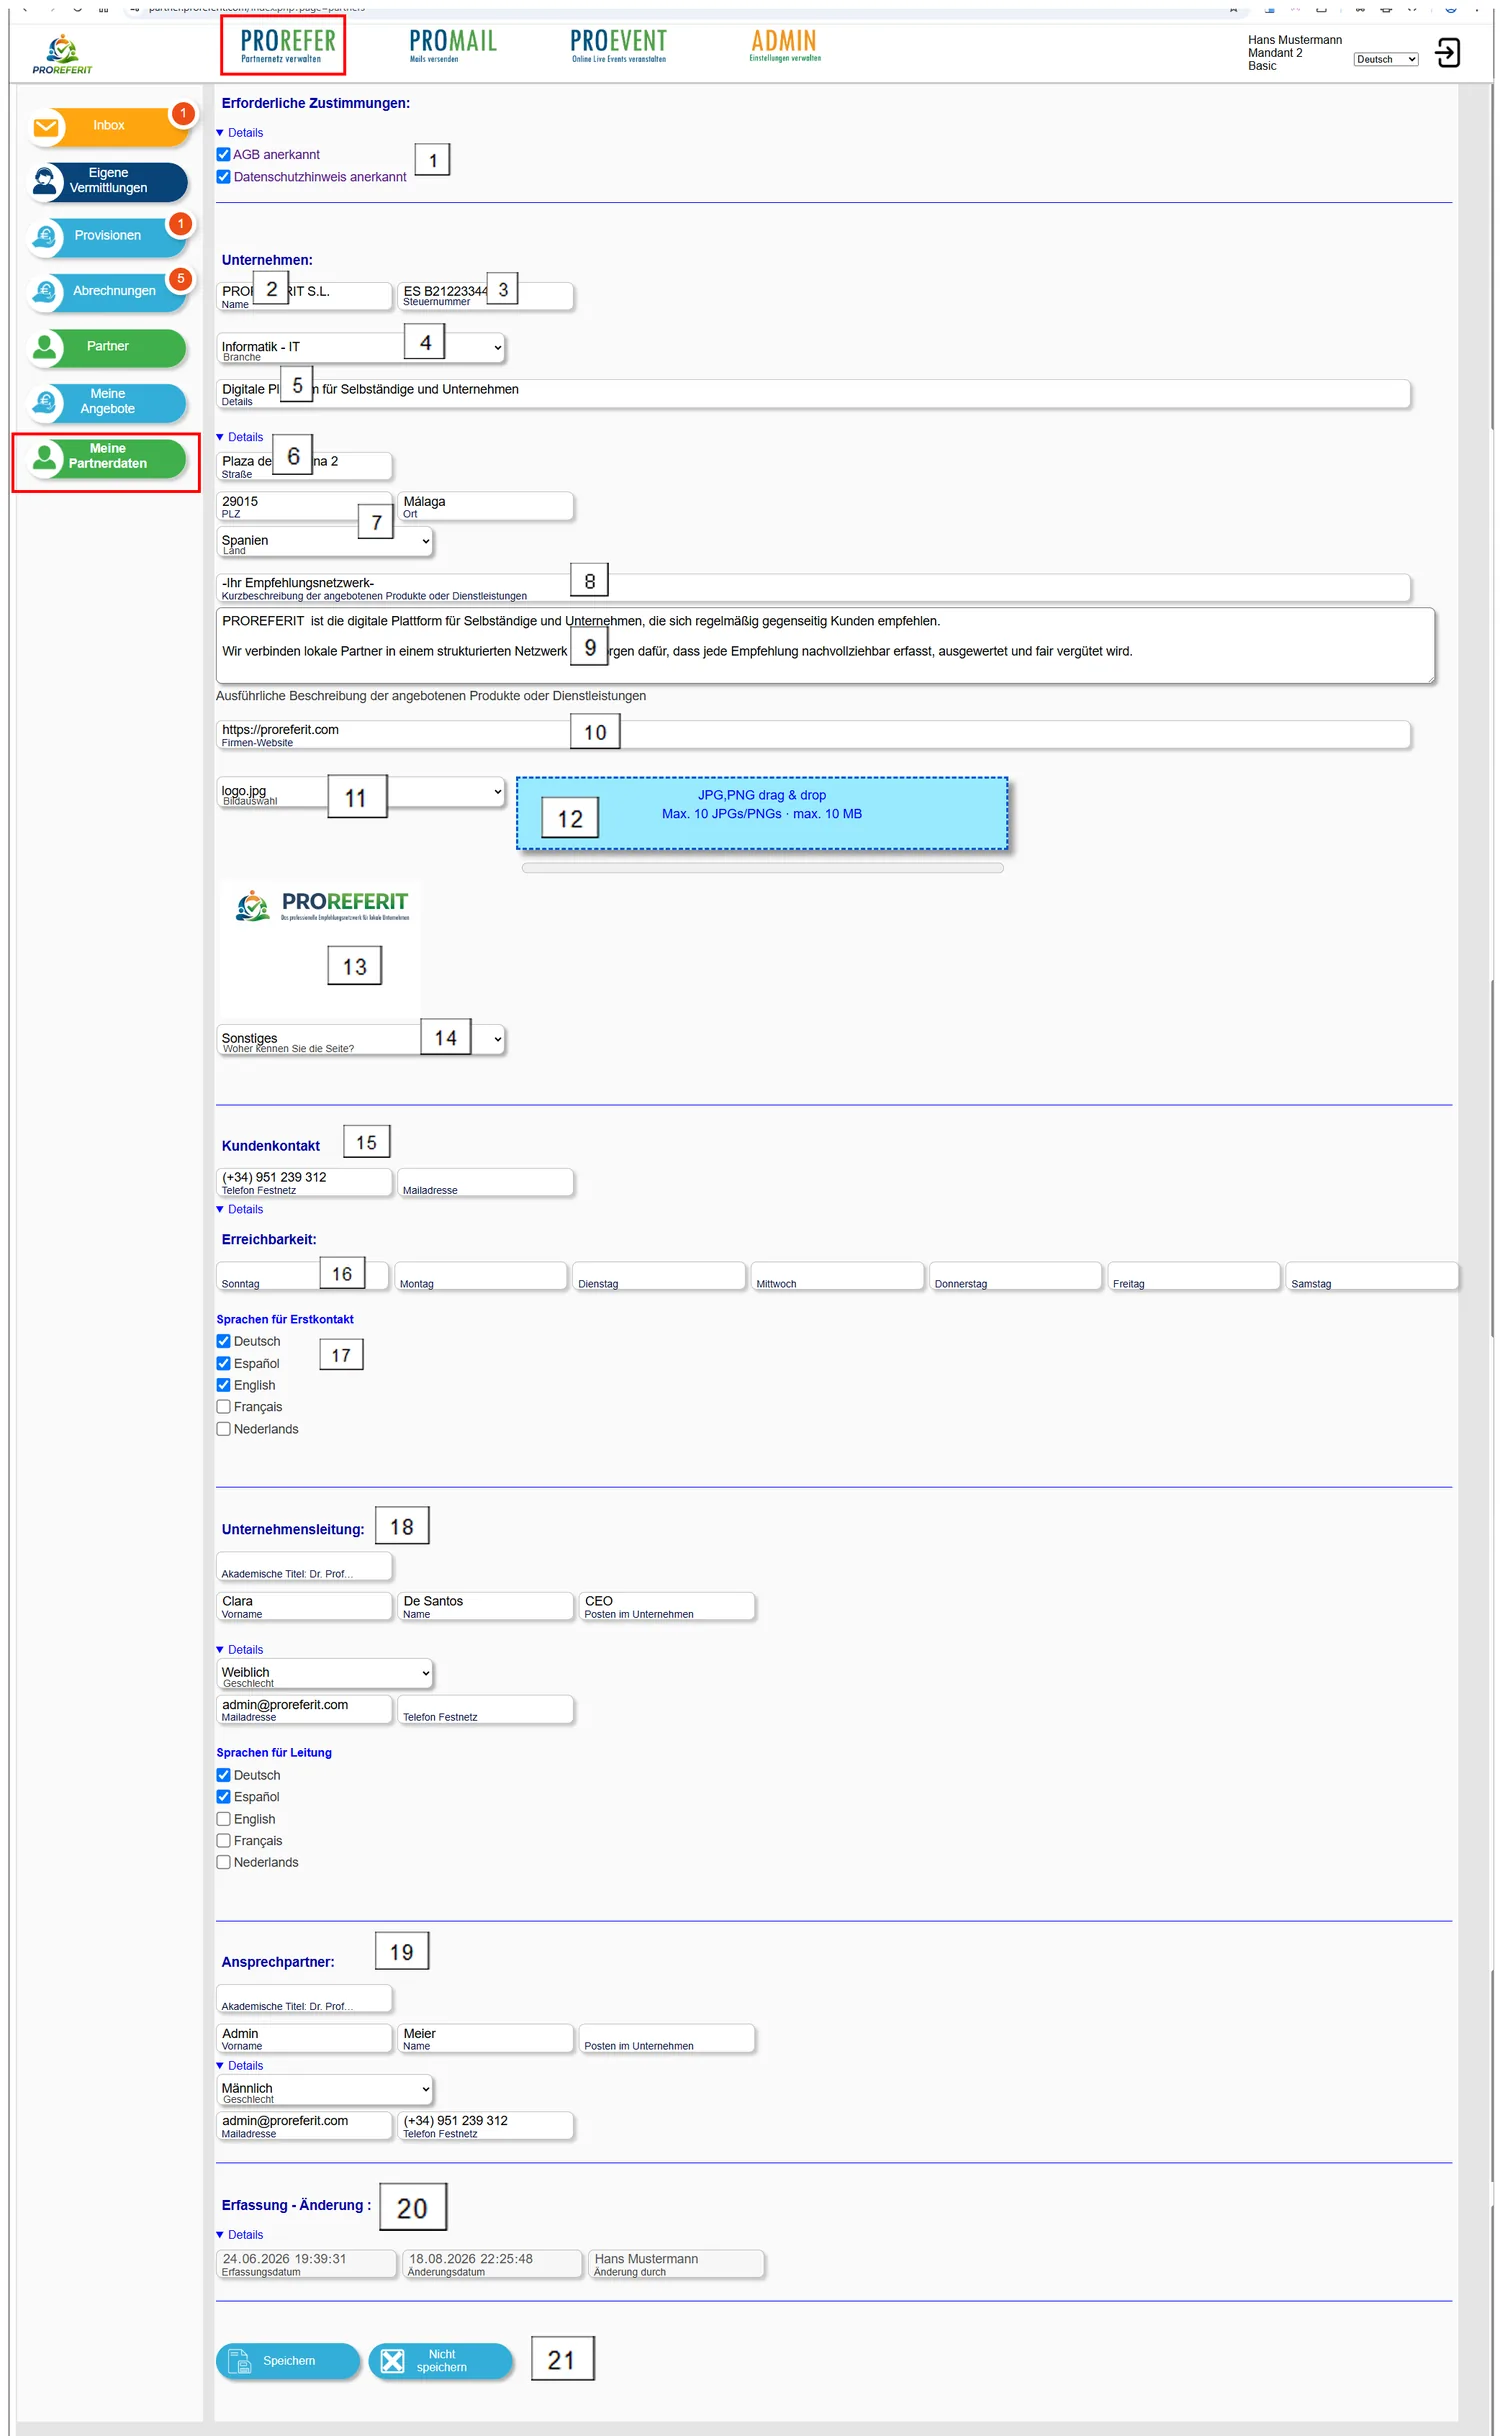
PROMAIL#
Purpose#
PROMAIL manages multilingual text templates that can be
combined into personalised emails and sent to specific customers or customer groups. Numerous ‘placeholders’ are
available to automate the creation process further. Placeholders can be recognised in the text by the curly
brackets {{placeholder name}}. The placeholders you need can be selected from a list when creating
the text templates.
Anyone who already knows one of the common word processing programs from everyday office work will be able to start editing text blocks straight away.
-
Benefit from a multilingual text system for automating and optimising your customer communication
-
Save a large part of your time by using standard emails in different languages.
-
all standard texts are available online in several languages.
-
Benefit from the copy function for texts you have created. This lets you quickly adapt existing texts (including the sample texts supplied) to your needs and use them.
-
Standard texts such as contact details, opening hours or holiday greetings, etc. only need to be created once and can then in turn be integrated into the standard texts as a text block of their own.
-
Texts you have already written in your current word processor can largely be transferred to PROMAIL with copy and paste, including formatting.
Recommended steps#
Create your own new standard text or select an existing one#
The quickest way to create a new standard text of your own is to copy an existing text (for example, a sample text, recognisable by the 📌) and then make the appropriate changes.
-
PROMAIL >
-
Select a group from the ‘Groups’ list box
-
Select a text from the ‘Texts’ list box
-
Select

-
Adapt or add the short text, subject and text as required in the relevant languages.
-
Save the new text
-
Select the text you want from the ‘Texts’ list box
Select customers or a customer group#
Select PROMAIL > 
Select customers and click 
Send email#
-
Switch to PROMAIL >
 if this does not happen automatically
-
Check the text
-
Click

Detailed description#
Selecting email templates#
-
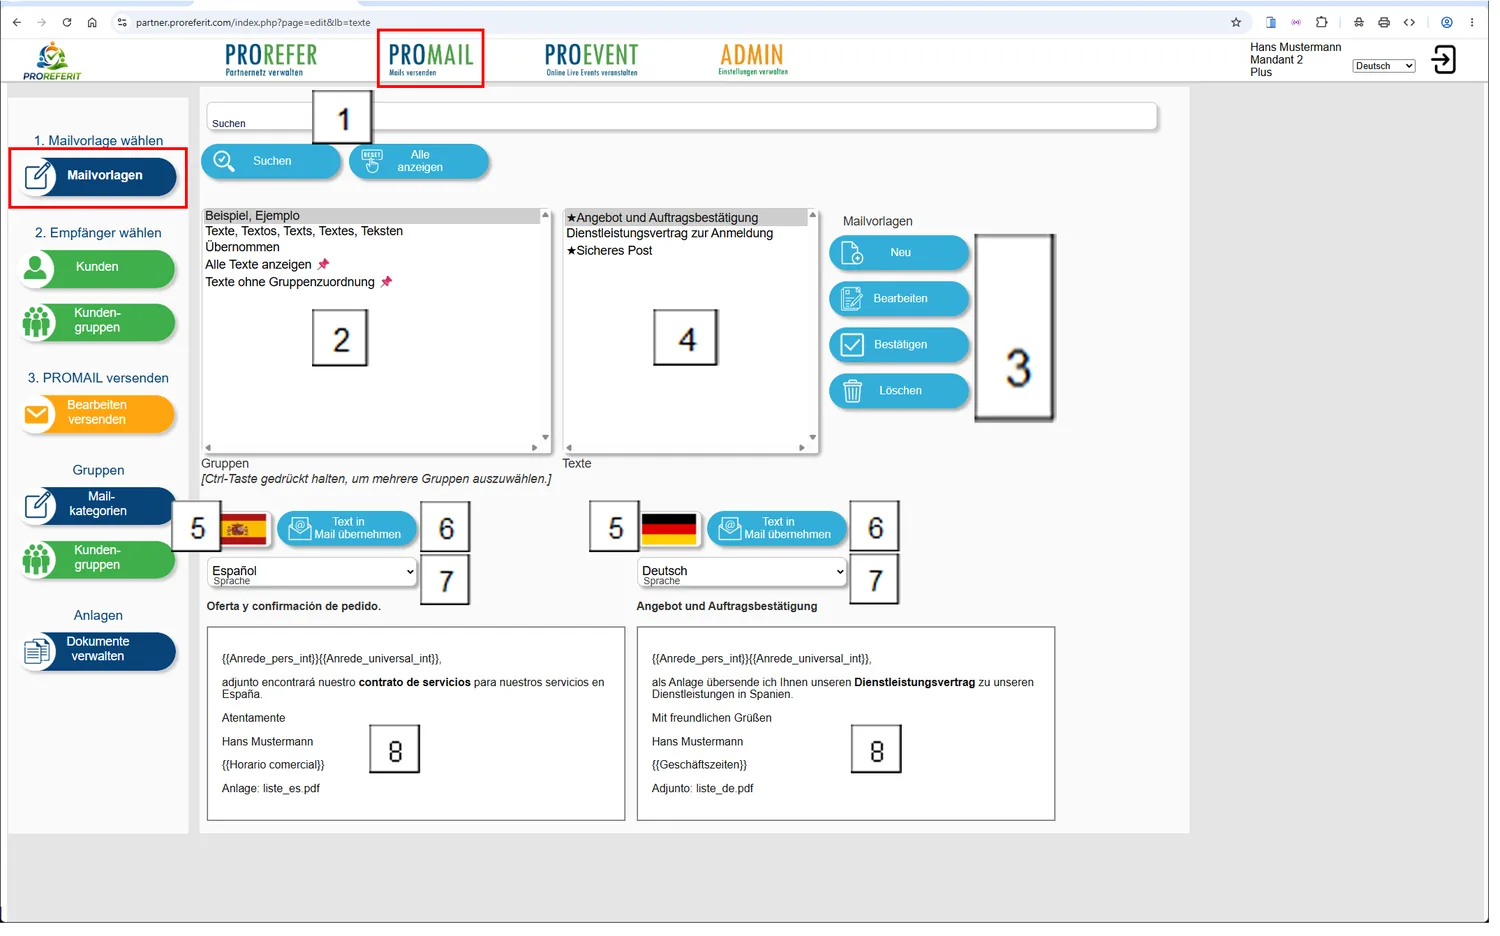
Search field to narrow down the displayed text templates when there are many. If text is entered here and ‘Search’ is clicked, only the text blocks containing the entered text are displayed.
To display all texts again, click  . The search field is then cleared.
-
List of the text groups, which can be maintained under the menu item
 .
-
Menu bar:
 Create a
new text block. It is important that at least one text group is assigned.
 The selected text block
is opened in the editing window,
 If a text block has
been newly entered in the editing window,
or an existing text has been changed, an ‘*’ is placed before the description in the
‘Texts’ list box 4. Once the text has been checked, you can confirm it and the asterisk ‘*’ disappears.
This menu item is only displayed if the text has not yet been confirmed. The text block is
deleted.
You will first be asked whether you really want to do this.
-
National flag
Clicking the displayed national flag copies the displayed text to the clipboard so that you can use it, for example, in another program (copy and paste). -
 The
displayed text is transferred to the area .
If no recipient email address has been selected yet, the ‘Customers’ section of the program is opened.
Otherwise the program jumps directly to ‘Edit and send’. -
List box for selecting the language to be displayed
-
Display of the text saved for the selected language.
Creating and editing email templates#
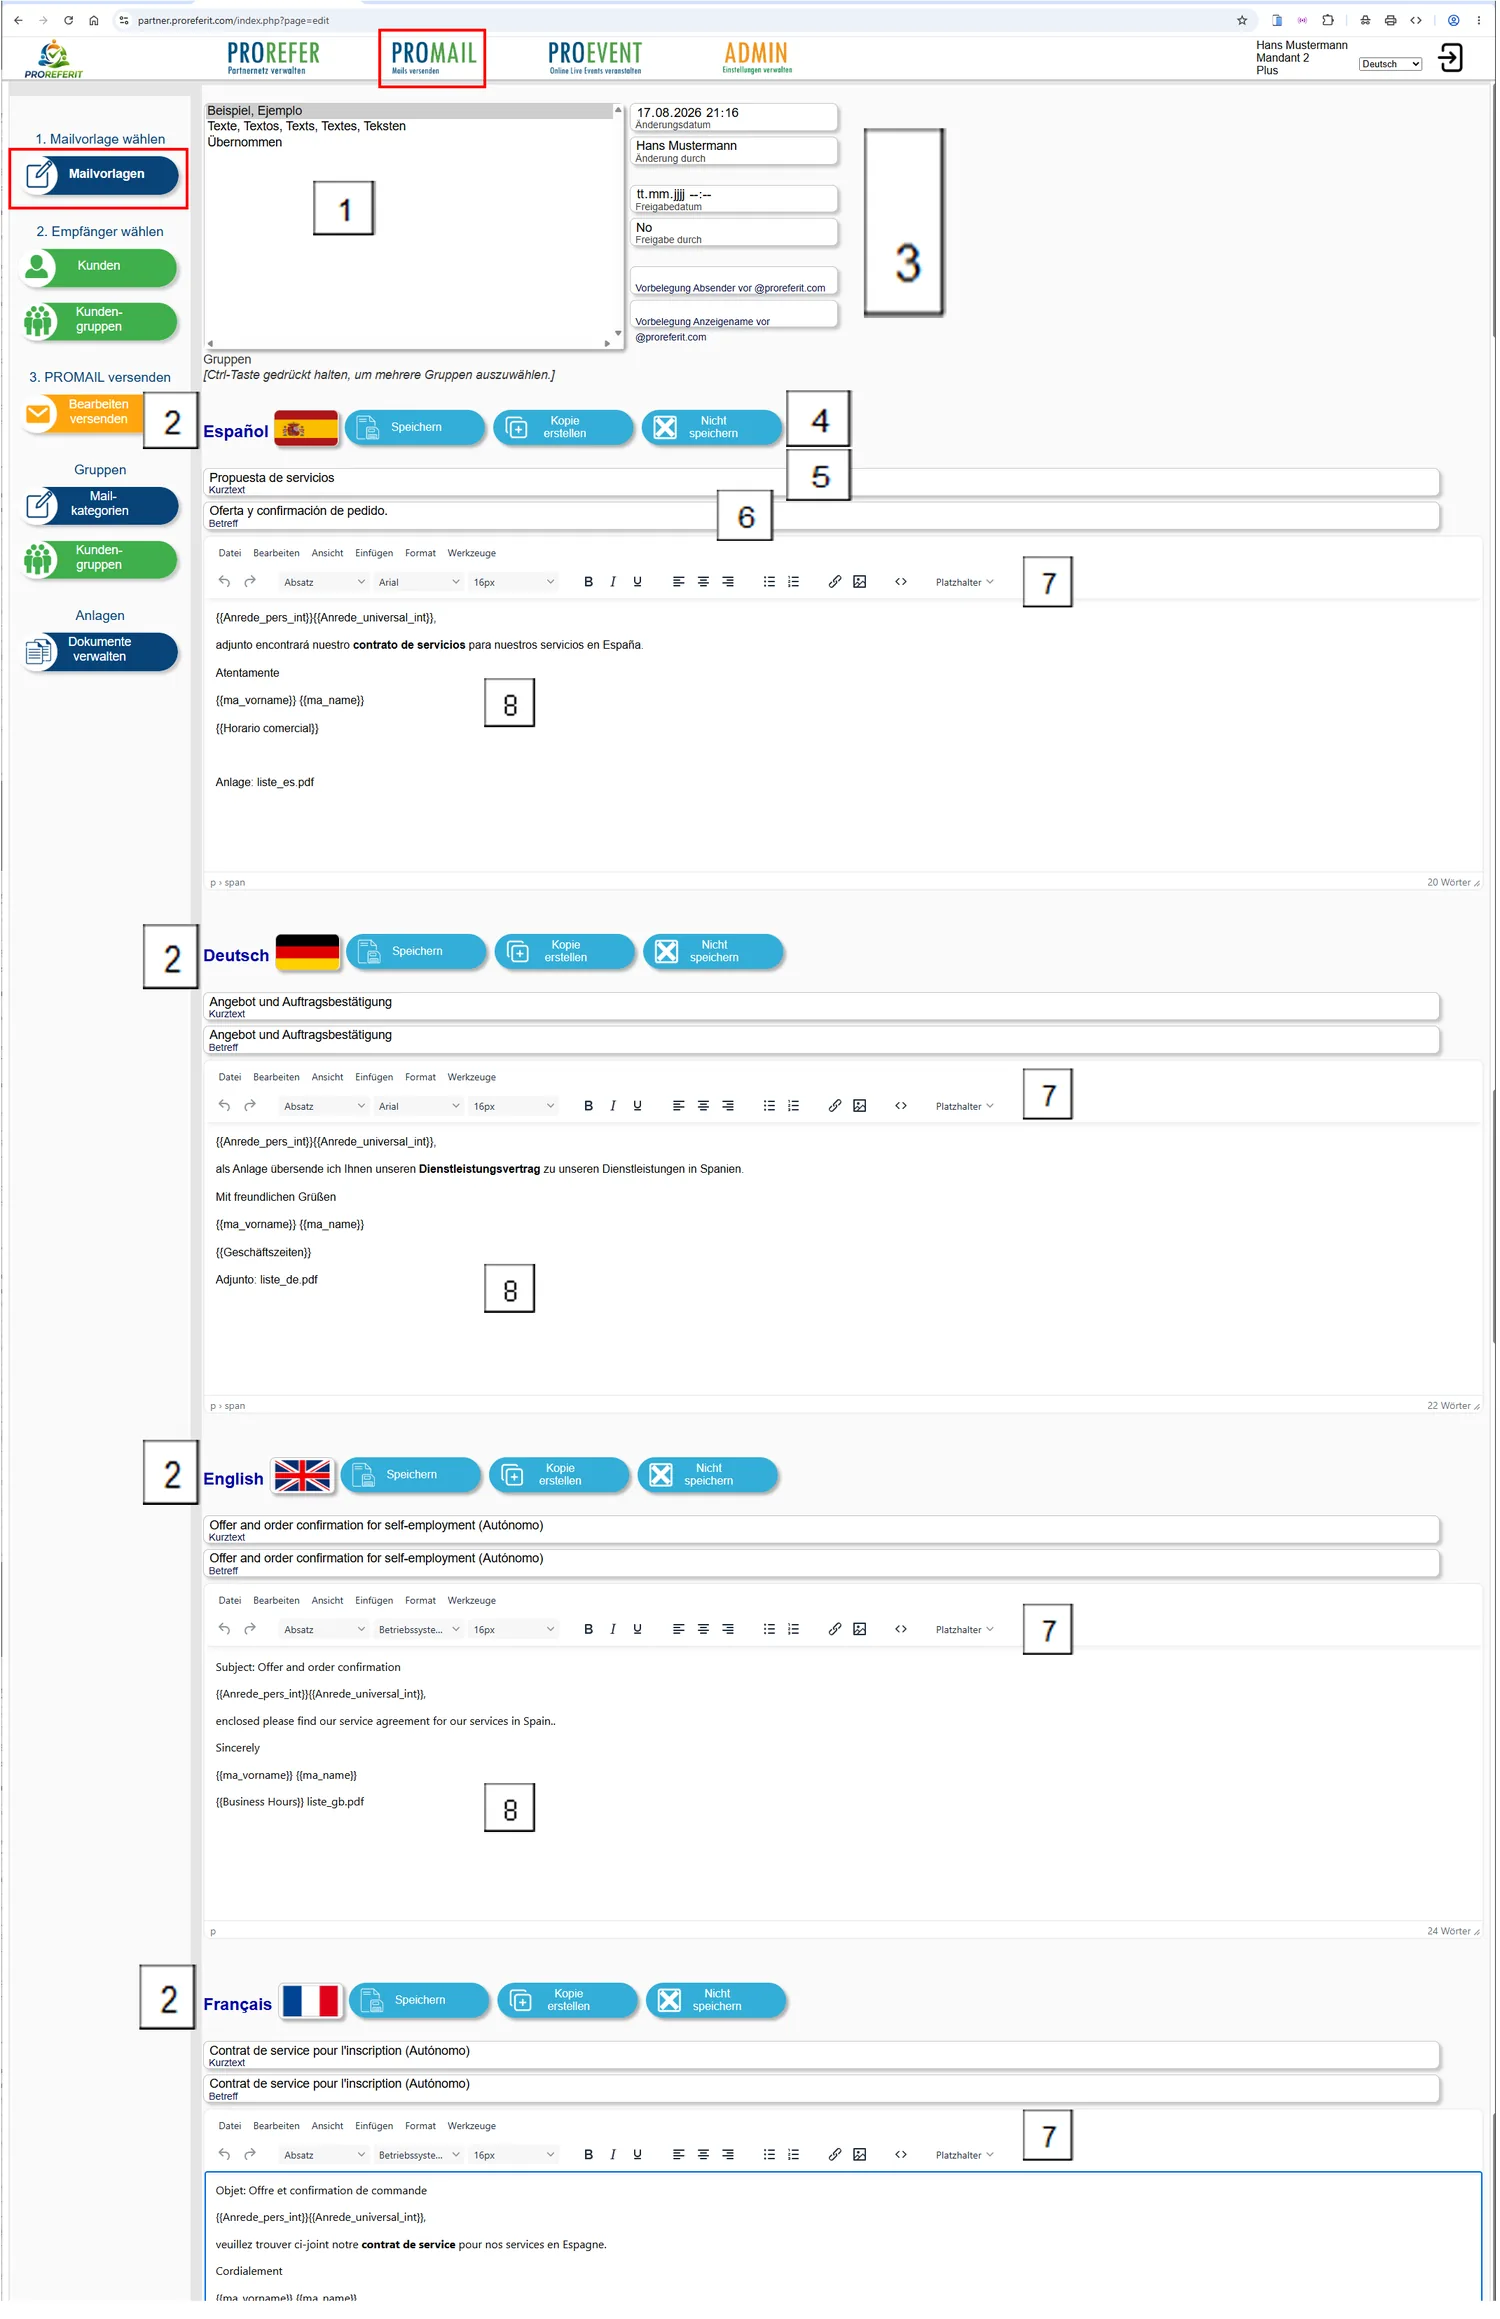
-
Every text block must be assigned to at least one group so that, with larger numbers of text blocks, you can keep a clear overview later.
By holding down the ‘Ctrl’ key on Windows systems, you can also assign several groups. -
Enter the texts in the respective national language
-
The area is updated every time you save. This makes it traceable when and by whom the changes or the approval were made.
In the fields ‘Default sender’, you can enter the defaults you want for the later sending of emails for the respective document. This makes it possible, for example, to pre-set the sender ‘Accounting’ for one text block and the sender ‘Support’ for another.
This requires that your mail host allows the mailbox you use, which should normally be the case.
For more information, see ADMIN > System settings under the items ‘Bulk email defaults’
-
When entry is complete, you can click
at any point. The text block is then saved with all its sections.If you want to use an existing text as the basis for a new one, select
. The entire content is then copied into
a new text block and you are returned to the display page. The new item can now be used or edited. -
The Short text line contains the text that is displayed in the ‘Texts’ list box 4 on the previous selection page.
Note that what is displayed depends on which language is selected.
-
Enter in the Subject field the text that should appear as the ‘heading’ of the later email.
-
The editing toolbar for the texts should be self-explanatory and works as you know it from other word processing systems.
However, the fonts and formatting have been restricted to those commonly usable in emails.The ‘Placeholders’ list box contains the fields that will later be replaced in the personalised email by the real values such as surname, first name, today’s date, etc.
When you select a placeholder, it is inserted at the position of the cursor.
-
Area for displaying, editing and formatting the email texts.
Creating customer data#
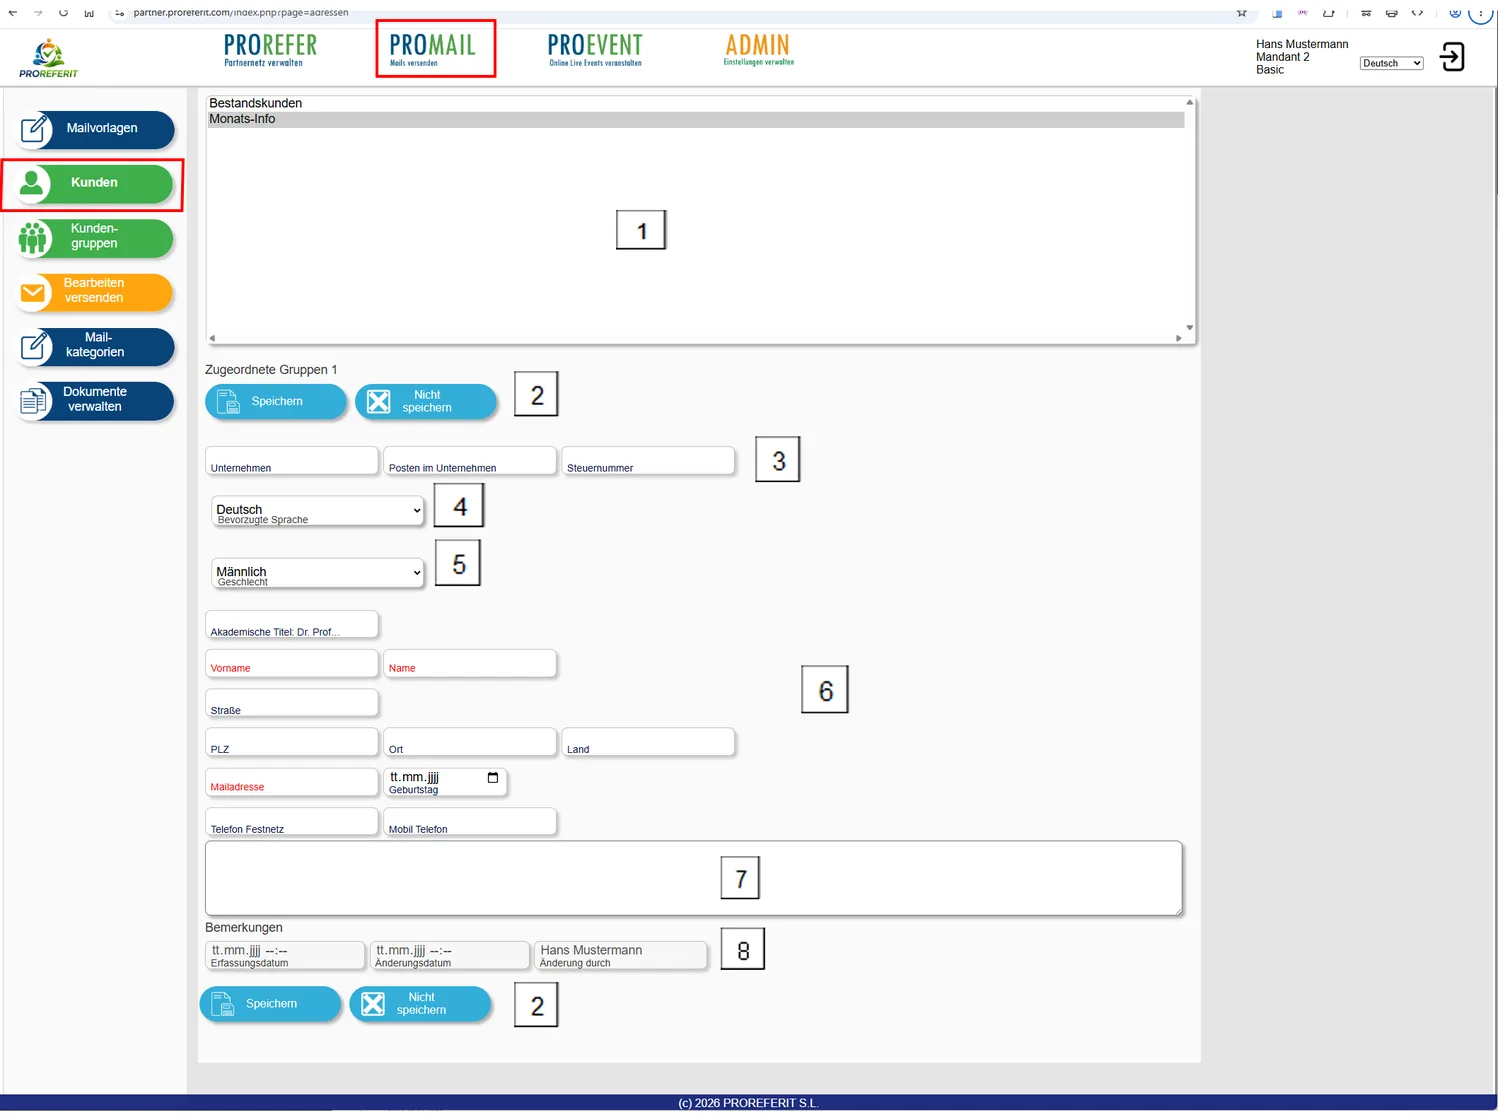
After selecting PROMAIL > Customers, you can maintain
existing customer data and, using the menu item  , enter new customer data.
-
Address groups can be assigned to each customer. If you hold down the ‘Ctrl’ key on Windows systems, you can also assign several groups.
-
Save the data or cancel the entry.
-
If a company can be assigned to the record, the data can be entered here.
-
The person’s preferred language selected here ensures that, when emails are sent, the person receives the text in the assigned language.
-
The ‘Gender’ selection leads to the correct form of address when an email is created, such as ‘Dear Ms …’ or ‘Dear Mr …’.
-
Further information can be entered here.
-
If special information is to be stored, this can be done here as free text.
-
Each time you save, the date and the person who saved are entered here automatically.
At the end of the entry, don’t forget .
Maintaining customer data#
-
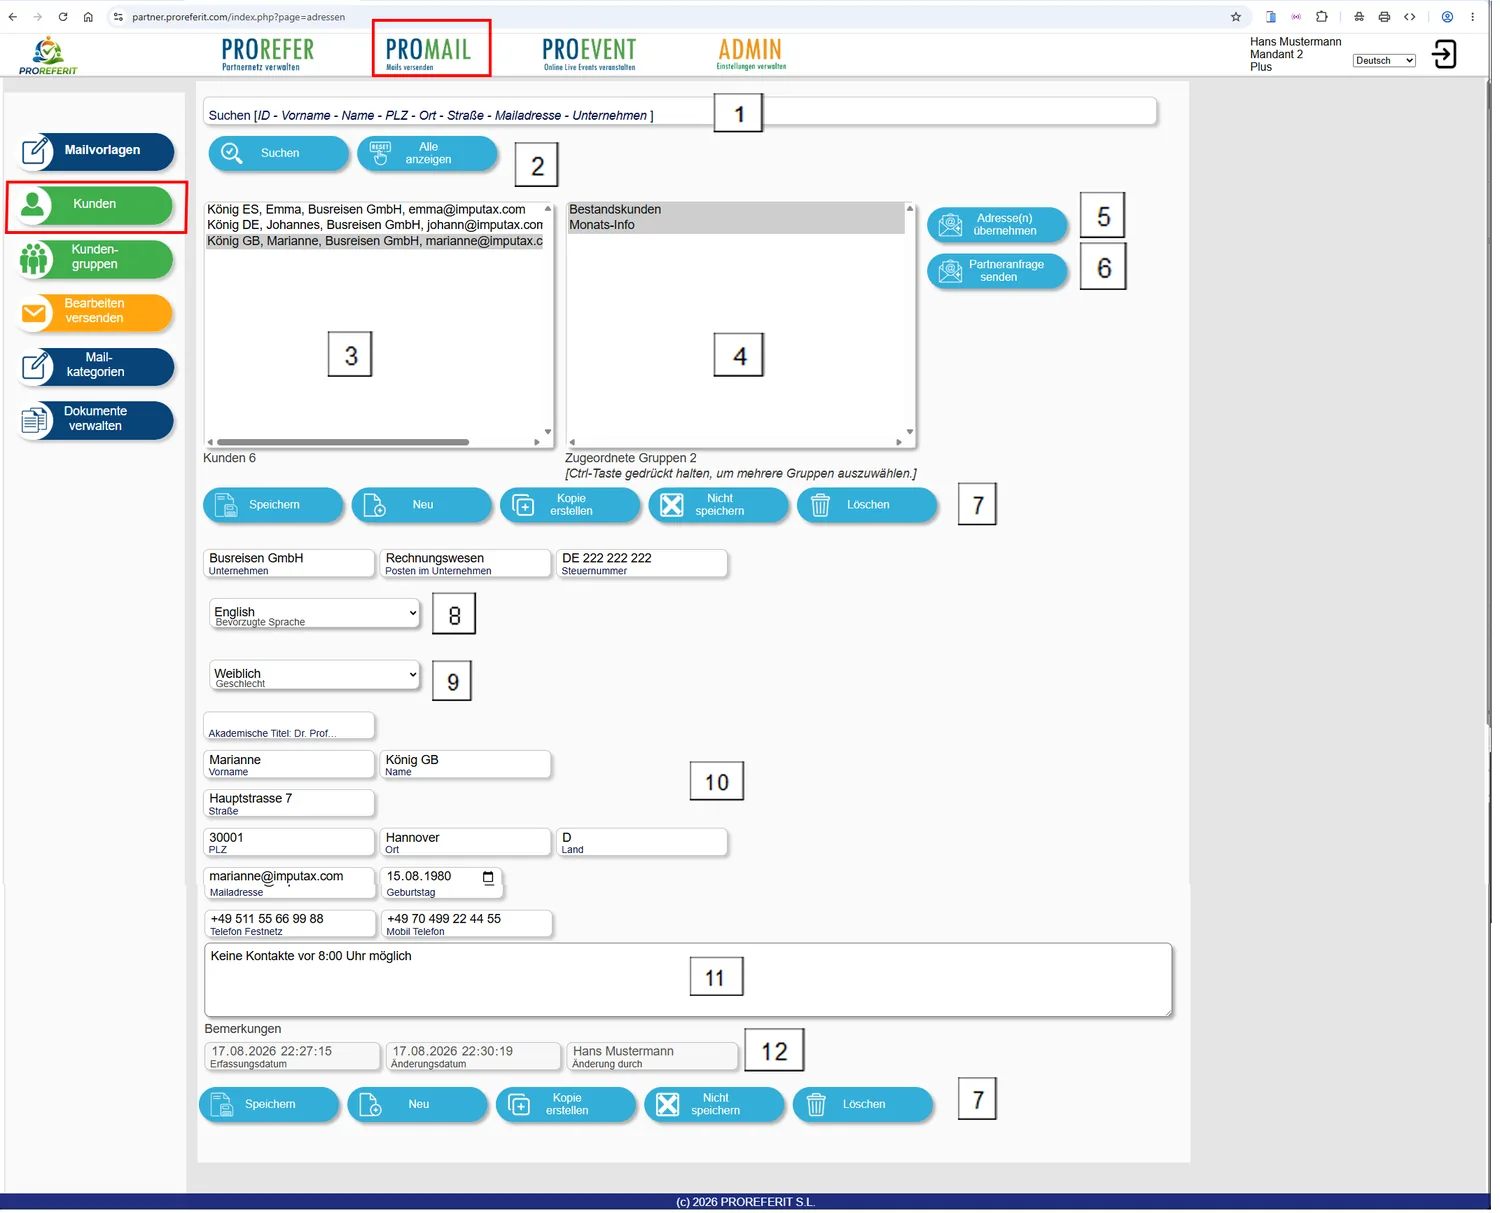
Search field to narrow down the displayed address records when there is a large amount of data. If text is entered here and ‘Search’ is clicked, only the addresses containing the entered text are displayed. All records containing the entered character string are found.
It is also possible to use the wildcard ‘%’ instead of letters. A search for ‘k%nig’ would find all records ‘König, Koenig’. This can be particularly helpful if it is unclear whether a name is spelled, for example, with an umlaut or with ß or ss.
-
Clicking
 starts the
search.
To display all records again, click. The search field is then cleared. -
Display of all customer records, or of those narrowed down by the search restriction
-
Display of the groups assigned to a customer record. By selecting one or more groups and then clicking
, you can change the
assignment. -
After selecting an address record, you can transfer it to the email with
. After the selection, the program goes
either directly to  , or, if no text block has been selected yet, to
 .
-
If you work successfully with a person or company, you can send them a ‘partner request’. A link (Test partner contact) is then generated, which you can send to them.
This link can then be used by your partner person or company to recommend your services to third parties.
You can test what the form opened by the link looks like by clicking ‘Test partner contact’, which is located below
.The requested partner is added in parallel as a partner request to your partner list under PROREFER > Partners.
-
Menu bar:
The data
entered or changed are saved Create new address data.
If you want to
use the existing address as the basis for a new one, select this item. The entire content is then copied
into a new address record. This can be useful if several records with the same address are to be created, as
may be the case, for example, with family groups or company employees.After copying, only a few details such as email address, first name or surname need to be adjusted.
-
The person’s preferred language selected here ensures that, when emails are sent, the person receives the text in the assigned language.
-
The ‘Gender’ selection leads to the correct form of address when an email is created, such as ‘Dear Ms …’ or ‘Dear Mr …’.
-
Further information can be entered here.
-
If special information is to be stored, this can be done here as free text.
-
Each time you save, the date and the person who saved are entered here automatically.
Contact form for referrals by partners#
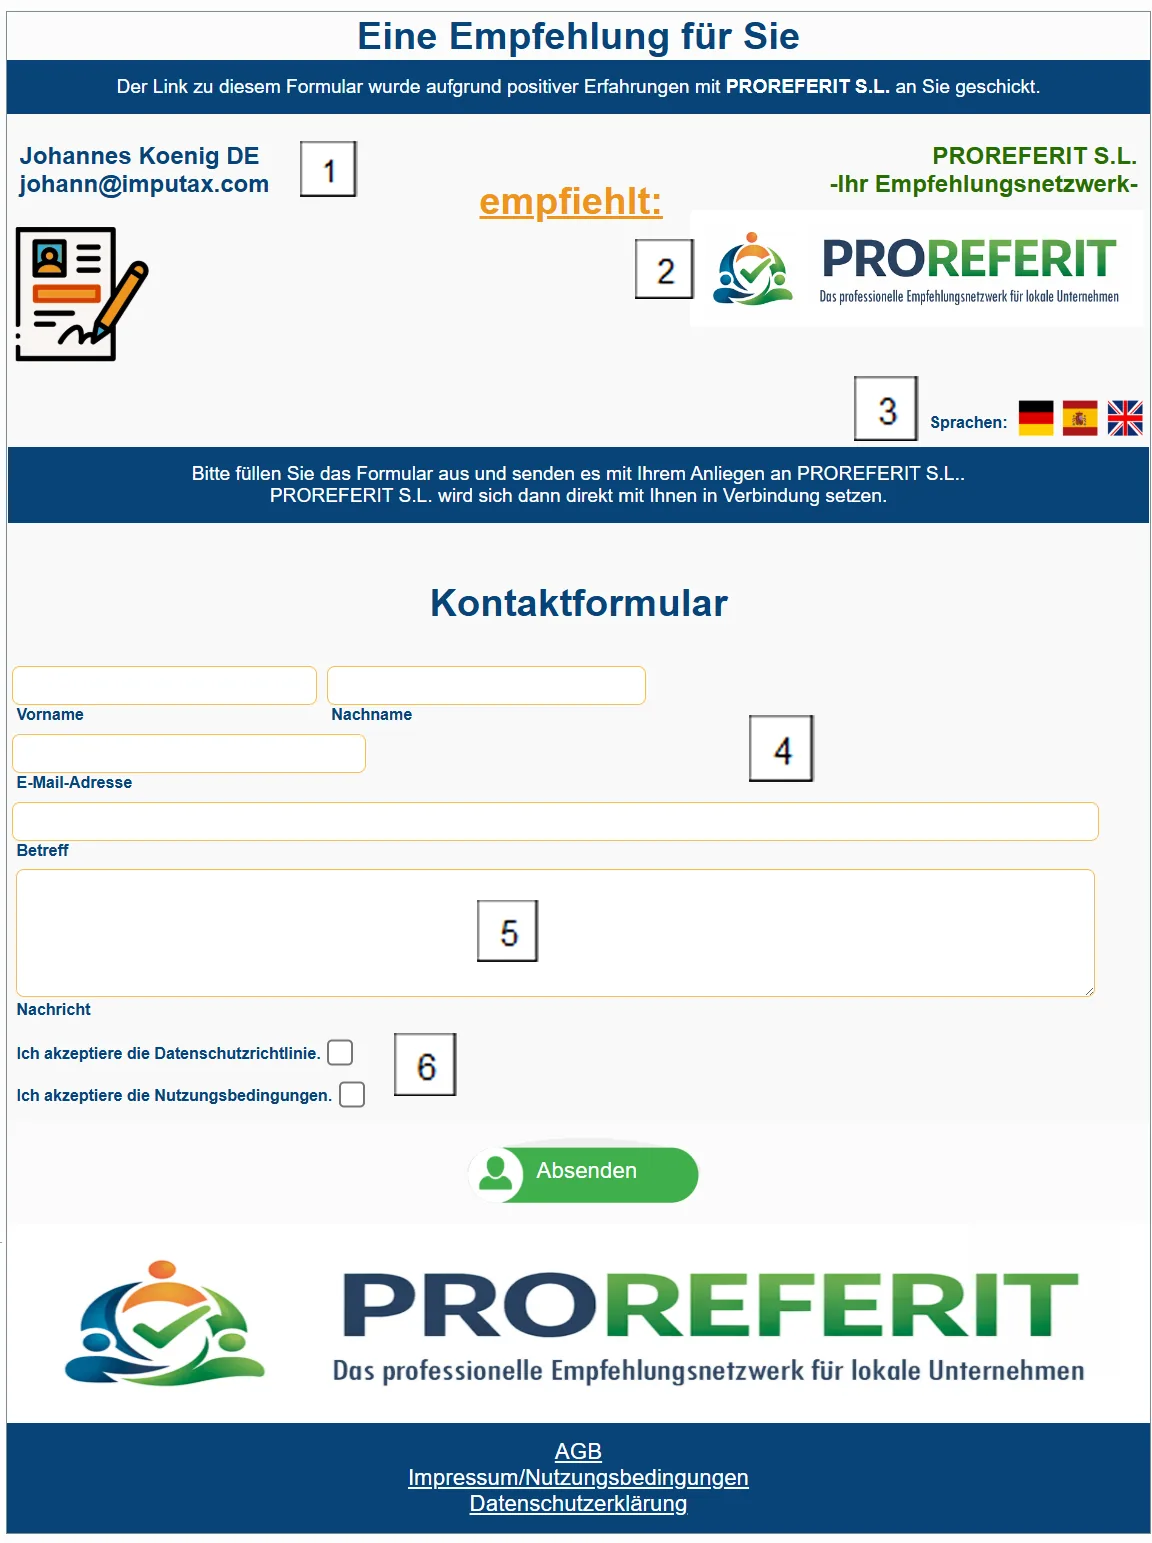
-
Recommending person
-
Recommended company. The data entered under PROREFER > My partner data is displayed.
-
The languages selected under PROREFER > My partner data > Customer contact > Languages for first contact are displayed.
-
Customer’s contact details
-
Customer’s enquiry text
-
The customer’s confirmation that they accept the privacy policy and the terms of use of PROREFERIT.
After the customer has clicked Send, they receive a confirmation of sending and the message lands directly in your inbox under ‘PROREFER > Inbox’ for further processing.
Maintaining customer groups#
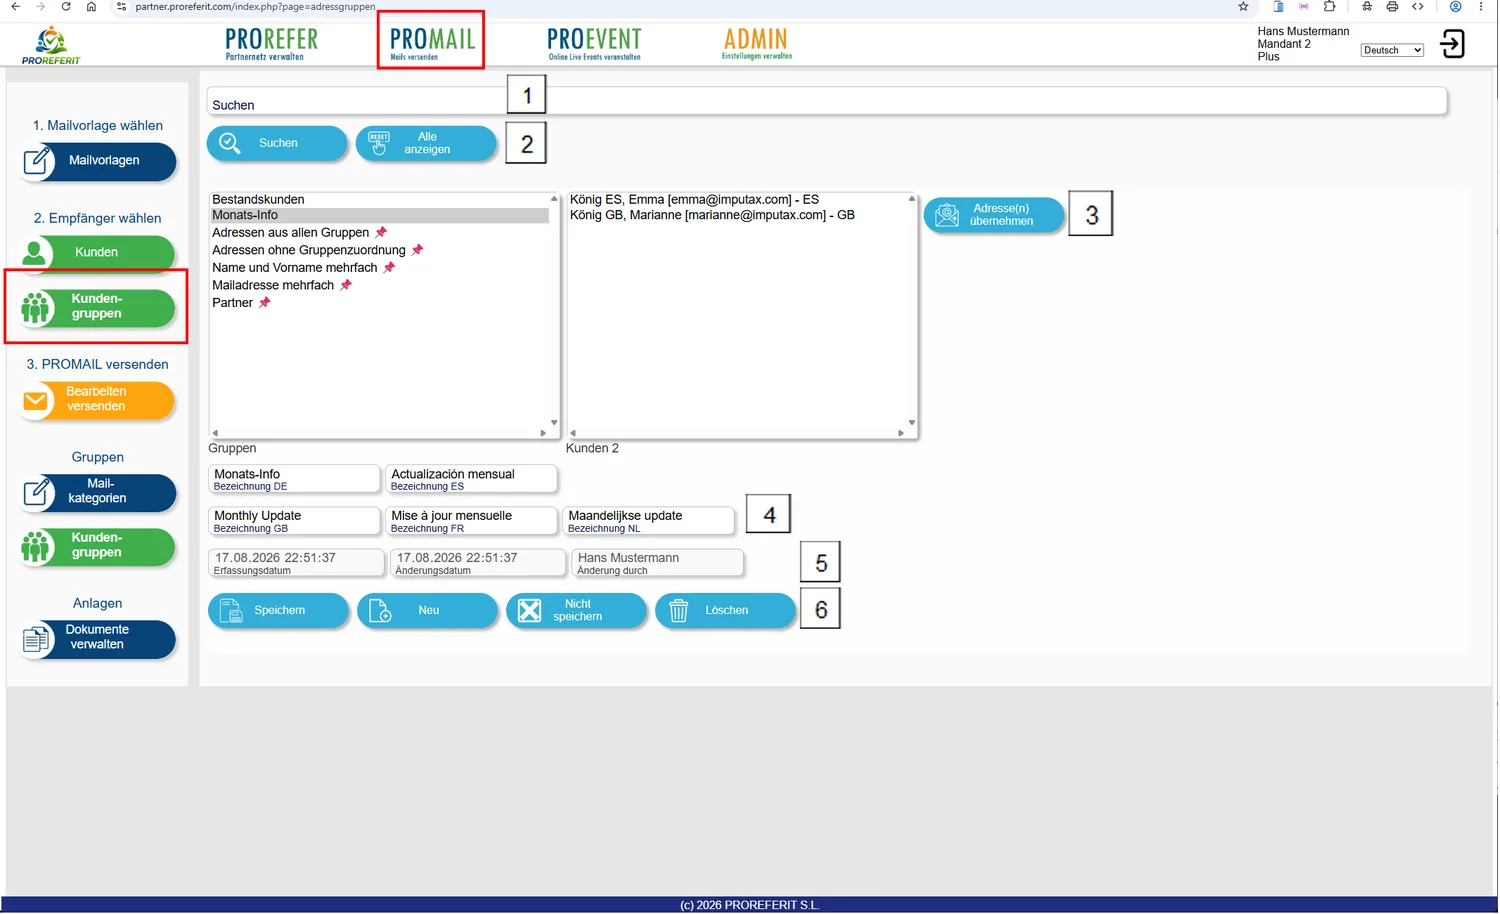
When the program section is opened for the first time, only the ‘supplied’ customer groups (recognisable by the 📌) are displayed.
It is advisable to create your own customer groups first, as described in the next chapter.
To do so,
click the button .
-
Search field to narrow down the displayed groups when there are many customer groups. If text is entered here and
-
 is clicked, only the
groups in which the entered text appears in one of the name fields are displayed.
To display all groups again, click.
The search field is then cleared. -
After selecting the customer group, the related records can be transferred to the email with
. After the
selection, the program goes either directly to , or, if no text block has been selected yet, to .It is also possible to select one or more customers with the mouse in the customer list box. Then not all, but only the selected customers are transferred.
To select several customers from the customer list box, click the first customer with the mouse and then, holding down the ‘Ctrl’ key, select further customers one by one.
To select larger contiguous ranges, for example for email campaigns, click the first customer with the mouse button and then, holding down the Shift key, click the last record you want. All records in between are then marked for transfer.
-
When making changes, please enter the names of the customer groups in the languages you want
-
Each time you save, the date and the person who saved are entered here automatically.
-
Menu bar:
The data
entered or changed are saved The entry screen is
opened to create new groups Changes are
discarded. The customer group is
deleted.
You will first be asked whether you really want this.
Creating customer groups#
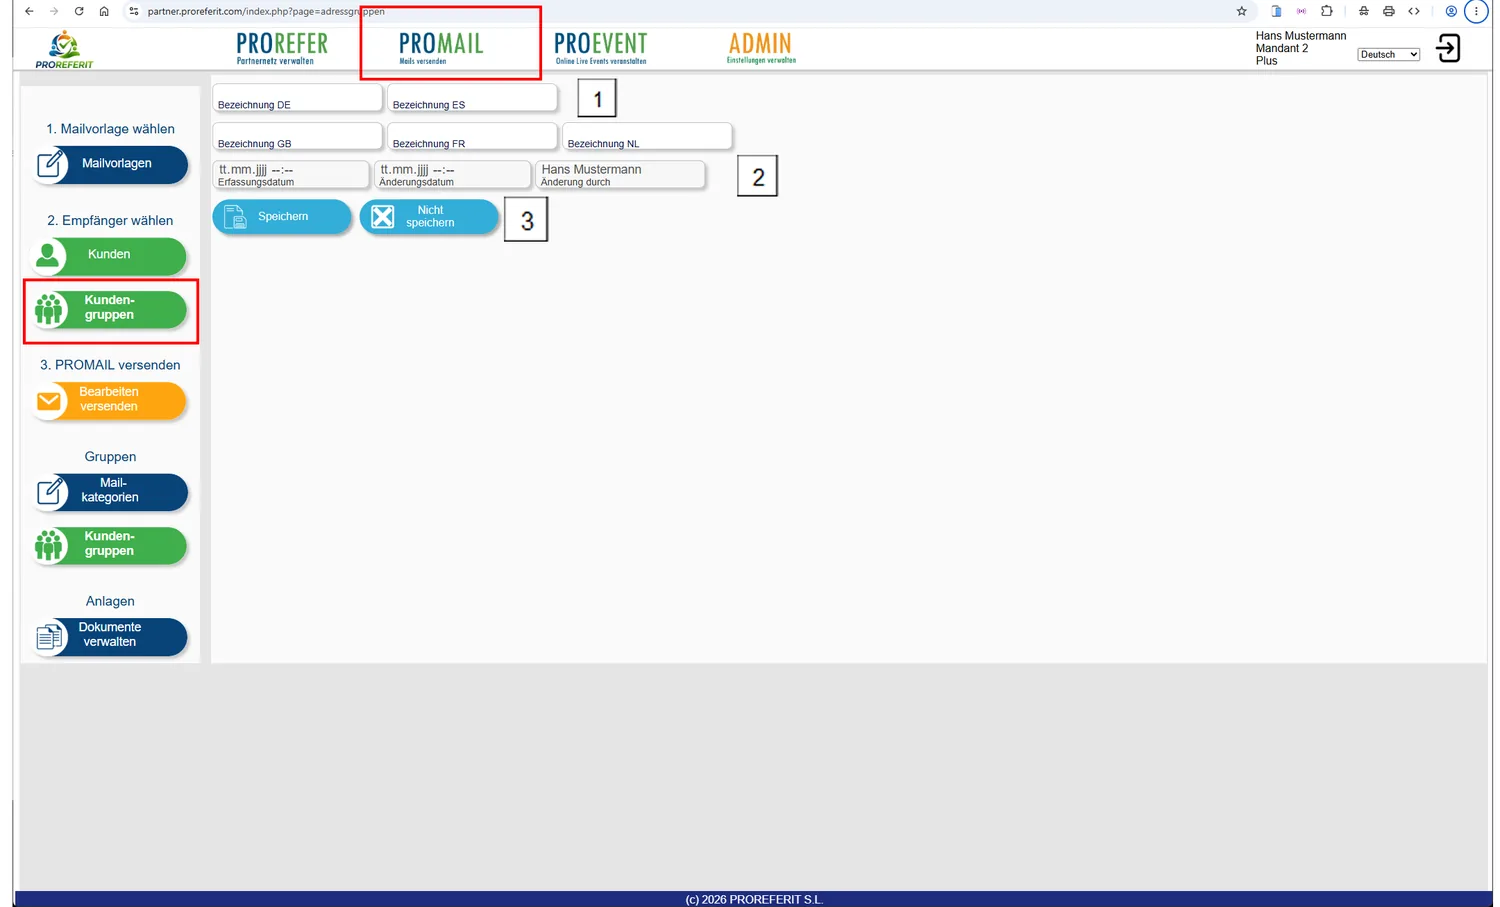
-
Please enter the names of the customer groups in the languages you want
-
Each time you save, the date and the person who saved are entered here automatically.
-
Menu bar:
The data
entered or changed are saved Changes are
discarded.
Editing and sending emails with automatic adaptation to the customer’s language#
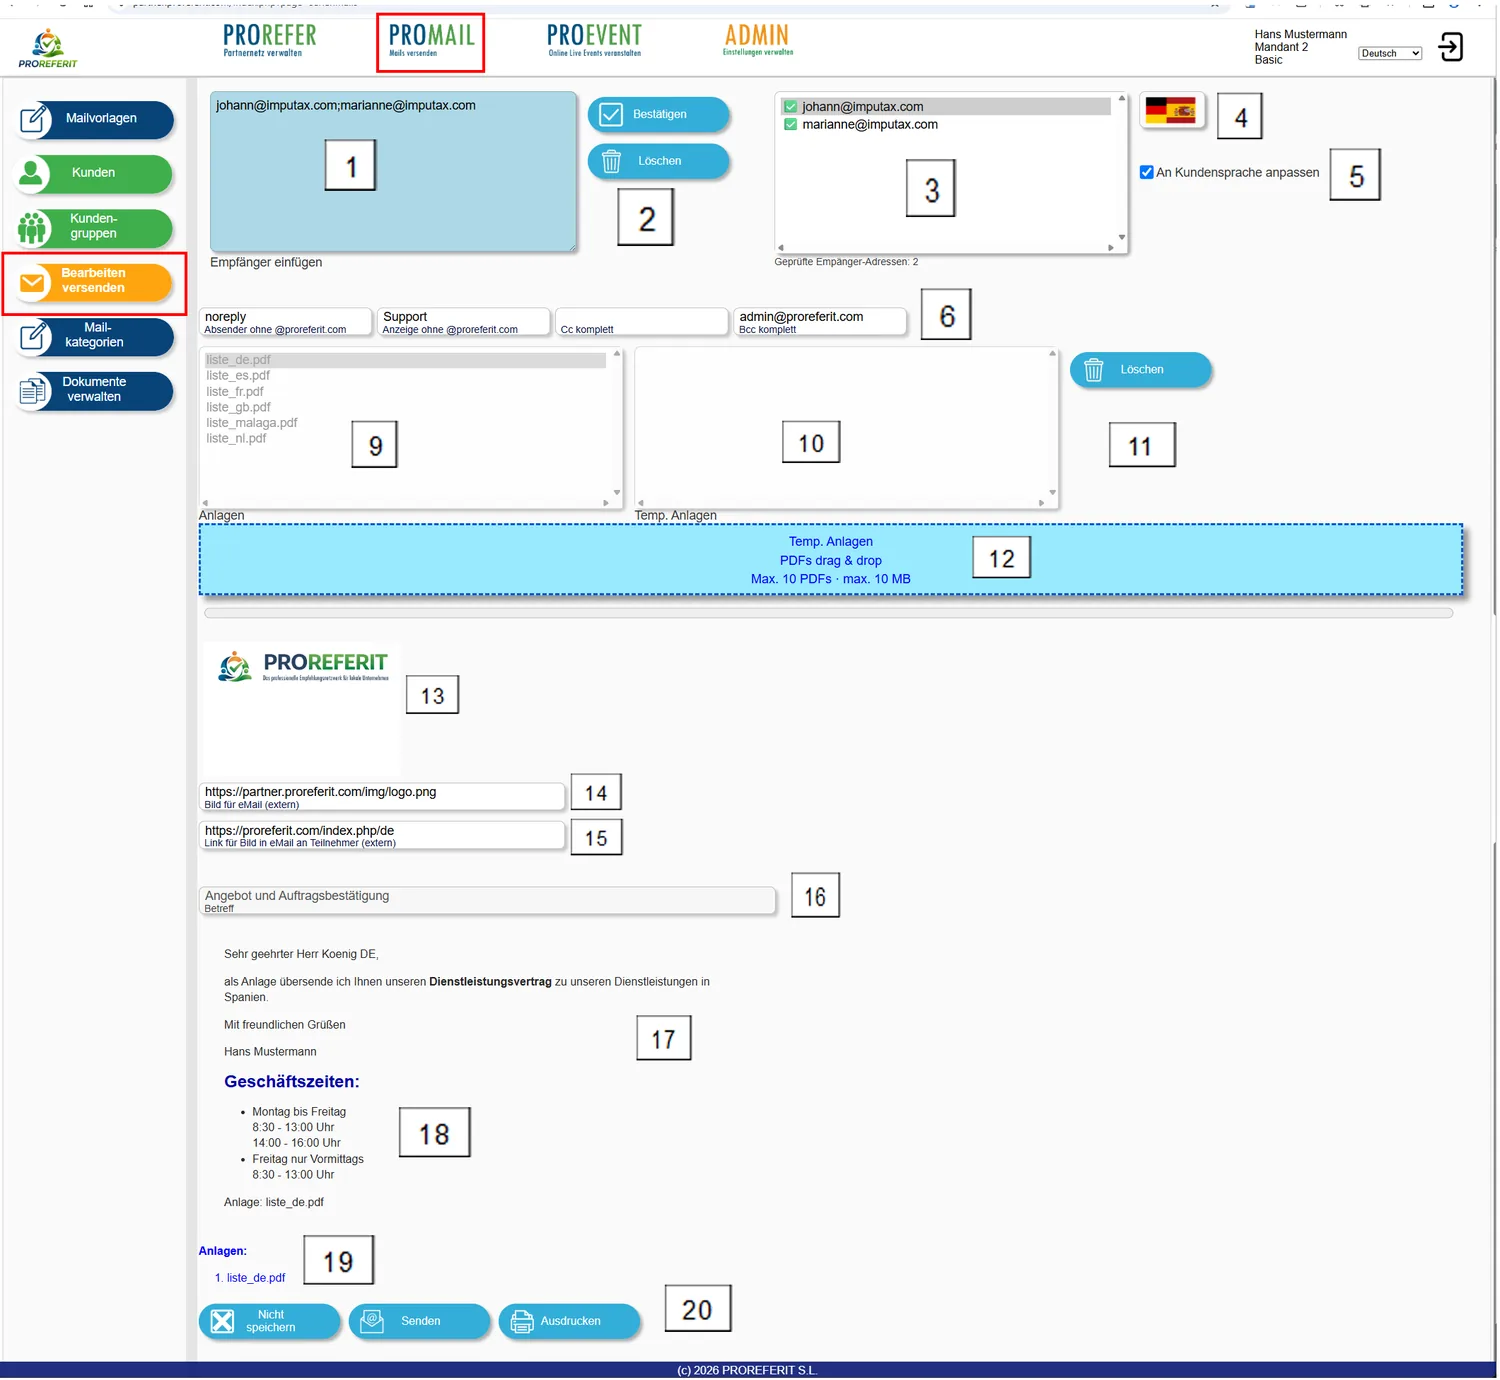
-
Email addresses can be typed in here or pasted in from other programs by copy and paste, or they are transferred from
or
 .
If the same email addresses are entered here more than once, then after clicking the
-
button
, they are
transferred to the list box 3 only once. The addresses are
checked for valid spelling and sorted in ascending order. Invalid addresses are not transferred.If all addresses in the recipient field 1 are to be deleted, you can do so using the
button.
Individual email addresses can be deleted either from the text field 1 by selecting and removing them, or by double-clicking the address with the left mouse button in the list box 3. -
All email addresses that have been transferred are displayed here.
You can tell whether an email address is already saved in the customer data by the ✅ before the address.
If a ❌ is shown before it, the email address is not yet saved in the customer file.
-
If an email address in the list box 3 has been selected, the placeholders contained in the email template text (recognisable by
{{placeholder}}) are automatically combined with the stored customer data and other information. The result can be seen in the areas 17 to 19.If you now click the flag symbol 4, the content is copied to the clipboard and can be pasted into other programs (email, text …) (copy and paste).
If you want to paste the text into MS Word, note that the key combination ‘Ctrl + V’ does not retain any formatting.
To paste the formatting too, move the mouse to the place where the text is to be inserted, press the left mouse button and then the right mouse button. Various paste options are then offered, including the option to keep the formatting.
-
If the tick in the field 5 ‘Adapt to customer language’ is set, every time the selection of email addresses 3 changes, a check is made of which language the selected person prefers.
If there is a suitable text version in the corresponding national language and the email address is saved in the customer data, the text is converted into the national-language version.
In addition, a check is made for the new text of which attachments are to be added, and the attachment field 9 is adjusted accordingly.
If
- the email address is not saved,
- the email address is saved more than once, or
- no email template is saved in the customer’s language,
the text that was selected previously is used. -
When the email is sent, various items of information are sent along, which can be entered here. The field ‘Sender’ determines which sender is displayed to the email recipient. If the recipient clicks ‘Reply’ in their email program, this is the email address to which the reply is sent. Only the part of your email address before the @ sign is to be entered here.
It is therefore important that you have the corresponding means of receiving mail for the address entered.
The field ‘Display’ contains the text that the email recipient sees as the sender in their email program. Only the part of your email address before the @ sign is to be entered here.
If you want a copy of the emails sent to be sent to another mailbox as Cc, you can enter that mailbox here in the field ‘Cc complete’. The email recipient then sees an indication of who else the email was sent to. The complete email address must be entered here and this email address must exist.
If you want a copy of the emails sent to be sent to another mailbox as Bcc, you can enter that mailbox here in the field ‘Bcc complete’. The email recipient then sees no indication of who else the email was sent to. The complete email address must be entered here and this email address must exist.
-
List box displaying the attachments that will be sent with the selected email template. For each email text, a check is made as to whether it contains a passage that matches the file name of a file uploaded via the menu item PROMAIL >
 .
If matches are found, the files are selected as attachments automatically.
-
List box with temporary attachments that are to be sent as attachments only in this case. The file name does not matter here. The list box is filled by uploading the attachments you want as PDF files 12
-
All temporary attachments are deleted after a confirmation prompt.
The temporary attachments are also deleted if the group of recipients 3 changes. This is intended to avoid attachments being sent by mistake to recipients for whom they were not meant.
-
Temporary documents are uploaded by dragging them from the file explorer onto the blue field ‘PDFs drag & drop’. Alternatively, you can click the blue field, which opens a file selection dialogue.
Several documents can be selected and uploaded at the same time.
-
An image can be sent with every email; it is displayed here.
-
Which image is sent along is specified here. To do so, enter a valid internet address where the image can be found.
For example, the link to your company logo. If no link or an incorrect link is entered, no image is displayed and none is sent. -
If a valid link for the image is sent along, you can specify here which web page (for example, your company website) the email recipient is taken to when they click the image in the email.
-
Display of the subject text taken from the email template. This subject cannot be changed as long as the tick 5 for adapting to the customer’s language is set.
-
The version with the placeholder information merged in is displayed.
-
In addition to the placeholders supplied, you can create your own placeholder texts. In this case, for example, business hours can be entered in the languages you want under PROMAIL > Email templates. The name of the placeholder in the short text is then, for example, ‘
{{Horario comercial}}’ for the Spanish version and{{Geschäftszeiten}}for the German version.This placeholder can then be used anywhere in your other text templates. When the email is sent, it is replaced by the corresponding texts.
This has the advantage that you only need to maintain standard information in one place and can then use it in all other documents.
-
The documents 9 and 10 that are attached are displayed once more here.
-
Menu bar:
The
sending process is cancelled. The selected text is
sent with the attachments to the recipient list. The currently displayed
text can be printed. A print dialogue opens in which you can select the printer you want.
Editing and sending emails without automatic adaptation to the customer’s language#
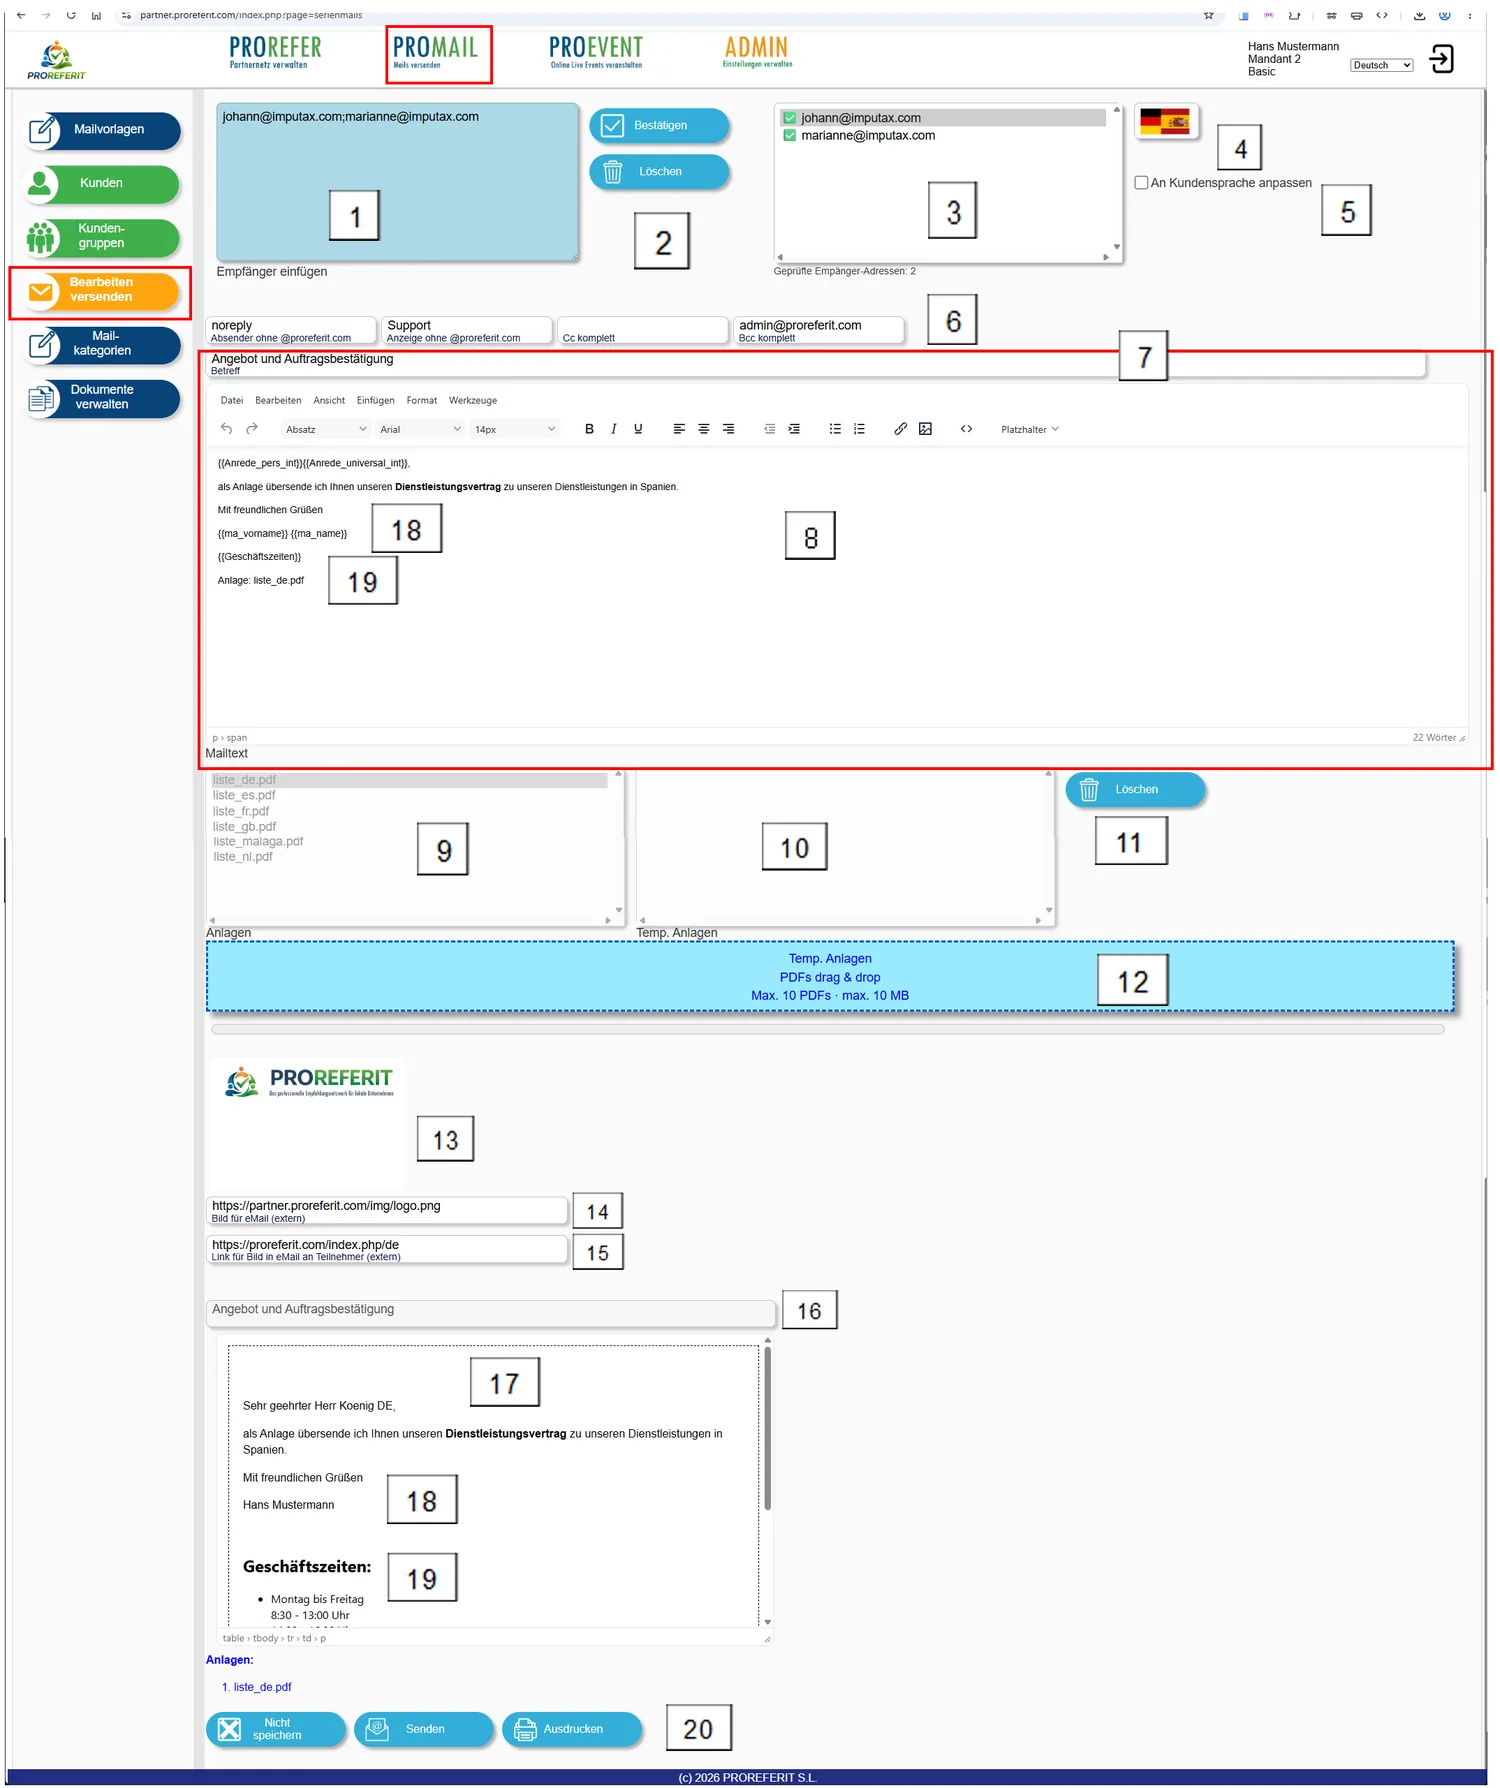
-
Email addresses can be typed in here or pasted in from other programs by copy and paste, or they are transferred from
or
.If the same email addresses are entered here more than once, then after clicking the
-
button
, they are
transferred to the list box 3 only once. The addresses are
checked for valid spelling and sorted in ascending order. Invalid addresses are not transferred.If all addresses in the recipient field 1 are to be deleted, you can do so using the
button.
Individual email addresses can be deleted either from the text field 1 by selecting and removing them, or by double-clicking the address with the left mouse button in the list box 3. -
All email addresses that have been transferred are displayed here.
You can tell whether an email address is already saved in the customer data by the ✅ before the address.
If a ❌ is shown before it, the email address is not yet saved in the customer file.
-
If an email address in the list box 3 has been selected, the placeholders contained in the email template text (recognisable by
{{placeholder}}) are automatically combined with the stored customer data and other information. The result can be seen in the areas 17 to 19.If you now click the flag symbol 4, the content is copied to the clipboard and can be pasted into other programs (email, text …) (copy and paste).
If you want to paste the text into MS Word, note that the key combination ‘Ctrl + V’ does not retain any formatting.
To paste the formatting too, move the mouse to the place where the text is to be inserted, press the left mouse button and then the right mouse button. Various paste options are then offered, including the option to keep the formatting.
-
If the tick in the field 5 ‘Adapt to customer language’ is not set, no address-dependent automatic adaptation of the email text is made.
The text is always output in the language that was previously selected when choosing the email templates under
.
Instead, you can now adapt and format the subject text and the text itself individually 8.
-
When the email is sent, various items of information are sent along, which can be entered here. The field ‘Sender’ determines which sender is displayed to the email recipient. If the recipient clicks ‘Reply’ in their email program, this is the email address to which the reply is sent. Only the part of your email address before the @ sign is to be entered here.
It is therefore important that you have the corresponding means of receiving mail for the address entered.
The field ‘Display’ contains the text that the email recipient sees as the sender in their email program. Only the part of your email address before the @ sign is to be entered here.
If you want a copy of the emails sent to be sent to another mailbox as Cc, you can enter that mailbox here in the field ‘Cc complete’. The email recipient then sees an indication of who else the email was sent to. The complete email address must be entered here and this email address must exist.
If you want a copy of the emails sent to be sent to another mailbox as Bcc, you can enter that mailbox here in the field ‘Bcc complete’. The email recipient then sees no indication of who else the email was sent to. The complete email address must be entered here and this email address must exist.
-
The subject can be adapted individually for the respective email recipient.
-
The entire text can be edited individually for the respective email recipient. You can also insert standard placeholders or add your own placeholders such as
{{Horario comercial}}to the text.As soon as you leave the email text field (by clicking another area with the mouse), the output 17 to 19 is updated.
-
List box displaying the attachments that will be sent with the selected email template. For each email text, a check is made as to whether it contains a passage that matches the file name of a file uploaded via the menu item PROMAIL >
.If matches are found, the files are selected as attachments automatically.
-
List box with temporary attachments that are to be sent as attachments only in this case. The file name does not matter here. The list box is filled by uploading the attachments you want as PDF files 12
-
All temporary attachments are deleted after a confirmation prompt.
The temporary attachments are also deleted if the group of recipients 3 changes. This is intended to avoid attachments being sent by mistake to recipients for whom they were not meant.
-
Temporary documents are uploaded by dragging them from the file explorer onto the blue field ‘PDFs drag & drop’. Alternatively, you can click the blue field, which opens a file selection dialogue.
Several documents can be selected and uploaded at the same time.
-
An image can be sent with every email; it is displayed here.
-
Which image is sent along is specified here. To do so, enter a valid internet address where the image can be found.
For example, the link to your company logo. If no link or an incorrect link is entered, no image is displayed and none is sent. -
If a valid link for the image is sent along, you can specify here which web page (for example, your company website) the email recipient is taken to when they click the image in the email.
-
Display of the subject text taken from the email template. This subject cannot be changed as long as the tick 5 for adapting to the customer’s language is set.
-
The version with the placeholder information merged in is displayed.
-
In addition to the placeholders supplied, you can create your own placeholder texts. In this case, for example, business hours can be entered in the languages you want under PROMAIL > Email templates. The name of the placeholder in the short text is then, for example, ‘
{{Horario comercial}}’ for the Spanish version and{{Geschäftszeiten}}for the German version.This makes clear how the placeholders are applied.
This placeholder can then be used anywhere in your other text templates. When the email is sent, it is replaced by the corresponding texts.
This has the advantage that you only need to maintain standard information in one place and can then use it in all other documents.
-
The documents 9 and 10 that are attached are displayed once more here.
-
Menu bar:
The
sending process is cancelled. The selected text is
sent with the attachments to the recipient list. The currently displayed
text can be printed. A print dialogue opens in which you can select the printer you want.
Maintaining email categories#
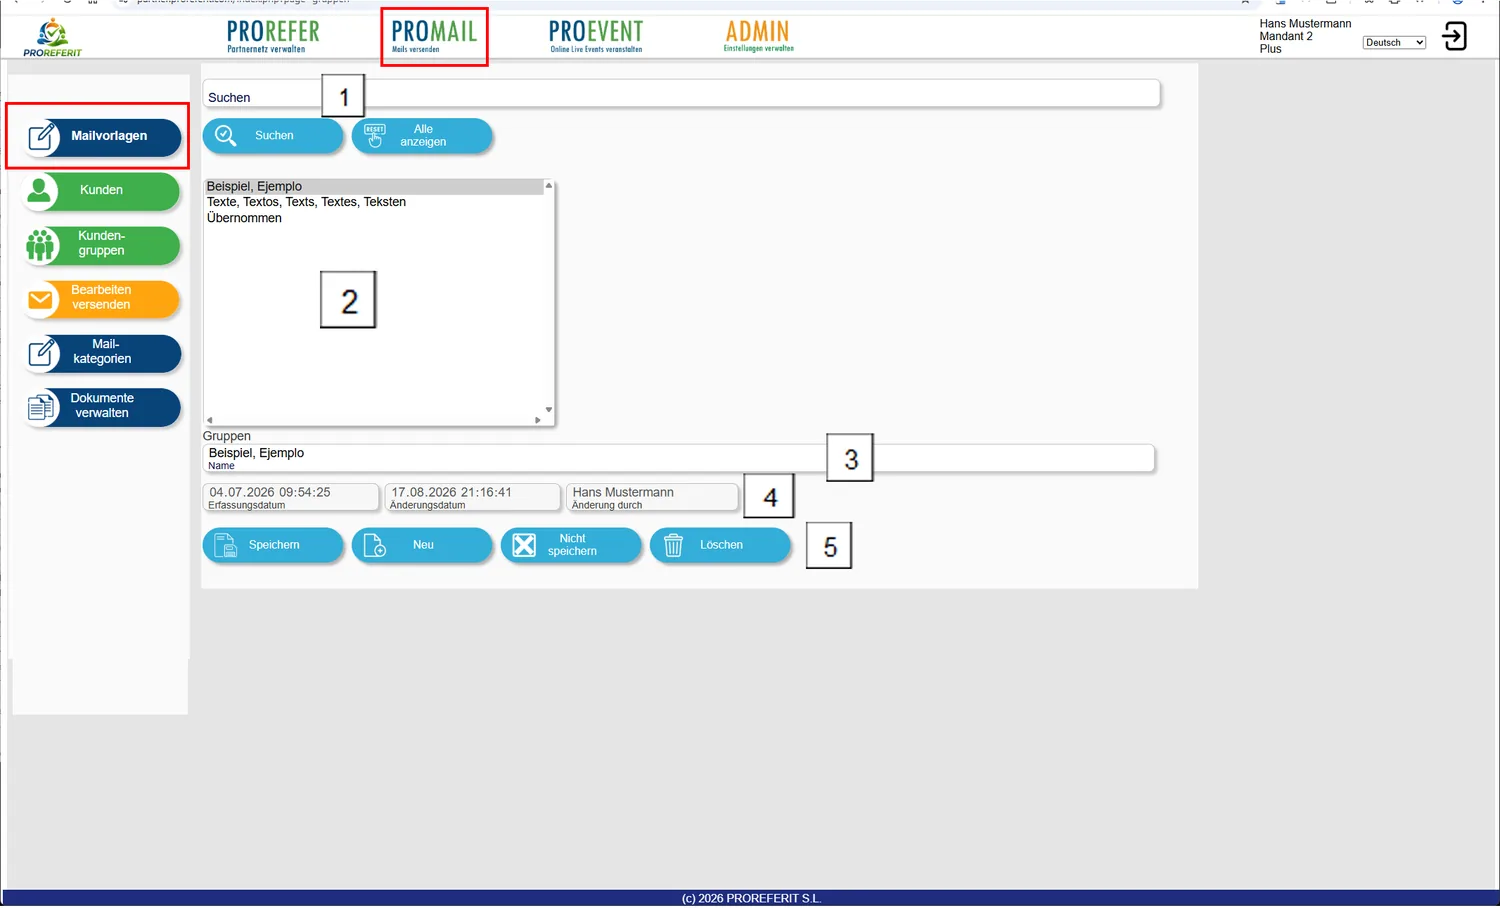
It is advisable to create your own email categories first, as described in the next chapter.
To do so,
click the button .
-
Search field to narrow down the displayed categories when there are many email categories. If text is entered here and
is clicked, only the
categories in which the entered text appears in the Name field are displayed.
To display all categories again, click. The search field is then cleared. -
After selecting the category, you can work with the selected record. Only one category can be selected with the mouse at a time.
-
Please enter the name of the category in all the languages you want in the Name field. For example: ‘Texte, Textos, Texts, Textes, Teksten’
-
Each time you save, the date and the person who saved are entered here automatically.
-
Menu bar:
The data
entered or changed are saved The entry screen is
opened to create new categories Changes are
discarded. The category is
deleted.
You will first be asked whether you really want this.
Creating email categories#
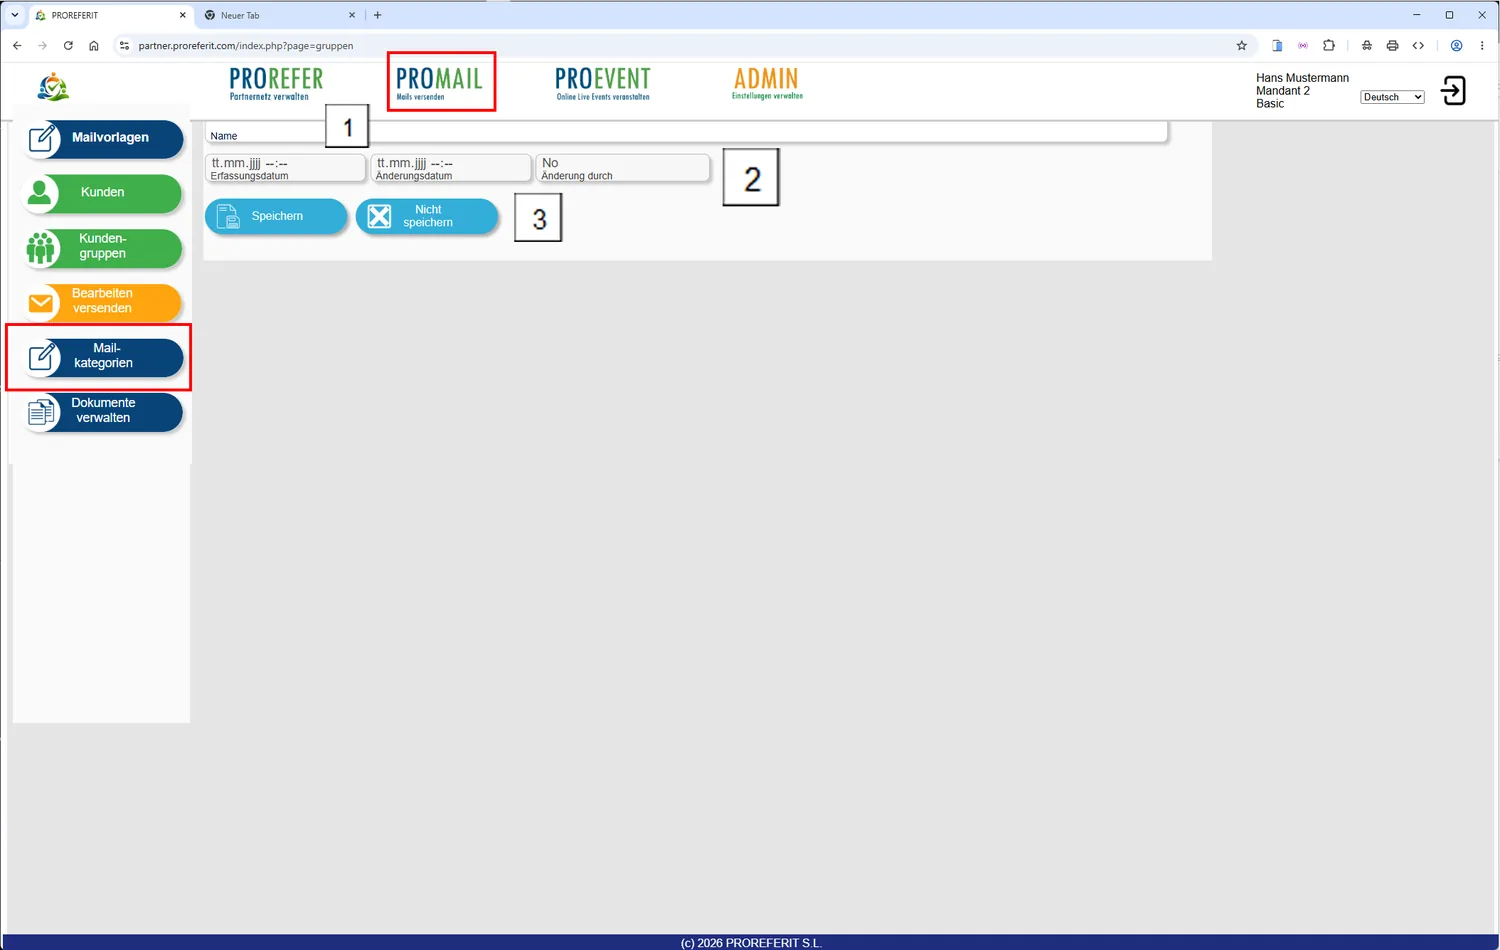
After opening PROMAIL > Email categories, click the button
on the page. The screen shown
above then appears.
-
Please enter the name of the category in all the languages you want in the Name field. For example: ‘Texte, Textos, Texts, Textes, Teksten’
-
Each time you save, the date and the person who saved are entered here automatically.
-
Menu bar:
The data
entered are saved Changes are
discarded and the entry is cancelled.
Managing documents#
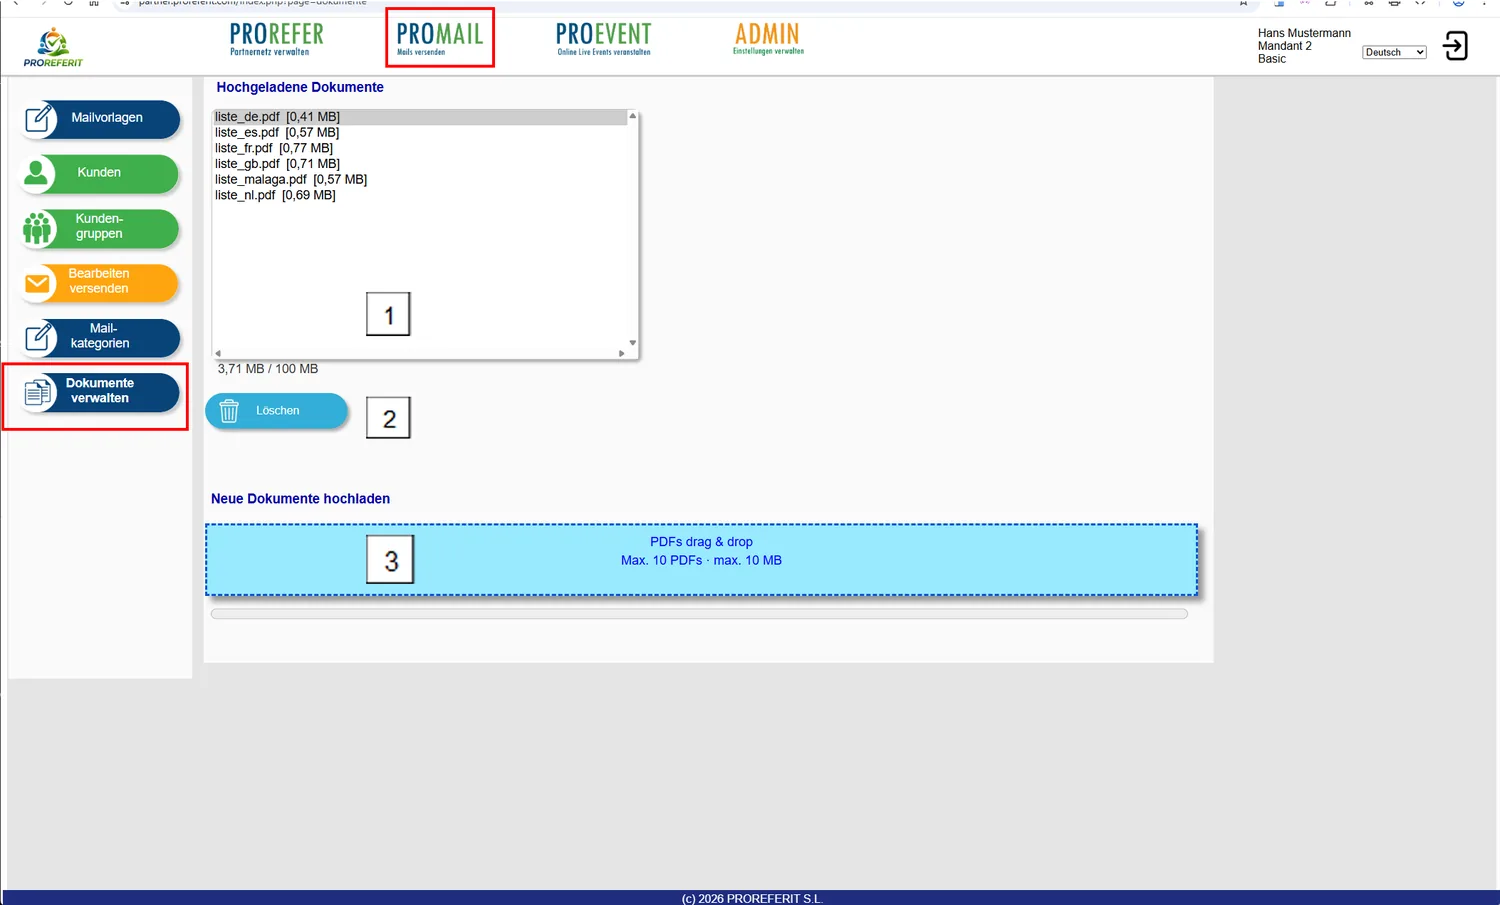
With this menu item you can upload documents in PDF format, which are then automatically added as attachments to the respective emails later, when emails are edited and sent, if the email contains the name of the uploaded document.
In the first step, find the PDF documents that you want to upload and later send as attachments.
Give the documents a meaningful name so that the recipient can easily tell what the email attachment is.
If you want to send PDF documents in different languages, it can be sensible to give the documents largely identical names and add the country suffix at the end, as in the example above: ‘list_en.pdf’ for an English-language attachment or ‘list_es.pdf’ for a list with the same content in Spanish …
The assignment to documents is simple: just insert the name of the attachment anywhere in the respective document (email template).
Example:
Dear Mr Smith,
please find attached an overview of current activities (list_en.pdf) for your further use.
Kind regards
….
If the document ‘list_en.pdf’ has been uploaded and not deleted, it is attached automatically to the email created later. It does not matter where in the text the document name appears. All that matters is that the spelling matches exactly. Upper and lower case must also be observed. Any number of documents can be referred to in order to attach them.
-
List of the uploaded documents. The names match the file names. The size (storage used) of the document in MB is shown after each name.
-
If a document is no longer needed, it can be selected and deleted.
If there is a new version of the document, you can delete the old document here and then upload the new document again under the same name.
-
New documents are uploaded by dragging them from the file explorer onto the blue field ‘PDFs drag & drop’. Alternatively, you can click the blue field, which opens a file selection dialogue.
Several documents can be selected and uploaded at the same time.
PROEVENT#
Purpose#
PROEVENT is used to plan, set up and present online events on the internet. The registration process for participants is largely automated.
You can concentrate on your customer contacts and are relieved of tiresome administrative work.
-
Present your services in group conversations
-
Win new customers without leaving your office
-
Use digital events as an additional sales channel
Recommended steps#
Setting up and managing events#
The quickest way to set up a new event of your own is to copy an existing event (for example, a sample event, recognisable by the 📌) and then make the appropriate changes.
-
Select PROEVENT >
 >
-
Select the copied event in the list box
-
Adapt the data
At a minimum, enter the date on which the new event is to take place and the period during which it is to be displayed on the internet. -
Save the new event
Managing events#
In some input fields (header line, description, target group, privacy notices), formatting can be entered in addition to the actual text. This formatting should be used sparingly so that the overall appearance of the later display on the internet is not spoiled.
Detailed description of the Events page#
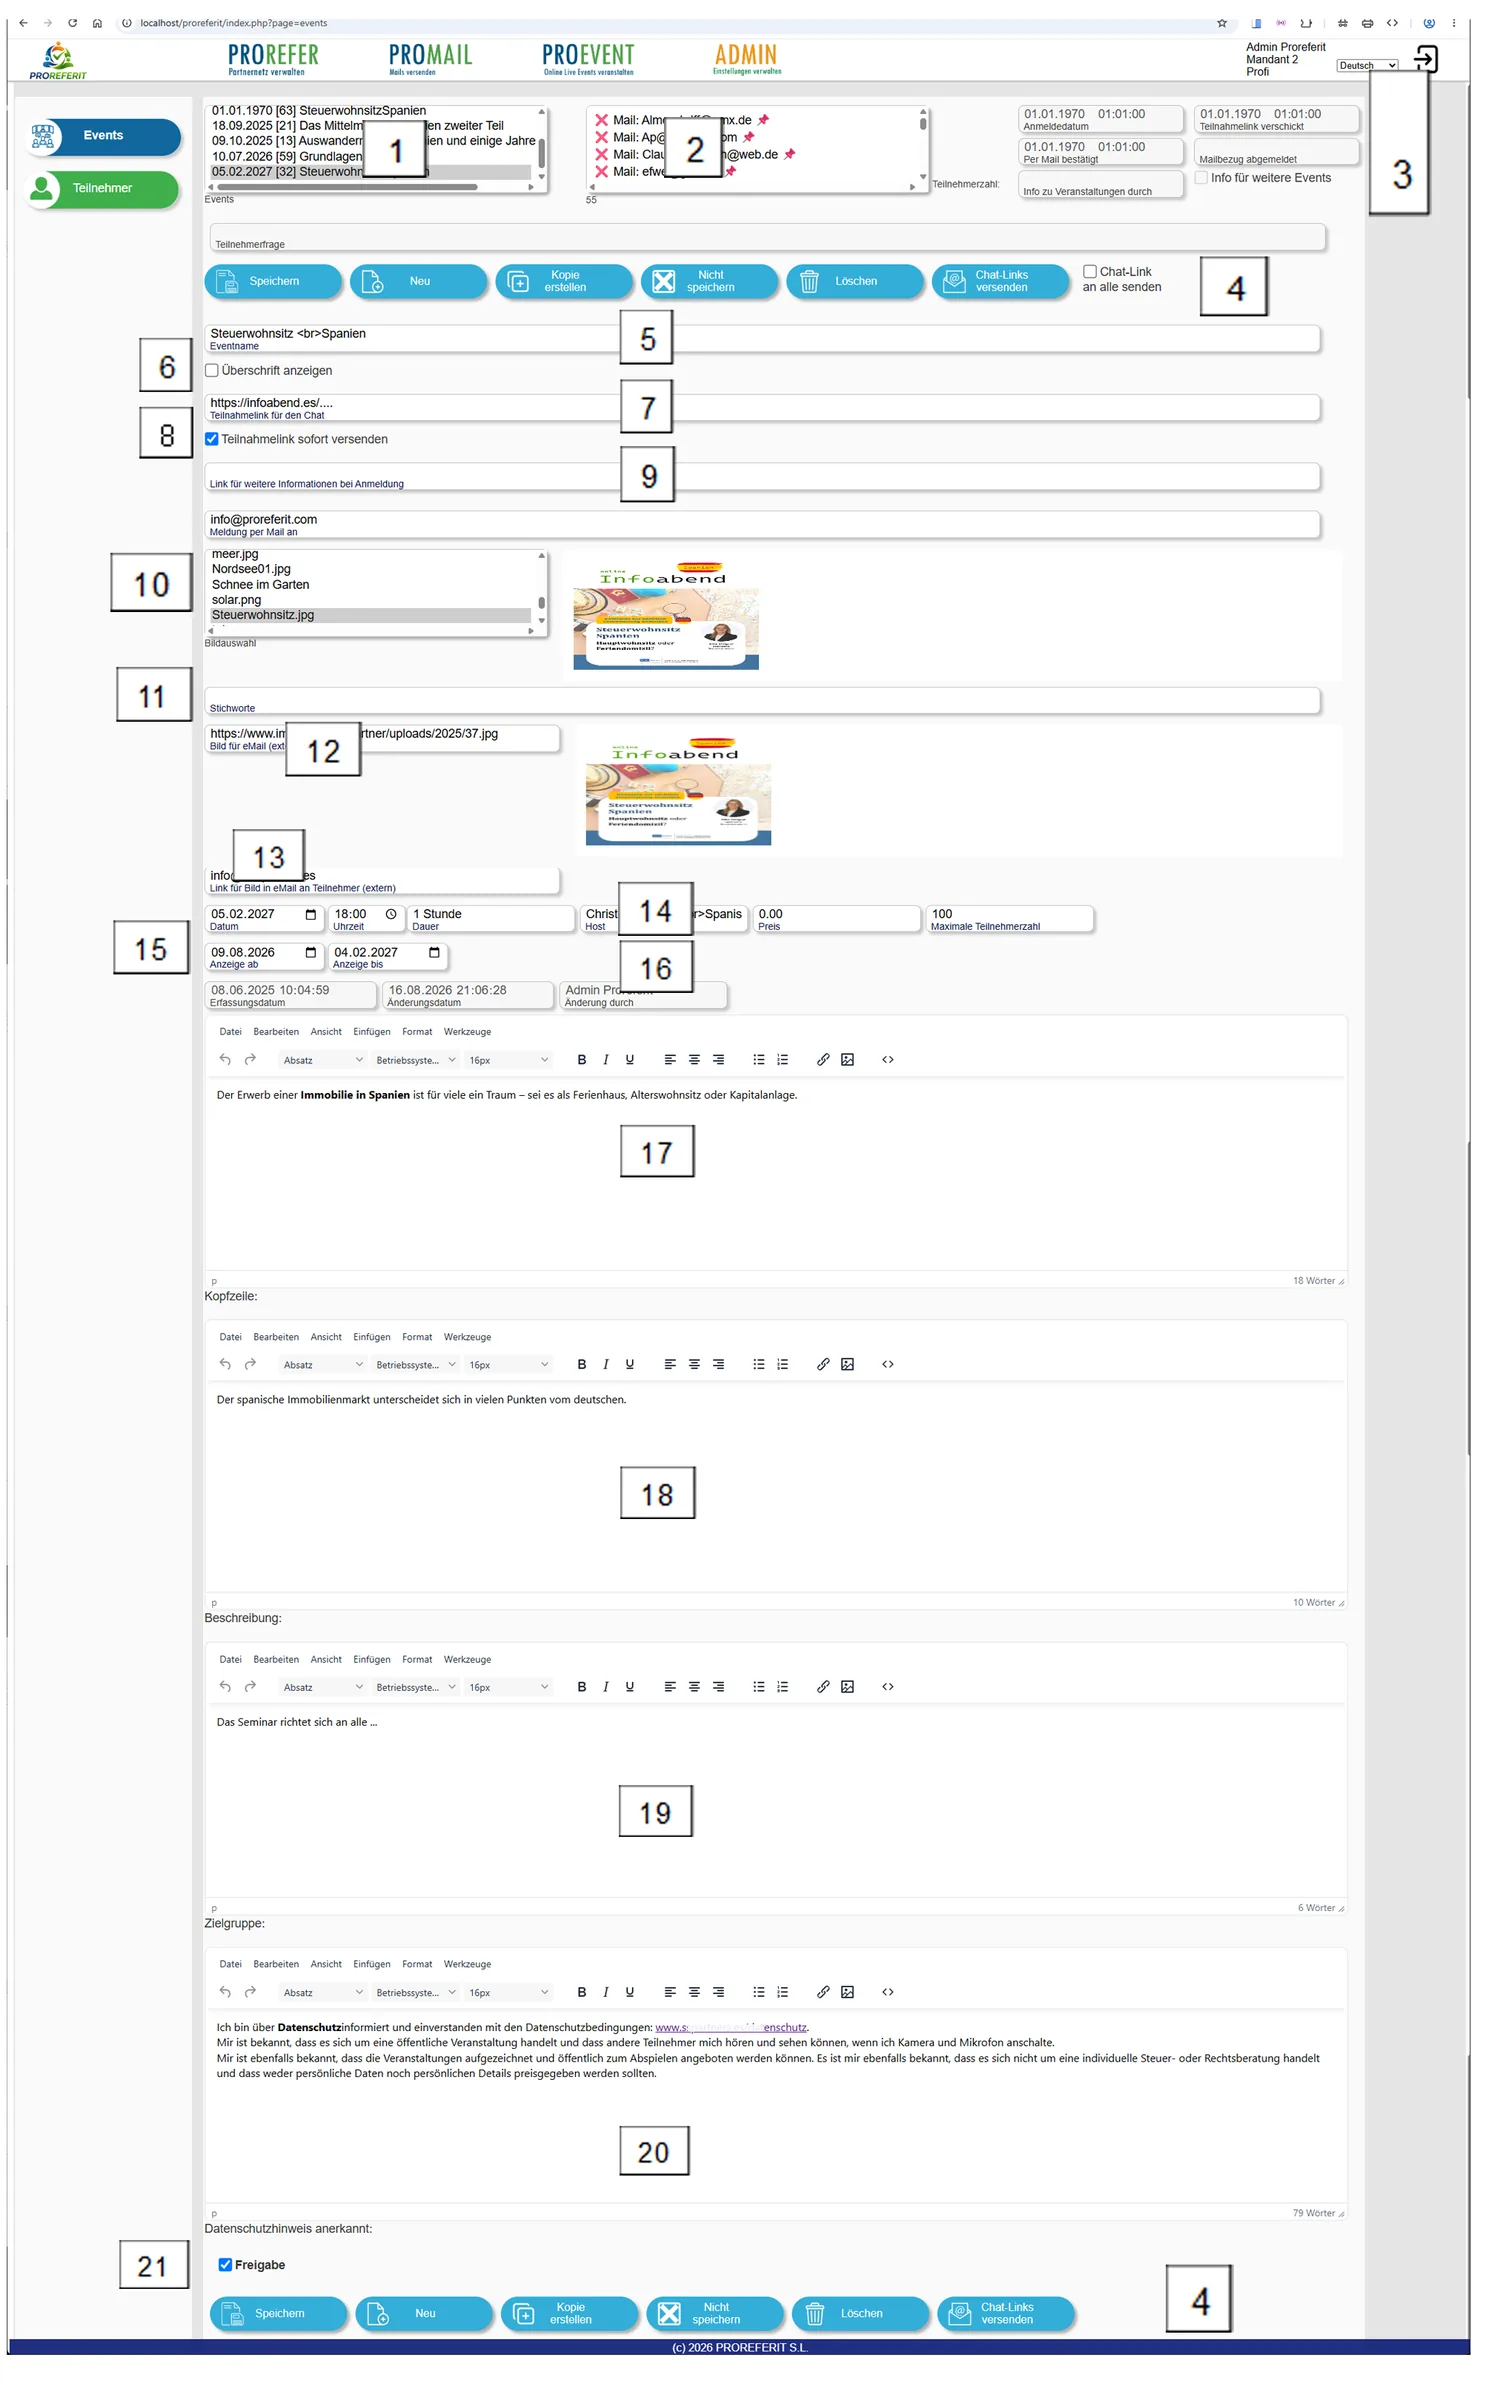
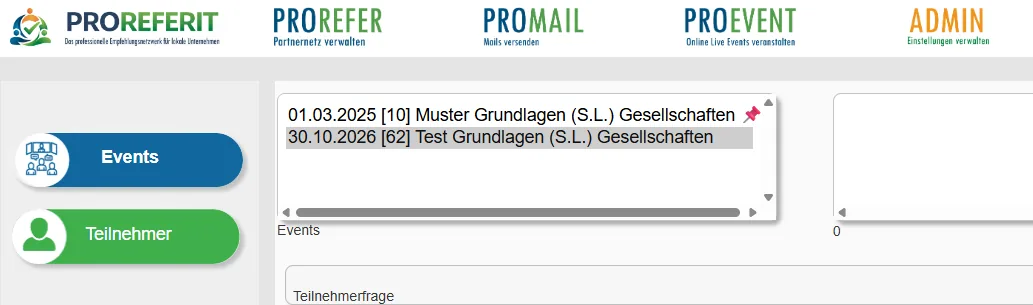
-
List of events
-
List of registered participants. Double-clicking with the left mouse button deletes the selected participant from the list.
-
Information on the participants
-
Menu bar
Save
changes to the current event Create a new ‘empty’
event Duplicate the
selected event. The event moves to the top of the list (1.). Data still has to be entered. Changes are
discarded. The event is deleted.
You will first be asked whether you really want to do this.
 The selected event
can be shown as a preview. Additional information (questions and email addresses of the participants) is
output if registrations exist.
 This button
only appears if the field ‘Participation link for chat’ is filled in. For all participants who have
confirmed their participation via the email link, the information about the chat link is sent to those who
do not yet have an entry in the field ‘Participation link sent’ (3). If the box ‘Send participation link to
all’ is ticked, everyone receives the email, possibly several times, for example as a reminder.
-
Name of the event. If the checkbox ‘Show heading’ is activated, the name of the event is output when the events are later displayed.
-
If the checkbox ‘Show heading’ is active, the event name 5 is output in the later display.
-
Participation link for the chat. If the link is to be sent immediately on registration, this field must be filled in and
-
‘Send participation link immediately’ must be activated if an email with the participation link is to be sent directly after a registration. If item 7 or 8 is missing, a notice is sent saying that the link will be sent by email in good time before the event. For this purpose, a bulk email can be sent shortly before the event using the item
. -
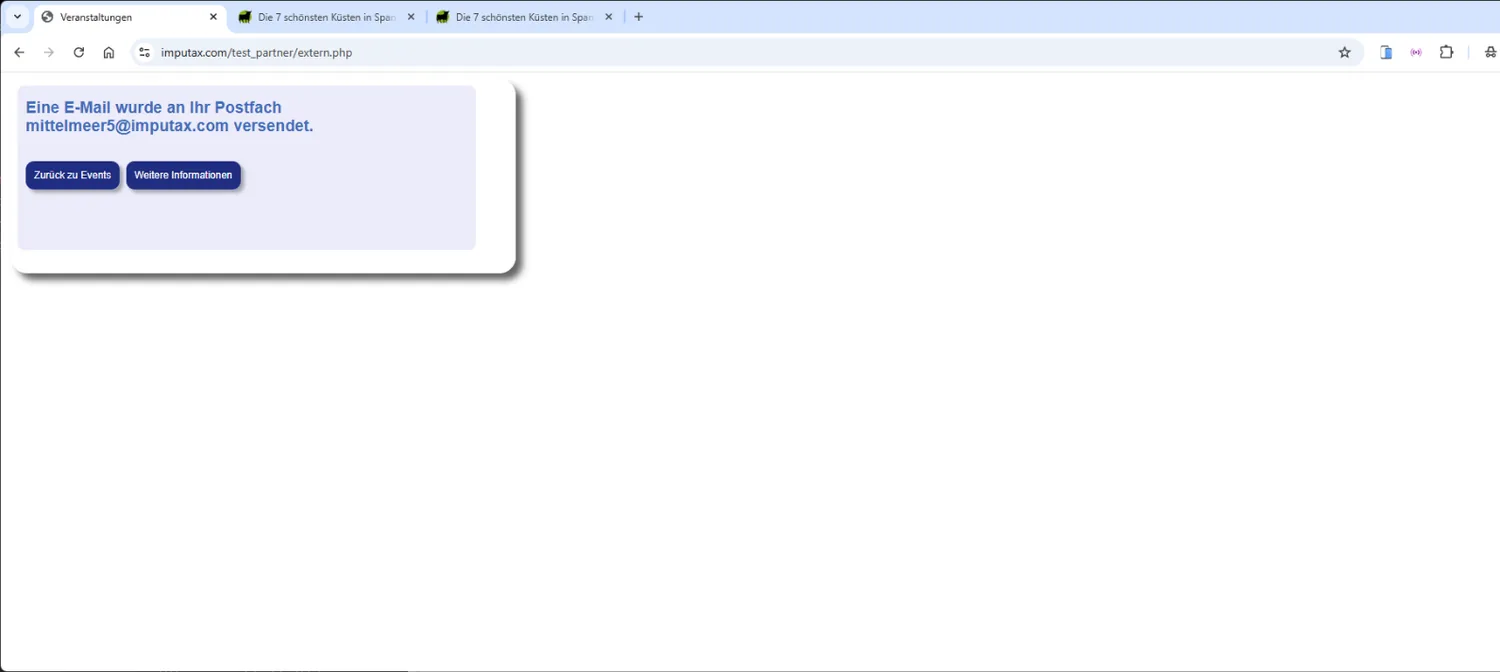 A URL is stored here that is to be made available
for further information on registration. If the field is empty, the button ‘More information’ is not
displayed.
-
The image to be displayed for the event is selected here. New images can be added via the menu item ADMIN > Manage image files.
-
Keywords are not yet used any further, but can be used for future search engine optimisation.
-
An image is attached to the emails, which must be reachable via an accessible link so that it can be displayed in the email.
-
If the email recipient clicks the image that was sent along, the link entered here (to your website) is opened, provided it exists.
-
Further information about the event is stored in this line.
-
Date of the event
-
Start time
-
Expected duration of the event
-
Host or moderator of the event
-
Price in €. If 0 is entered, ‘Attend for free’ is displayed. If an amount greater than 0 is entered, ‘Book participation’ is displayed.
Payment is not part of this program. -
The maximum number of participants, if limits are to apply. This value is currently not taken into account, but could be used in later versions to stop displaying the event once the maximum number of participants has been reached.
-
-
Information is stored here on when (Display from) and until when (Display until) the event is published. If the current date is later than the ‘Display until’ date, the event is no longer displayed.
-
Information is output here on when the event was first entered and when and by whom it was last changed. This information is set automatically and cannot be changed.
-
A short text is entered in the header line, which is displayed as a short teaser in the event display.
-
The description gives a more detailed account of the content of the event.
-
The field ‘Target group’ describes who the offer is aimed at.
-
Privacy notices and general terms of participation for the event are shown in the registration form at registration and must be confirmed by the participant.
-
If the field ‘Approval’ is ticked, the event is displayed for the intended period. If ‘Approval’ is not activated, it is not displayed.
Displaying events on your own website#
Examples of embedding:
Only events of one tenant (tenant 0) are displayed.
<iframe src="https://partner.proreferit.com/extern.php?page=showevents&mandant=0" width="100%" height="1500px"></iframe>Please insert your own tenant ID (shown at the top right of the screen) in place of ‘mandant=0’
All current events from all providers are displayed.
<iframe src="https://partner.proreferit.com/extern.php?page=showevents" width="100%" height="1500px"></iframe>or
<iframe src="https://partner.proreferit.com/extern.php?page=showevents&mandant=" width="100%" height="1500px"></iframe>Only one specific current event is displayed.
<iframe src="https://partner.proreferit.com/extern.php?page=showevents&event=0" width="100%" height="1500px"></iframe>Please insert the event ID you want (shown in the ‘Events’ list box) in place of ‘event=0’
Managing participants#
As part of the registration process for events, participants enter their own data and confirm their registration by email authentication.
 Via the menu item
PROEVENT >
all participants who have registered for your events so far are displayed.
Specific participants can
be found more easily if you enter part of the name in the search field and then click.
Only the participants whose name contains the search term are then displayed.
Detailed description of the Participants page#
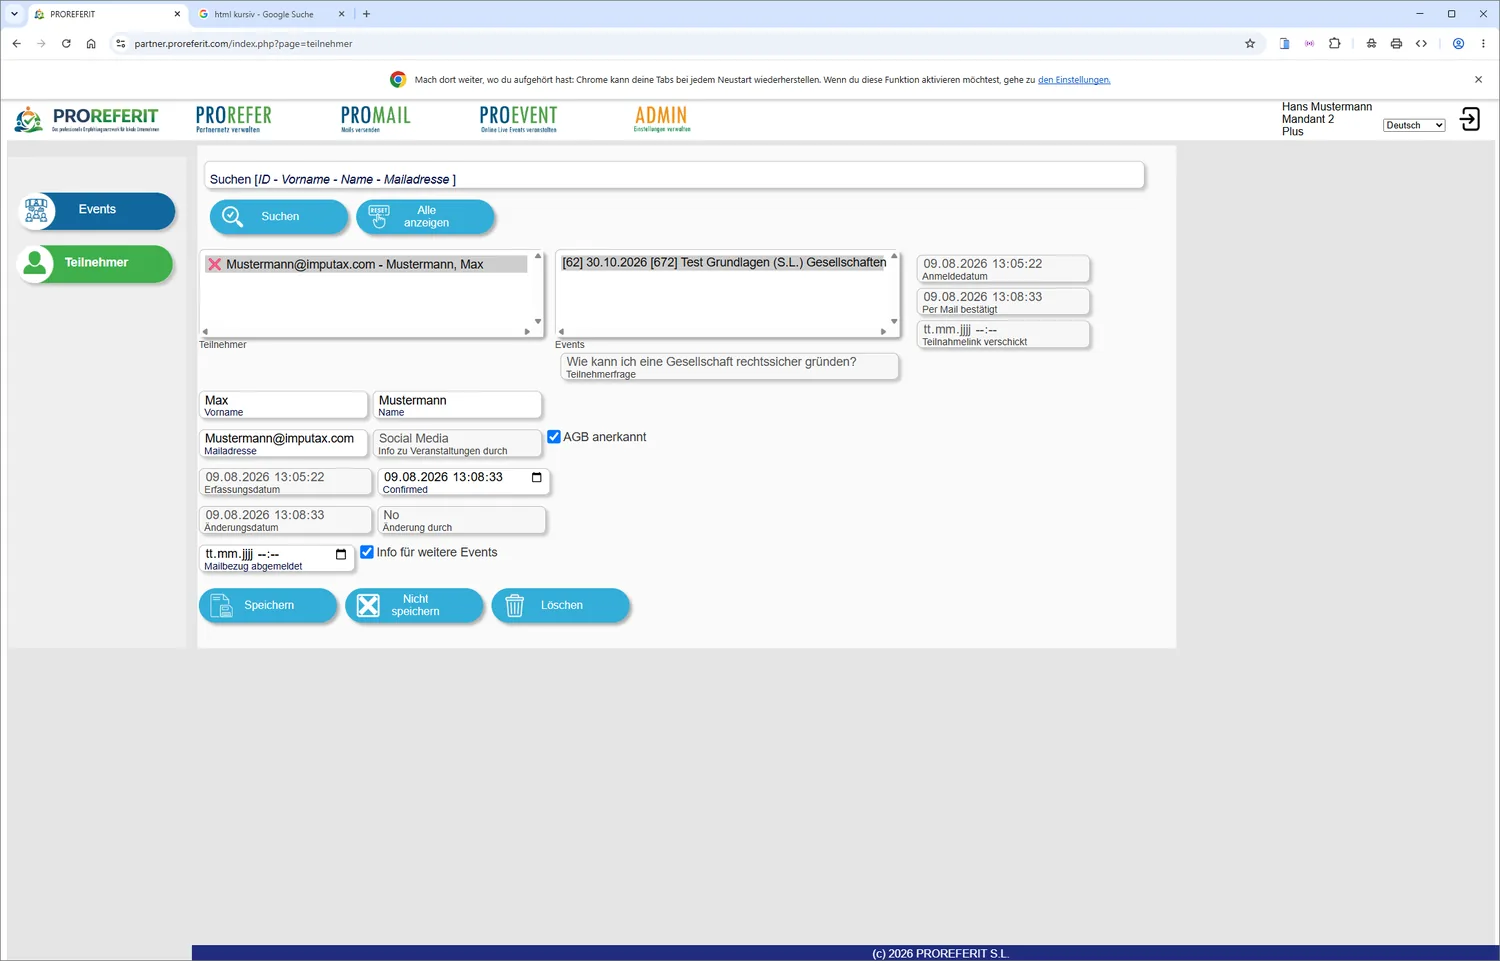 123456789
-
Search: Specific
participants can be found more easily if you enter part of the name in the search field and then click. Only
the participants whose name contains the search term are then displayed.
-
 To display all
participants again, simply click the button.
-
List of registered participants.
Before the participants’ email address there is either a
✅ = email address is already saved as a customer address, or a
❌ = email address is not yet saved as a customer address
This shows at a glance the ratio of new prospects to existing addresses.
-
After selecting a participant, all events for which a registration exists for this person are listed.
Information on the registration for the respective event. The data are entered automatically and cannot be
changed.
By double-clicking with the left mouse button, you can delete the selected event from the list
after a security prompt.
-
With the participant’s registration activities, the data for the respective event registration are updated automatically. They cannot be changed by you.
-
The personal details are entered by the participant when registering for the first event. They can then be changed by you later.
-
Registration by the participant on the internet is only possible if the general terms and conditions (T&Cs) are accepted.
If the participant later withdraws this acceptance towards you, you can remove the tick. The participant then receives no further information about the events. -
At registration, the participant can choose whether they want to receive information about further events. If this is withdrawn for the future, you can remove the tick and set the date in the field ‘Unsubscribed from mailings’.
-
Menu bar
Save
changes to the current participant Changes are
discarded. The participant is
deleted. You will first be asked whether you really want to delete.
ADMIN
ADMIN#
Change password#
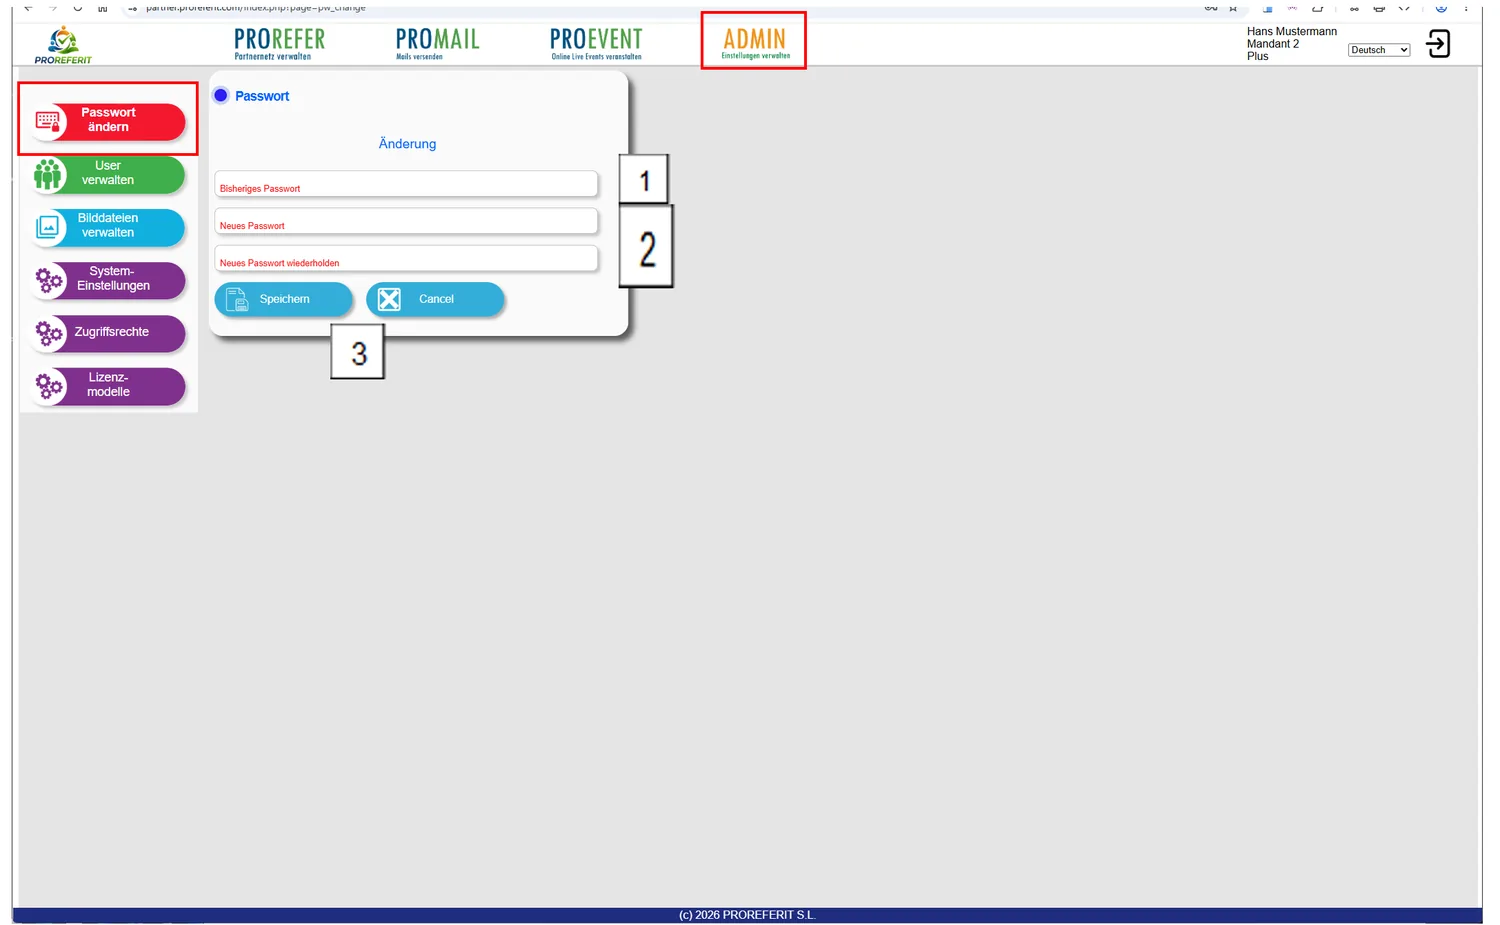
Every logged-in user can change their own login password. For reasons of data security, this should also be done regularly.
A secure password should be chosen, which is as long as possible and also contains upper and lower case letters as well as digits and special characters.
-
First enter your current password
-
Enter the new password and repeat it with identical spelling.
-
Save the changed password
or cancel the change process (Cancel).After saving, you will use the new password the next time you log in.
Managing users#
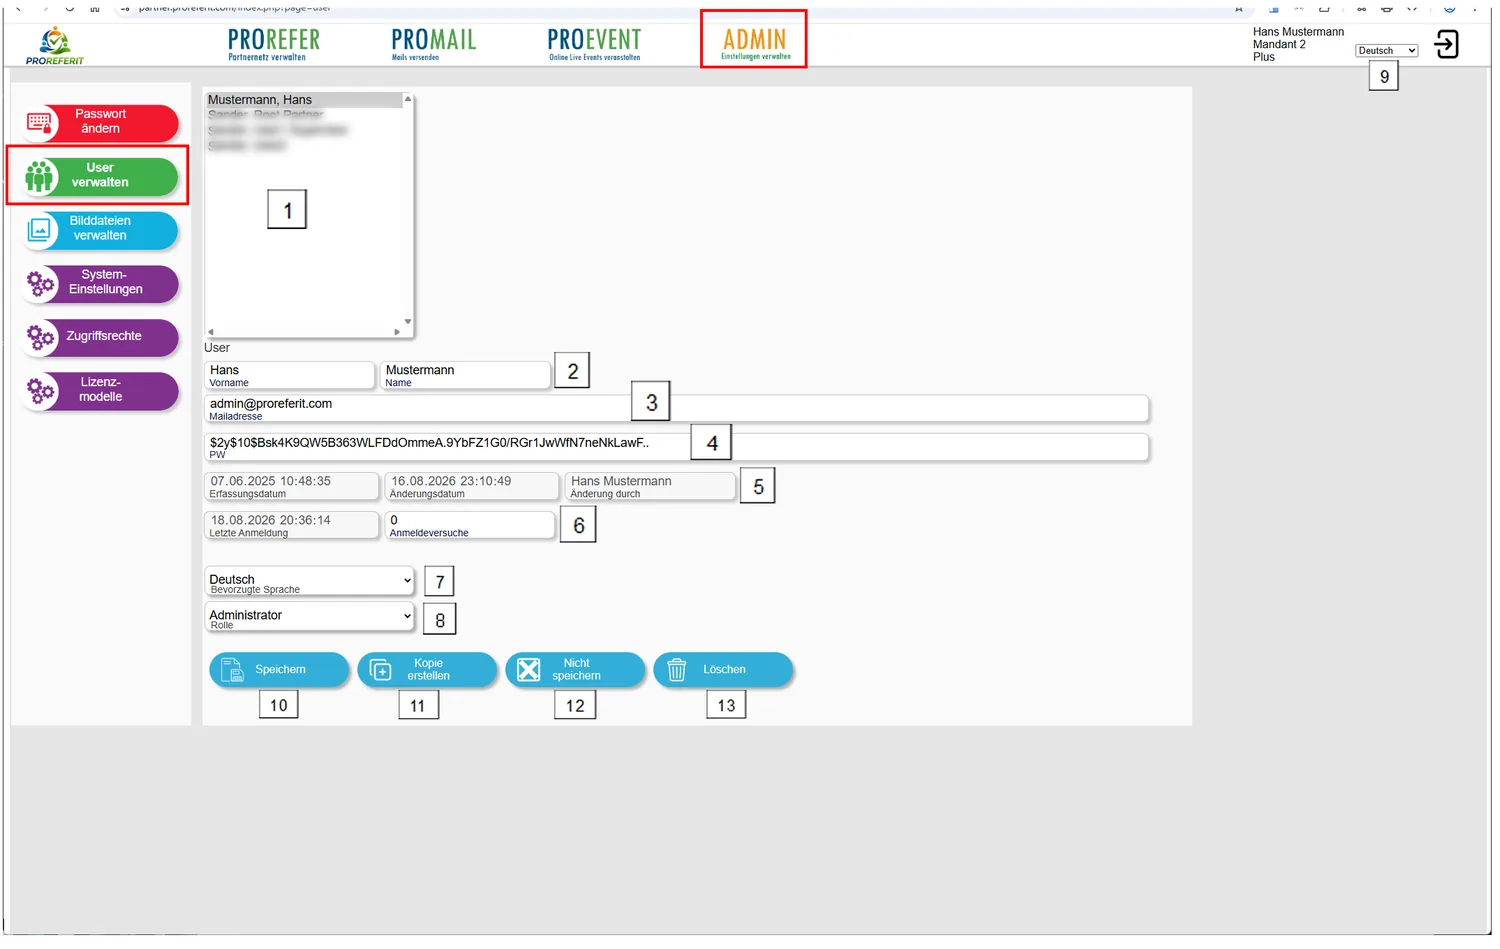
The person who registers for the first time as a new tenant is automatically also created as administrator for the entire system. In the administrator role, you can then create new users for the tenant.
To create a new user (usually an employee), simply go to a user that has already been created,
-
change the fields First name and Surname to those of the new user 2
-
the email address of the new user 3 and
-
the password (simply enter a new password in plain text) 4 and make a note of it
and then click .
A new user with the data entered is then created. The password is encrypted automatically and, for security reasons, can no longer be displayed in plain text afterwards. Tell the new user which email address and which password (which you noted beforehand) they can now use to log in.
After first logging in, the new user should open the item
ADMIN >  themselves and assign their own password. The newly assigned password
is then encrypted again and cannot be read in plain text even by the administrator.
If a user ever forgets their password, the administrator can assign a new password in plain text at any time, with which the user can then log in again.
Even after a password change by the administrator, the employee concerned should change their password themselves again, as described above.
-
List box for selecting a registered user
-
First name and surname of the registered user
-
Email address of the registered user
-
Encrypted password of the registered user. The administrator cannot read the password in plain text, so nobody can log in without authorisation using the encrypted password. However, the administrator can change the password at any time by entering it in plain text and clicking the
button. -
Each time you save, the date and the person who saved are entered here automatically.
-
Display of when a user last logged in. After a proper login, the counter in the field ‘Login attempts’ is reset to 0. After unsuccessful login attempts, the counter is increased, so that it can be traced whether someone has tried to log in with a wrong password.
-
Selection list for the language in which the user is to or wants to work in the screens. The user can change the preferred language at any time by choosing another language in the page header 9.
-
Selection of the permissions the user is given.
The permission levels are sorted in ascending order. This means that, for example, the permission level ‘Supervisor’ contains all permissions that ‘User’ has. The highest level is ‘Administrator’, with all permissions.The role ‘Created only, without email confirmation’ means that the user is registered but has no further access permission.
The roles assigned here correspond to the settings under
ADMIN >  ,
where you can specify for each program module which access
rights are at least required for use.
-
Selection of the preferred language – can be set independently by each user
Menu bar
-
Save changes
-
Copy the selected
entry. Note that at least the field ‘Email address’ must be changed before copying. For each tenant there
must be no duplicate email addresses among the users, because authentication takes place via the email
address together with the password.
-
The saving or entry
process is cancelled
-
The saved user is
deleted. This also ends their access to the system.
Managing image files#
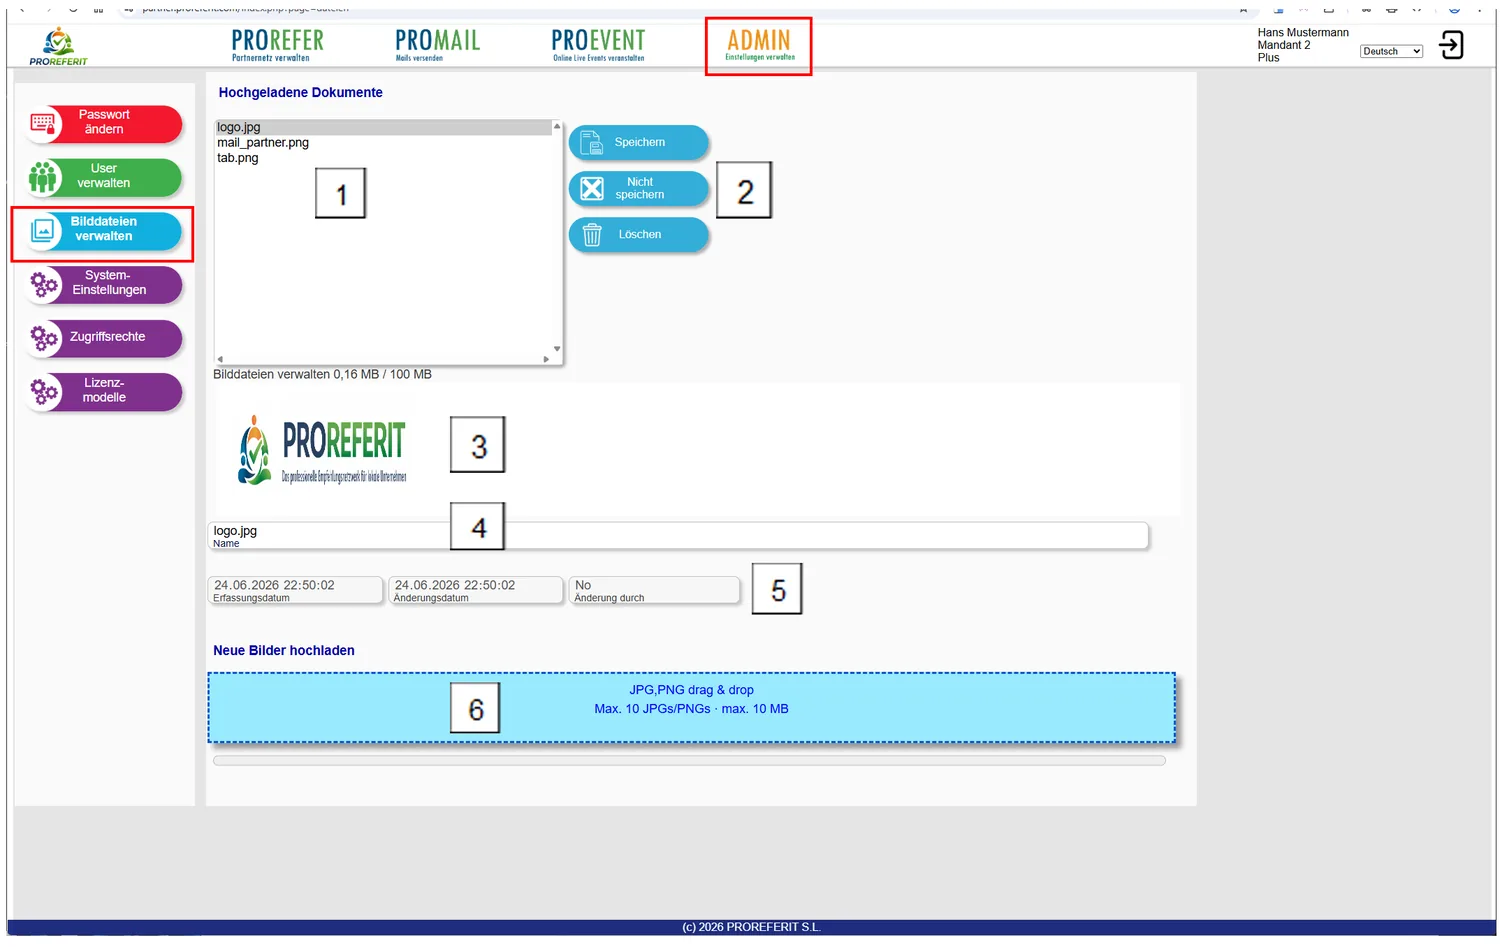
With this program module you can upload your own images (for example, the company logo) and give them a suitable name.
-
List of all uploaded images
-
Menu bar
Changes to the image name are
saved
Changes are discarded
The image is deleted after
a security prompt
-
Display of the selected 1 image
-
Name of the image. The name can be chosen freely and only serves as a guide for you.
-
Each time you save, the date and the person who saved are entered here automatically.
-
Images are uploaded by dragging them from the file explorer onto the blue field ‘PDFs drag & drop’. Alternatively, you can click the blue field, which opens a file selection dialogue.
Several images can be selected and uploaded at the same time.
When uploading, the original name of the image is kept. This name can then be changed as described under 4.
System settings#
33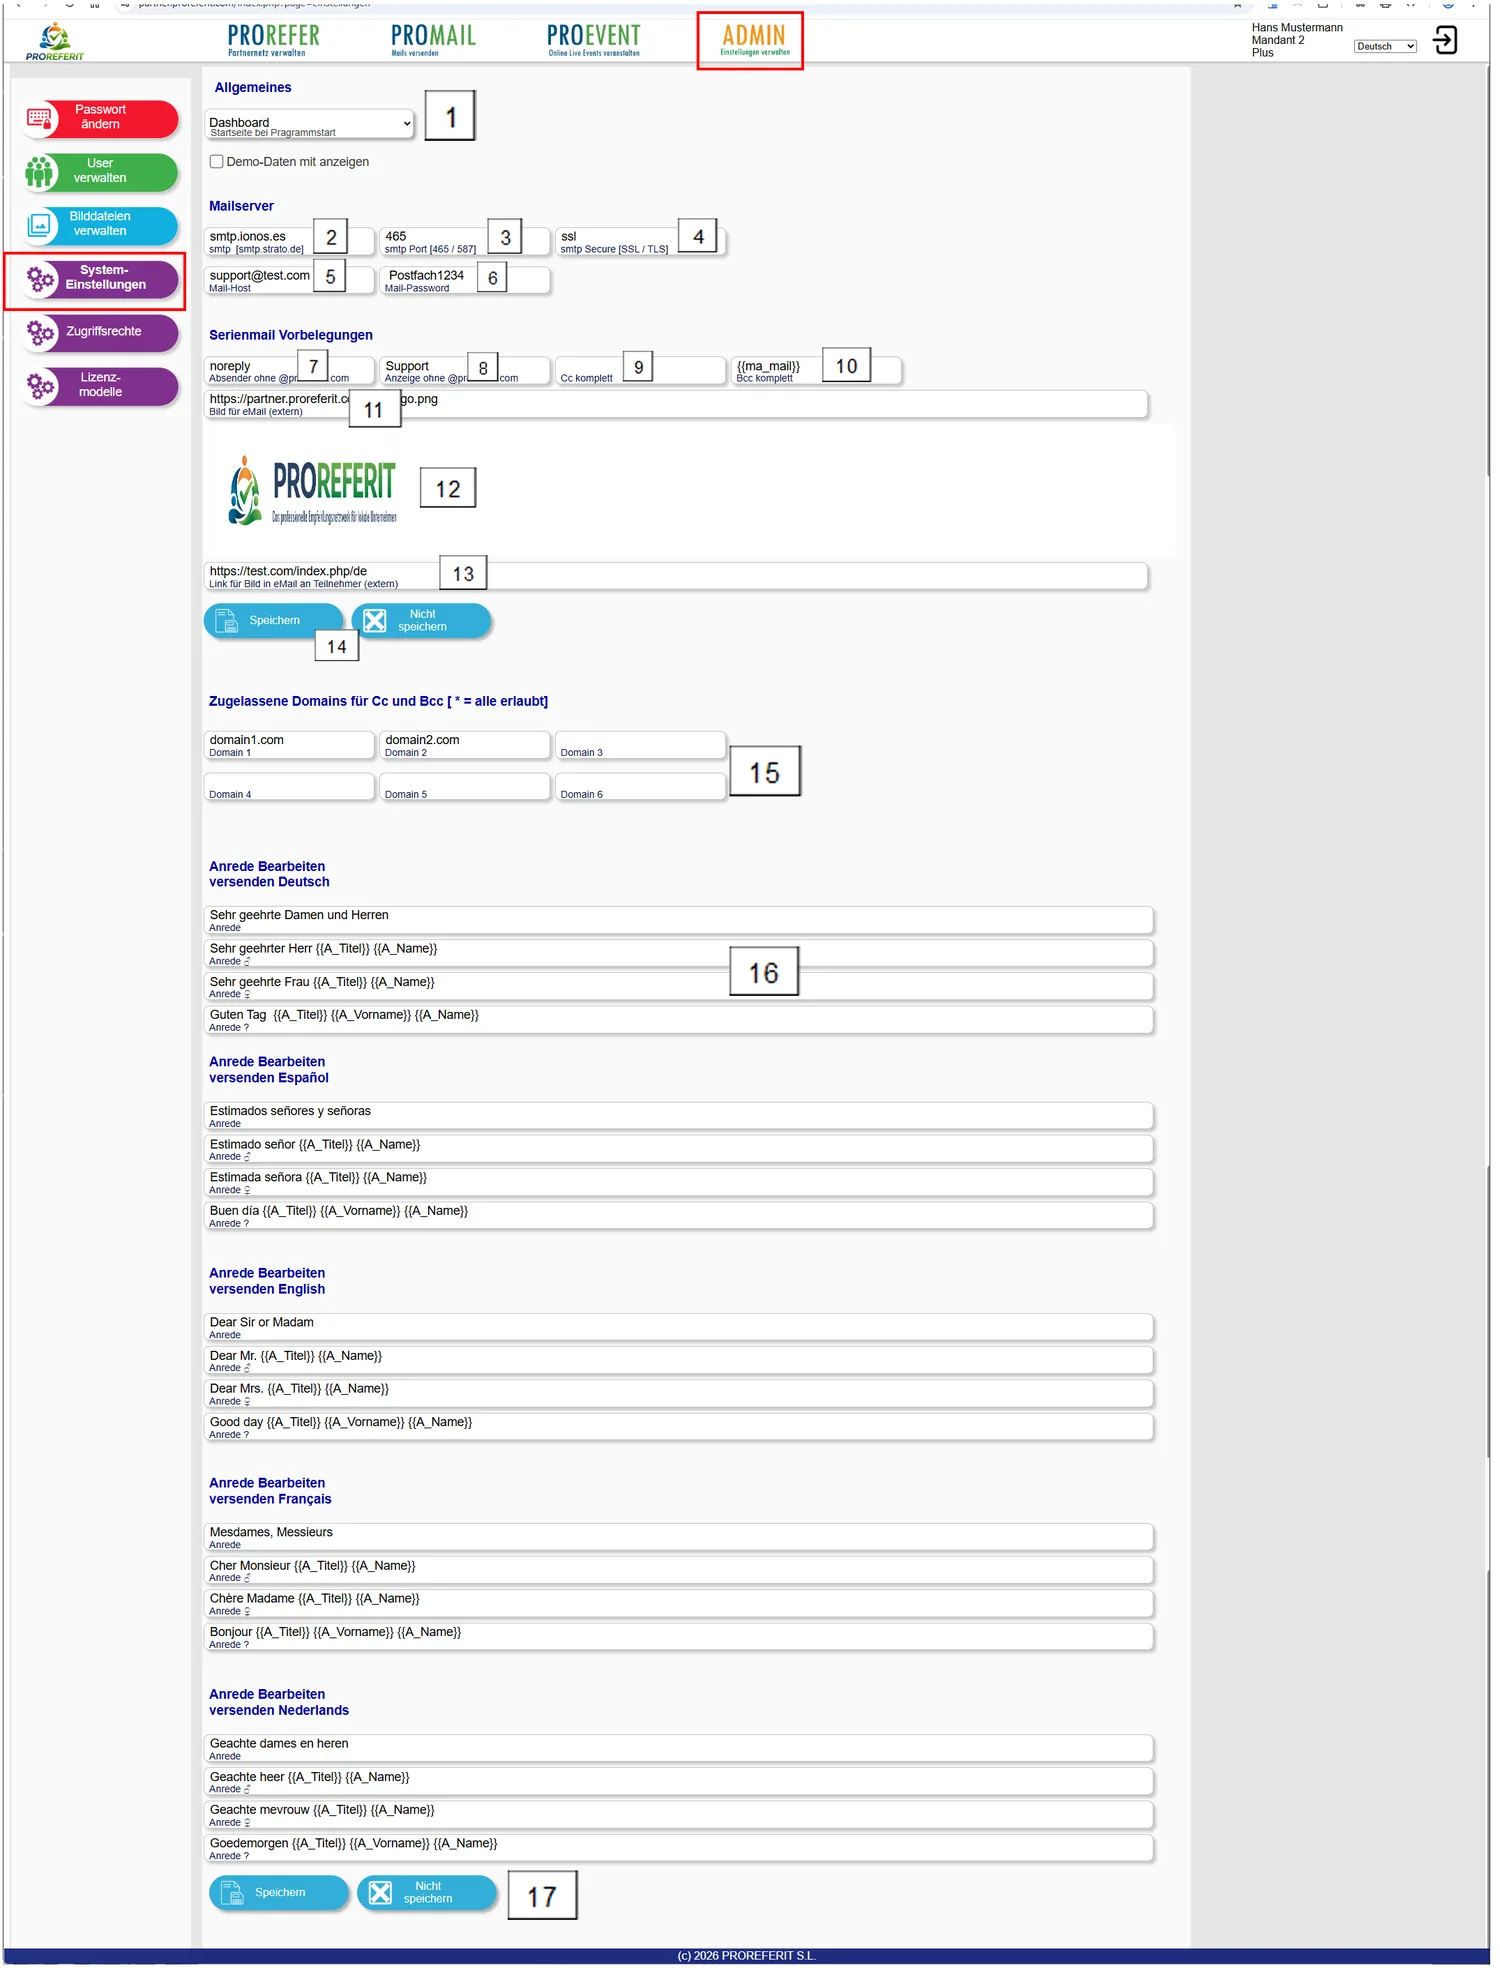
The System settings are where you make the settings that are later applied in the individual program modules. This page should be reserved for administrators.
-
List box for selecting the page that is to be opened first when the program starts.
If the checkbox ‘Show demo data’ below it is activated, samples are also displayed in various parts of the program (for example, email templates, events). These samples are recognisable by a preceding 📌 and can be neither changed nor deleted by you.
Especially at the beginning, it can be helpful to access these samples, copy them and adapt them to your own needs.
After you have worked with the program for a while, the tick can be removed again. The samples are then no longer displayed. -
If you want to use the email functions, you need access to your own mail server, usually with a host such as Strato, 1&1 or IONOS …
-
Port of your mail server – usually 465 or 587
-
Type of encryption, either SSL or TLS
-
Enter your mailbox here
-
Enter the password for the mailbox here. The password is encrypted before saving and only decrypted again when it is used later.
-
Default for the sender ID when sending email, without the characters from the @ onwards. This sender is pre-set for all email activities via
, unless something else is entered in the email templates. These
suggestions can be overwritten again when sending email. -
Default for the sender name when sending email, without the characters from the @ onwards. For its effect, see the previous item.
-
Default for a mailbox to which later emails are to be sent as Cc. The complete email address must be entered here, including the @ and the characters after it.
It is also possible to use a placeholder.
If, for example,{{ma_mail}}is entered, this placeholder is always replaced by the email address of the employee who is currently logged in. -
Default for a mailbox to which later emails are to be sent as Bcc. The complete email address must be entered here, including the @ and the characters after it.
It is also possible to use a placeholder.
If, for example,{{ma_mail}}is entered, this placeholder is always replaced by the email address of the employee who is currently logged in. -
If an image (for example, the company logo) is to be attached at the end of your emails, enter the link to it here. The corresponding image is then displayed below. If no path or an incorrect path is entered, nothing is displayed or attached.
-
Image referred to under the previous item.
-
If an image is attached, you can also store a link (for example, to an information page of your website). When the email recipient clicks the image, they are forwarded to the page entered, provided it exists.
-
The data are saved with
;
changes are discarded with . -
Here you can specify which domains Cc or Bcc emails may be sent to. Up to six domains can be entered. This can prevent emails from being sent unintentionally to unauthorised email addresses in Cc or Bcc.
If the asterisk ‘*’ is entered in a field, sending with Cc and Bcc is not restricted.
-
The form of address you want is stored here for each national language. Placeholders such as
{{A_Name}}are replaced by the stored customer data when the email is put together – here by the customer’s name.Salutation: General form of address when email addresses are not saved in the customer records at all
or are saved more than onceSalutation ♂: Male form of address
Salutation ♀: Female form of address
Salutation ?: Form of address for diverse or unknown
-
The data are saved with
;
changes are discarded with ‘Don’t save’.
Access rights#
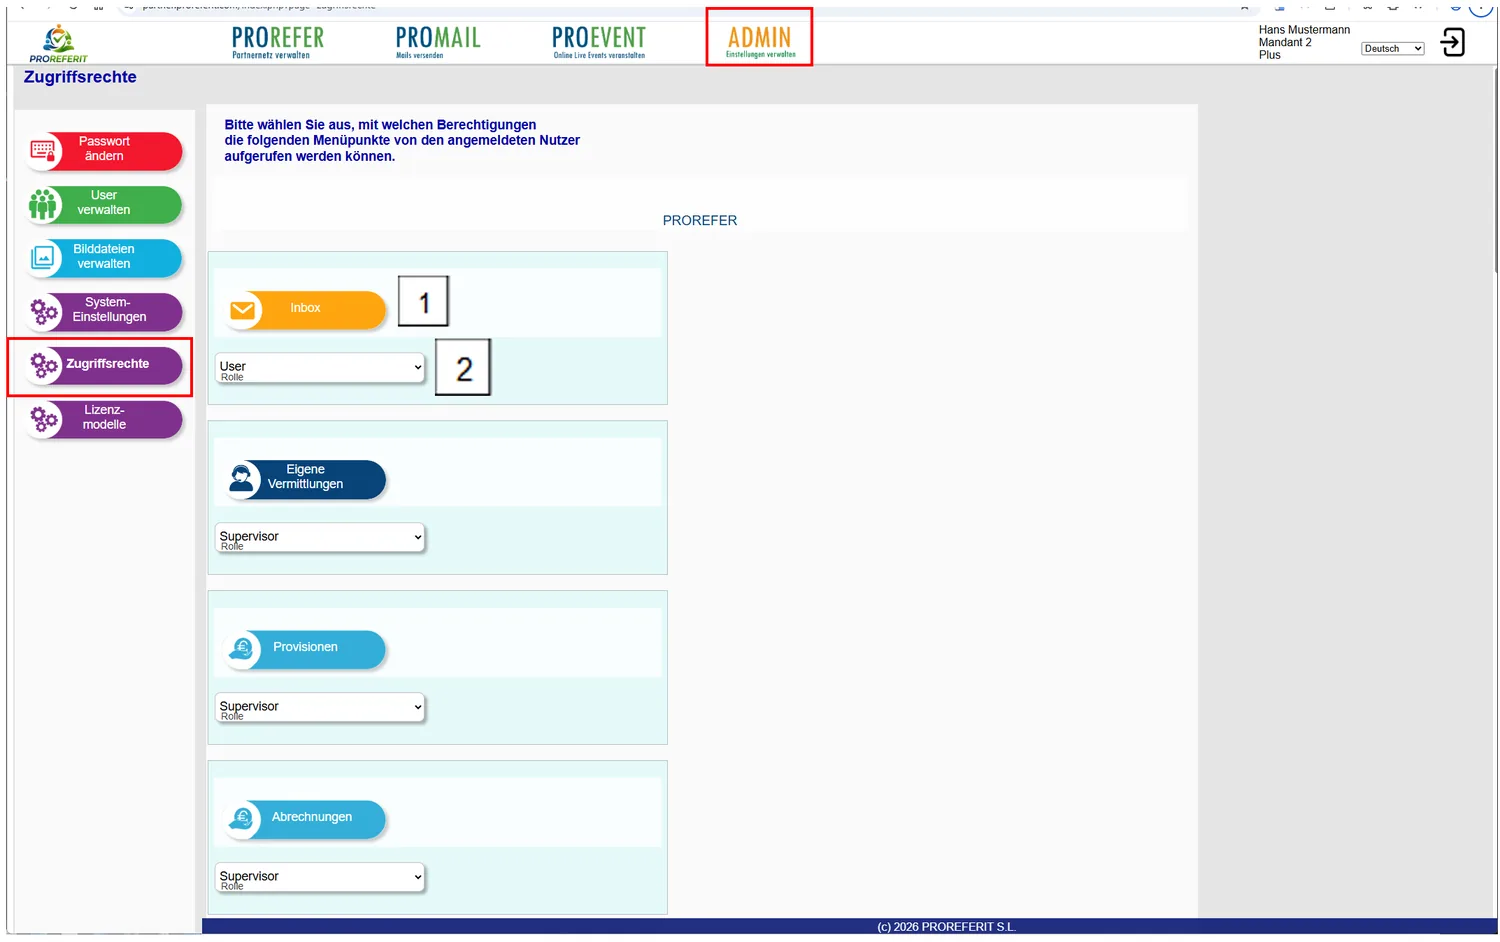
This menu item is used to assign to the individual program modules the minimum rights with which the users created under ‘Manage users’ can access them.
If you want to test which page is behind the menu items, you can go directly there by clicking the button.
Please note the ascending hierarchy of rights here as well:
If ‘User’ is entered as the role, a user with the role ‘Supervisor’ or ‘Administrator’ may also access it.
If ‘Supervisor’ is entered as the role, nobody with the role ‘User’ may access it, but every user with the role ‘Supervisor’ or ‘Administrator’ may.
If ‘Administrator’ is entered as the role, only a user with the role ‘Administrator’ may access it.
Changes are saved and take effect immediately, without further confirmation.
-
Assigned program module
-
Minimum role required for access
Licence models#
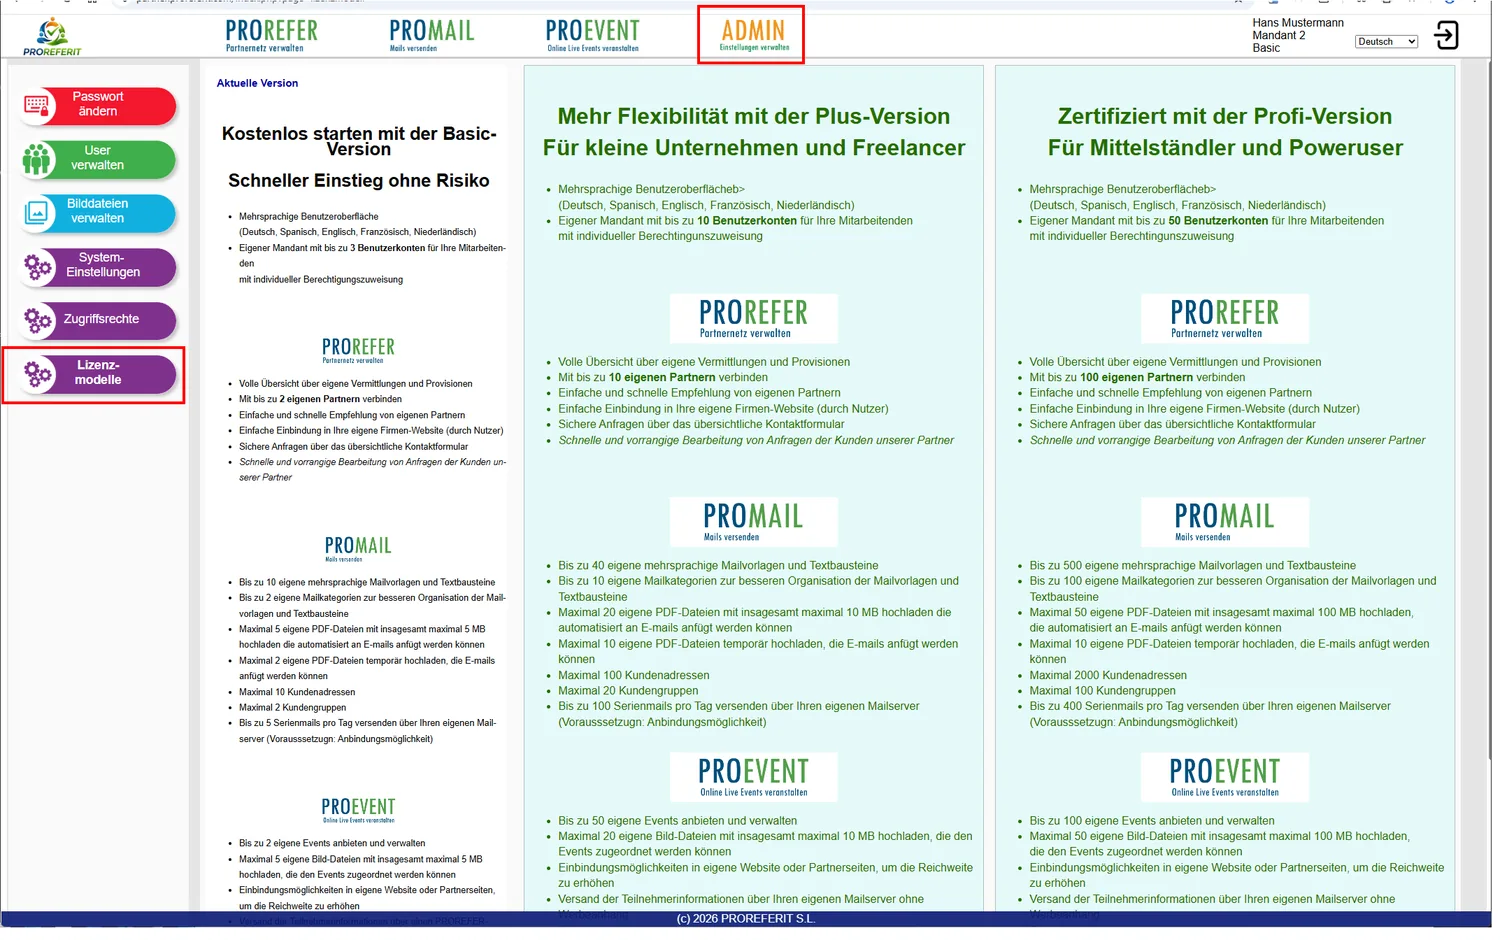
The licence models are described in detail here. At the bottom of the licence page you can select the licence model you want.
Appendices#
PROEVENT – Information evening#
Confirmation page for information evenings after successful registration#
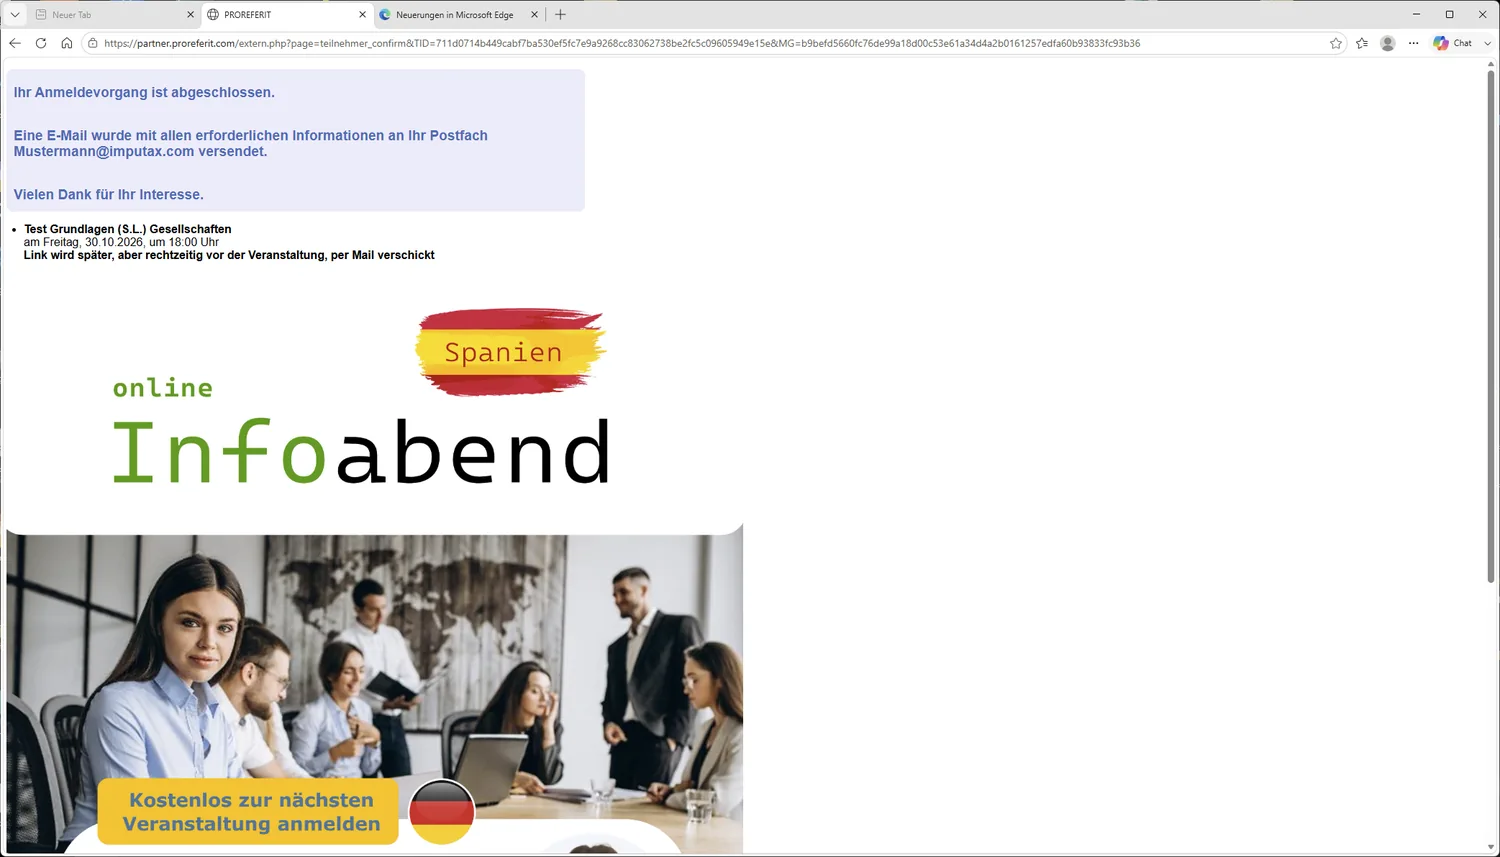
Variables for use in the module PROMAIL > Email templates#
| Description | Variable |
|---|---|
| Forms of address | |
|
Personal salutation of a person, adapted to the language. If a matching email address is saved, the values are taken over. The placeholder for the general salutation To cover both salutation options (address saved or not saved), both placeholders should be used one after the other. |
|
| General salutation of a person, adapted to the language, is only filled if no matching email address is saved. | {{Salutation_universal_int}} |
| General salutation DE German; only filled if the person’s data are not saved. |
{{Salutation_universal_DE}} |
| General salutation ES Spanish; only filled if the person’s data are not saved. |
{{Salutation_universal_ES}} |
| General salutation GB English and US English; only filled if the person’s data are not saved. |
|
| General salutation FR French; only filled if the person’s data are not saved. |
{{Salutation_universal_FR}} |
| General salutation NL Dutch; only filled if the person’s data are not saved. |
{{Salutation_universal_NL}} |
| Customer data, if a matching email address has been assigned | |
| Customer ID | {{A_ID}} |
| Title such as Dr, Prof … | {{A_Title}} |
| First name | {{A_First_name}} |
| Surname | {{A_Name}} |
| Gender | {{A_Gender}} |
| Birthday | {{A_Birthday}} |
| Birthday, country-specific | |
| Birthday DE | {{A_Birthday_DE}} |
| Birthday ES | {{A_Birthday_ES}} |
| Birthday GB | {{A_Birthday_GB}} |
| Birthday FR | {{A_Birthday_FR}} |
| Birthday NL | {{A_Birthday_NL}} |
| Birthday US | {{A_Birthday_US}} |
| Partner key (not in selection list) |
{{A_Partnerkey}} |
| Preferred language | {{A_Language}} |
| Role in the company | {{A_Role}} |
| Email address | {{A_Email_address}} |
| Postcode (ZIP code) | {{A_ZIP_code}} |
| City | {{A_City}} |
| Street and house number | {{A_Street}} |
| Country | {{A_Country}} |
| Company | {{A_Company}} |
| Tax number | {{A_Tax_number}} |
| Telephone (landline) | {{A_Landline_phone}} |
| Telephone (mobile) | {{A_Mobile_phone}} |
| Remarks | {{A_Remarks}} |
| First entry / first registration | {{A_Registration}} |
| Last change | {{A_Modification}} |
| Changed by (name of the employee who made the last change) | {{A_Changed_by}} |
| Data of the logged-in employee | |
| Employee surname | {{employee_name}} |
| Employee first name | {{employee_first_name}} |
| Employee email (complete email address of the logged-in employee) |
{{employee_mail}} |
| Employee email name (the part of the email address before the @) |
|
| Employee email domain (part of the logged-in employee’s email address after the @) |
|
| Date information: today’s date | |
| Today’s date DE | {{today_DE}} |
| Today’s date ES | {{today_ES}} |
| Today’s date GB | {{today_GB}} |
| Today’s date FR | {{today_FR}} |
| Today’s date NL | {{today_NL}} |
| Today’s date US | {{today_US}} |
| Today’s date, ISO standard | {{today_iso}} |
| Calendar information | |
| Current calendar week | {{calendar_week}} |
| Current quarter | {{quarter}} |
| Days of the week | |
| Current day of the week DE | {{day_of_week_DE}} |
| Current day of the week ES | {{day_of_week_ES}} |
| Current day of the week GB | {{day_of_week_GB}} |
| Current day of the week FR | {{day_of_week_FR}} |
| Current day of the week NL | {{day_of_week_NL}} |
| Month information | |
| Current month DE | {{month_DE}} |
| Current month ES | {{month_ES}} |
| Current month GB | {{month_GB}} |
| Current month FR | {{month_FR}} |
| Current month NL | {{month_NL}} |
| Previous month DE | {{month_minus_1_DE}} |
| Previous month ES | {{month_minus_1_ES}} |
| Previous month GB | {{month_minus_1_GB}} |
| Previous month FR | {{month_minus_1_FR}} |
| Previous month NL | {{month_minus_1_NL}} |
| Two months ago DE | {{month_minus_2_DE}} |
| Two months ago ES | {{month_minus_2_ES}} |
| Two months ago GB | {{month_minus_2_GB}} |
| Two months ago FR | {{month_minus_2_FR}} |
| Two months ago NL | {{month_minus_2_NL}} |
| Next month DE | {{month_plus_1_DE}} |
| Next month ES | {{month_plus_1_ES}} |
| Next month GB | {{month_plus_1_GB}} |
| Next month FR | {{month_plus_1_FR}} |
| Next month NL | {{month_plus_1_NL}} |
| Month after next DE | {{month_plus_2_DE}} |
| Month after next ES | {{month_plus_2_ES}} |
| Month after next GB | {{month_plus_2_GB}} |
| Month after next FR | {{month_plus_2_FR}} |
| Month after next NL | {{month_plus_2_NL}} |
| Company information outside the selection list | |
| Own partner key | {{partner_key}} |
| Storage location | {{base_url}} |
| Link to the contact form to pass on to prospects: |
{{base_url}}extern.php?page=show_kontakt&F_Selfkey={{partner_key}}&F_Adresskey={{A_Partnerkey}}
|
| Link for confirmation as a partner |
{{base_url}}extern.php?page=partner_confirm&F_Selfkey={{partner_key}}&F_Adresskey={{A_Partnerkey}}
|
Troubleshooting#
I was suddenly logged out
For security reasons, the connection to the server is ended if there has been no activity for more than one hour. Simply log in again.
I have not received a confirmation email for my registration
The confirmation is sent to the email address entered at registration. Check the spelling of the address and your spam folder. Only after clicking the confirmation link in the email does the account receive access rights; until then the role ‘Created only, without email confirmation’ applies.
Copying to the clipboard (flag symbol) does not work
In your browser’s site settings, allow the use of JavaScript and access to the clipboard for this page (see the chapter System requirements).
My changes have disappeared
Changes are only applied with the ‘Save’ button. With ‘Don’t save’, the content is reset to the last saved state.
A user does not see all menu items
The menu items depend on the user’s role. Under ADMIN > Manage users, check the assigned role and, under ADMIN > Access rights, the module’s minimum role.
Emails cannot be sent
Under ADMIN > System settings, check the mail server details: SMTP connection, port, type of encryption, mailbox and password. The sender ID must be permitted by your mail host.
An attachment is not added to the email automatically
The file name of the uploaded PDF file must match exactly in the email text, including upper and lower case. Also check under PROMAIL > Manage documents whether the file has been uploaded.
The text is not converted into the customer’s language
The adaptation only takes place if the tick ‘Adapt to customer language’ is set, the email address is saved exactly once in the customer data and there is an email template in the customer’s language. Otherwise the previously selected text is used.
‘Dear Sir or Madam’ appears instead of the personal salutation
The email address is not saved in the customer data or exists more than once. Duplicate addresses can be found under PROMAIL > Customer groups.
Cc or Bcc are not sent
Enter the complete, existing email address and check under ADMIN > System settings whether the domain is permitted for Cc and Bcc.
Sample texts or sample events are not displayed
Under ADMIN > System settings, activate the checkbox ‘Show demo data’.
An event is not displayed
The field ‘Approval’ must be activated, and the current date must fall within the period ‘Display from’ to ‘Display until’. For test purposes, the preview always shows the event.
Event booking does not work on my website
Some content management systems such as WordPress or Joomla start iframes in a sandbox. In this case, remove the ‘sandbox’ attribute.
The image in the email is not displayed
The image must be reachable via a valid, publicly accessible internet link. If the link is missing or wrong, no image is displayed or sent.
I cannot trigger a settlement
A settlement run can be triggered once open commissions of €20 or more have accumulated.